Excel includes its most common commands, such as Save and Undo, on the Quick Access Toolbar.
Click a toolbar button to choose a command. If you are not sure what a
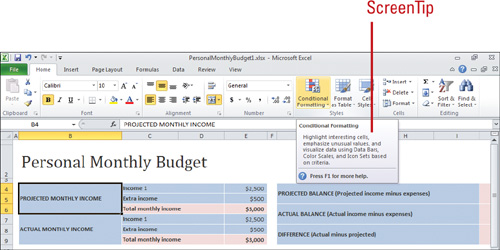
toolbar button does, point to it to display a ScreenTip. When Excel
starts, the Quick Access Toolbar appears at the top of the window,
unless you’ve changed your settings. You can customize the Quick Access
Toolbar or Ribbon (New!)
by adding command buttons or groups to it. You can also move the
toolbar below or above the Ribbon so it’s right where you need it. In
addition to the Quick Access Toolbar, Excel also displays the
Mini-Toolbar when you point to selected text. The Mini-Toolbar appears above the selected text and provides quick access to formatting tools.
Choose a Command Using a Toolbar or Ribbon
- Get command help. If you’re not sure what a button does, point to it to display a ScreenTip. If the ScreenTip includes Press F1 for more help, press F1.
- Choose a command. Click the button, or button arrow, and then click a command or option.

Add or Remove Items from the Quick Access Toolbar
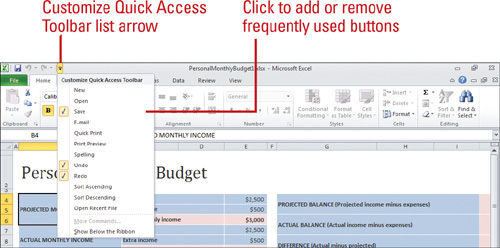
- Add or remove a common button. Click the Customize Quick Access Toolbar list arrow, and then click a button name (checked item appears on the toolbar).
- Add a Ribbon button or group. Right-click the button or group name on the Ribbon, and then click Add to Quick Access Toolbar.
- Remove a button or group. Right-click the button or group name on the Quick Access Toolbar, and then click Remove from Quick Access Toolbar.

Customize the Ribbon or Quick Access Toolbar
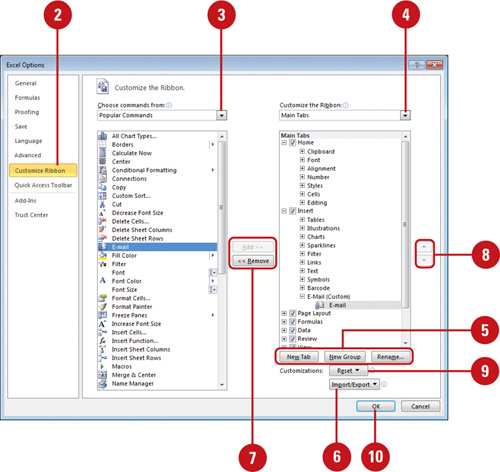
 Click the File tab, and then click Options.
 Click the Customize Ribbon (New!) or Quick Access Toolbar.
 Click the Choose commands from list arrow, and then click All Commands or a specific Ribbon.
 Click the list arrow (right column), and then select the tabs or toolbar you want to change.
 For the Ribbon, click New Tab to create a new tab, or click New Group to create a new group on the selected tab (right column).
 To import or export a customized Ribbon or Quick Access Toolbar, click the Import/Export list arrow, select a command, and then select an import file or create an export file.
 Click the command you want to add (left column) or remove (right column), and then click Add or Remove.
- To insert a separator line between buttons in the Quick Access Toolbar, click <Separator>, and then click Add.
 Click the Move Up and Move Down arrow buttons to arrange the order.
 To reset the Ribbon or Quick Access Toolbar, click the Reset list arrow, and then select a reset option.
 Click OK.

You can move the Quick
Access Toolbar to another location. Click the Customize Quick Access
Toolbar list arrow, and then click Show Below The Ribbon or Show Above
The Ribbon. You can minimize the Ribbon (New!).
Click the Minimize The Ribbon (Ctrl+F1) button on the right side of the
Ribbon (to the left of the Help button). Click the Expand The Ribbon
button to maximize it. When the Ribbon is minimized, you can click a tab
to auto maximize it. When you click an option or in the document, the
Ribbon minimizes again. Just like an auto-hide option.
You can turn off or change
ScreenTips. Click the File tab, click Options, click General, click the
ScreenTip Style list arrow, click Don’t Show Feature Descriptions In
ScreenTips or Don’t Show ScreenTips, and then click OK.