Worksheet cells can be adjusted so that only certain
values can be entered. Controlling how data is entered decreases errors
and makes a worksheet more reliable. You might, for example, want it to
be possible to enter only specific dates in a range of cells. You can
use logical operators
(such as equal to, not equal to, less than, or greater than) to set
validation rules. When invalid entries are made, a message—developed and
written by you—appears indicating that the entry is in violation of the
validation rules. The rule set will not allow data to flow into the
cell.
Create Validation Rules
 Select the range you want covered in the validation rules. Select the range you want covered in the validation rules.
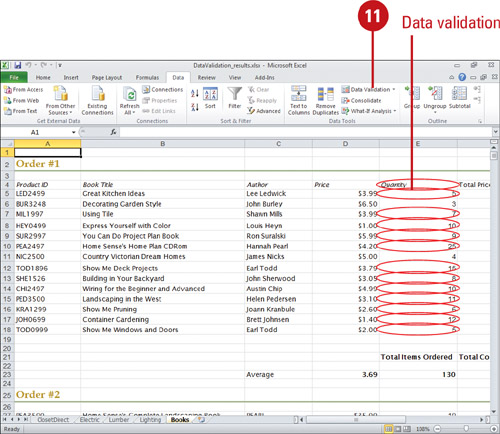
 Click the Data tab. Click the Data tab.
 Click the Data Validation button. Click the Data Validation button.
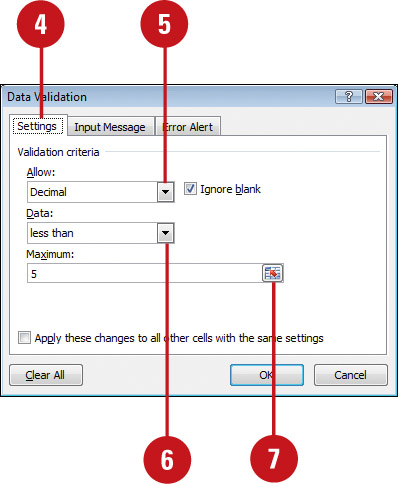
 Click the Settings tab. Click the Settings tab.
 Click the Allow list arrow, and then select a value type. Click the Allow list arrow, and then select a value type.
Options vary depending on the Allow value type you select.
 Click the Data list arrow, and then select a logical operator. Click the Data list arrow, and then select a logical operator.
 Enter values or use the Collapse Dialog button to select a range for the minimum and maximum criteria. Enter values or use the Collapse Dialog button to select a range for the minimum and maximum criteria.

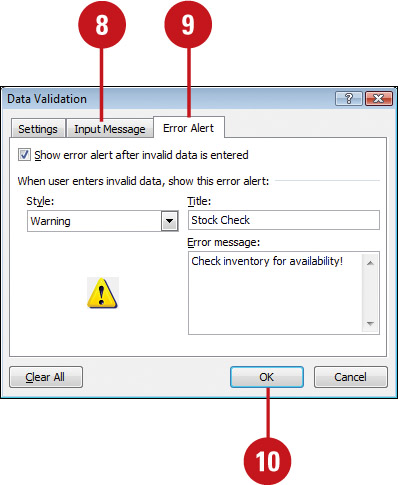
 Click the Input Message tab, and then type a title and the input message that should be displayed when invalid entries are made. Click the Input Message tab, and then type a title and the input message that should be displayed when invalid entries are made.
 Click the Error Alert tab, and then select an alert style, type a title, and error message. Click the Error Alert tab, and then select an alert style, type a title, and error message.
 Click OK. Click OK.

 To view invalid data, click the Data Validation button arrow, and then click Circle Invalid Data. To clear the circles, click the Data Validation button arrow, and then click Clear Validation Circles. To view invalid data, click the Data Validation button arrow, and then click Circle Invalid Data. To clear the circles, click the Data Validation button arrow, and then click Clear Validation Circles.

|