1. Inserting WordArt
|
WordArt
is removed when you open a workbook in the Excel Web App. In Excel
Starter and legacy versions of Excel, WordArt may not appear as
designed.
|
WordArt allows you to design text beyond the capabilities of the normal font settings on the Home tab, as shown in Figure 1.
After inserting the WordArt, go to the Drawing Tools, Format tab to
access the various tools for modifying the color and shape.

Inserting and Formatting WordArt
To insert WordArt and customize it, follow these steps:
1. | Go to Insert, Text, WordArt, and select a text style from the drop-down. The WordArt will be added to the active sheet.
|
2. | Excel adds generic text in the preset WordArt. Select the default text and type your own text.
|
3. | To change the font style, select the text and choose a new font style from the Font group of the Home tab.
|
4. | To add effects to the WordArt, such as the curve in Figure 12.6, go to Drawing Tools, Format, WordArt Styles, Text Effects. An option from Transform was used in the figure.
|
2. Inserting Pictures
After you’ve inserted a picture onto a sheet, the
picture tools become available, which you can use to crop and add many
effects to the image.
Inserting a Picture
To insert a picture, follow these steps:
1. | Select the cell where you want the top-left corner of the picture to be.
|
2. | Go to Insert, Illustrations, Picture.
|
3. | Select the image to import and click Insert.
|
Resizing and Cropping Pictures
|
Cropped images are removed when you open a workbook in the Excel Web App.
|
To resize the selected image, click and drag one of
the handles along the edge or in the corners of the picture. For more
specific sizing, enter the size in the Shape Height or Shape Width
fields of the Size group on the Picture Tools, Format tab.
You can manually crop an image or crop it to a specific shape, as shown in Figure 2.
To crop the selected image, go to Picture Tools, Format, Size, and
select an option from the Crop drop-down. If you later decide you’ve
made a mistake, go to Picture Tools, Format, Adjust, Reset Picture,
Reset Picture & Size, and the image will return to its original
state.
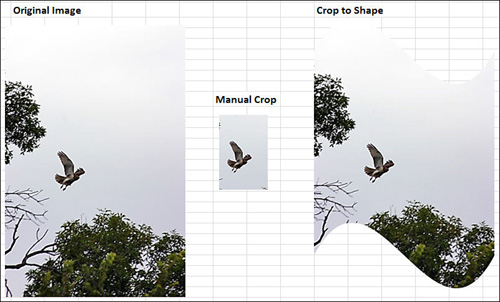
The Crop option is for a manual crop. On the image,
black cropping handles appear that you can use to outline the area to
crop. The part of the picture you are cropping away will appear grayed
out.
Choose Crop to Shape to crop the image to one of the
shapes available in the drop-down. The image will be recut to the
selected shape. To nudge the image within the shape, right-click the
image and select Format Picture. From the Format Picture dialog, go to
the Crop category and under the Picture Position options, change the
values in the Offset X and Offset Y fields. Adjusting the Offset X value
will move the image left or right in the shape; Adjusting the Offset Y
value will move the image up or down in the shape.
Cropping a Picture to a Shape
To crop an inserted picture to a shape, follow these steps:
1. | Select the picture to crop.
|
2. | Go to Picture Tools, Format, Size, and from the Crop drop-down, select Crop to Shape and select the desired shape.
|
3. | If the image needs to be moved within the shape, right-click the image and select Format Picture.
|
4. | Go to the Crop category.
|
5. | Under
the Picture Position options, adjust the Offset X and Offset Y values
as needed until the image is placed properly in the shape.
|
Corrections, Color, and Artistic Effects
You
can correct the brightness and contrast, change a color image to a
black-and-white image, or apply artistic effects to the selected image
through the options in the Adjust group of the Picture Tools, Format
tab. As you select an option in a drop-down, the image automatically
adjusts, providing a preview of the option. Click the option to accept
the change.
Corrections
The Corrections drop-down consists of options to
Sharpen and Soften the image and to adjust Brightness and Contrast. If
none of the predefined options are what you want, you can manually make
the adjustments by selecting Picture Corrections Options, which will
open the Format Picture dialog to the Picture Corrections category.
Changes made in the dialog will apply automatically to the image. To
undo a change, click the Undo button in the Quick Access toolbar.
Color
The Color drop-down includes options for adjusting
Color Saturation, Color Tone, or recoloring the image. The More
Variations option at the bottom of the drop-down is part of the Recolor
group. The Set Transparent Color allows you to select a pixel in the
image, and all pixels of the same color will become transparent, showing
whatever is behind the image. For more control of saturation, tone, and
recolor options, select Picture Color Options, which opens the Format
Picture dialog to the Picture Color category. Changes made in the dialog
will apply automatically to the image. To undo a change, click the Undo
button in the Quick Access toolbar.
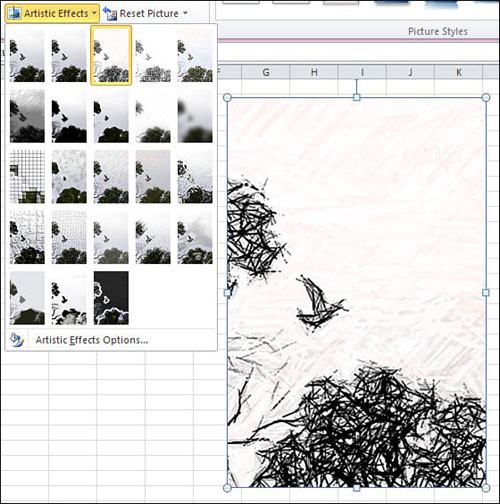
Artistic Effects
Artistic effects include Glow Edges, Film Grain,
Light Screen, and many other effects that will change the way an image
looks, as shown in Figure 3.
After you select an effect, you can fine-tune it through the Artistic
Effects category of the Format Picture dialog. The fine-tuning options
differ depending on the effect chosen. Changes made in the dialog will
apply automatically to the image. To undo a change, click the Undo
button in the Quick Access toolbar.
Arranging Pictures
The Arrange group of the Picture Tools, Format tab consists of several options for arranging imported images:
Bring Forward—
Brings the selected image forward, placing it on top of other images it
is stacked with. Includes Bring to Front, which places the selected
image as the topmost image.
Send Backward—
Send the selected image backward, placing it below other images it is
stacked with. Includes Send to Back, which places the selected image
behind all other images.
Selection Pane— Opens a side pane that lists all the shapes on the active sheet. You can use this pane to select a specific shape.
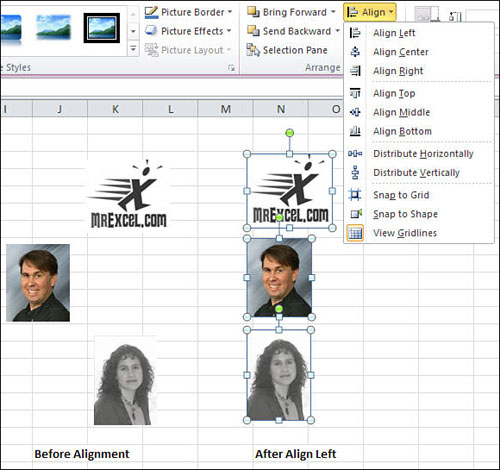
Align— Includes various alignment options, as shown in Figure 4, to quickly line up the selected images.
Group—
Includes the options to group and ungroup the selected images. Grouping
images allows you to move them together without losing their alignment
or order. If selective images were grouped together at one point and
then ungrouped, Regroup will re-create the group without your having to
reselect all the images.
Rotate— Rotates or flips the selected image.
Aligning Selective Images
To align selective images, follow these steps:
1. | Place
the images approximately how you want them. For example, if you want to
align the images left, place them in a vertical layout. If you want to
line them up by their centers, place them in a horizontal layout. Each
command’s icon provides an example of how the images should be laid out.
|
2. | Select the images by holding down the Ctrl key and clicking each image in turn.
|
3. | Go to Picture Tools, Format, Arrange, and select the desired alignment from the Align drop-down.
|
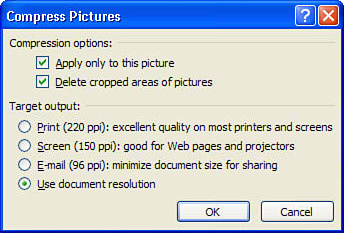
Reducing a Picture’s File Size
Importing
a picture into a workbook can dramatically increase the file size. The
Compress Pictures option offers multiple options for compressing images
based on how you will be using the workbook, as shown in Figure 5.
You can further reduce the file size by selecting the Delete Cropped
Areas of Pictures option, but this means that you will be unable to
return the image to its original state.