5. Indenting Text on a Page
To help you format notes in a simple outline
structure, you can increase or decrease the indent position of a line of
text by following these steps:
1. | Click anywhere within a line of text that you want to indent.
|
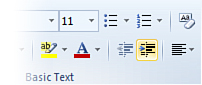
2. | On the Home tab, in the Basic Text group, click Increase Indent Position (see Figure 5).
|
3. | If necessary, click the Increase Indent Position button any number of additional times to further increase the indent position.
|
Once you have increased the indent position of a line
of text by at least one level, the Decrease Indent Position button on
the ribbon becomes available so you can remove the indentation again
later.
|
To quickly indent a normal line of text by one level,
position the cursor to the left of the first character of text, and
then press the Tab key. You can press the Tab key again for each
additional indentation level you want to add. To decrease the indent
position again by one level using your keyboard, position the cursor to
the left of the first character of text, and then press the Backspace
key. You can press the Backspace key again for each additional
indentation level that you want to remove.
|
6. Creating a Hierarchical Outline in Your Notes
Outlines offer a condensed view of a particular
subject. They’re often created to plan and summarize a project, and to account for its preparation and
successful execution. Outlines are often created in the brainstorming or
idea-gathering phase of a project or task, which means that the
information is likely to change quite often. This is where paper
notebooks have always failed us—once written down, you can never easily
change the order of things again. OneNote, of course, offers all of the
flexibility and benefits of electronic notetaking, never running out of
paper and allowing its pages and content to be changed on a whim.
When you take notes in a hierarchical outline format,
you can use the built-in level selection features in OneNote 2010 to
quickly select text at certain levels of your outline. This type of
selection makes formatting or rearranging of large outlines easier than
ever before. Another benefit is the ability to collapse or expand any
level of notes with the click of a mouse. This puts you in control of
the information at all times—whether you want to see only the high-level
headings of your outline or prefer to see all of the detail.
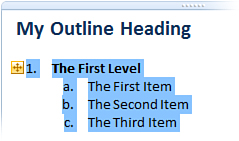
So, what does this look like? Let’s imagine you have
an outline with a main heading at the top and three levels of main
points below—each of which with three lines of detail below that (see Figure 6).
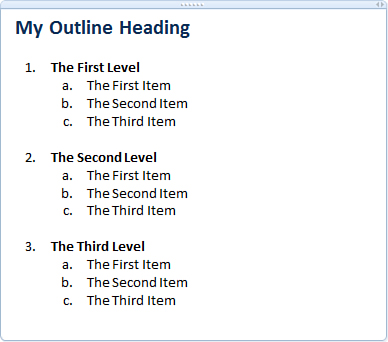
To create this outline, I applied the Heading 1 style
from the Styles gallery to the outline heading I typed. Next, I started
a numbered list for the three outline levels. For each of the three
lines of detail underneath each level, I pressed the Tab key to increase
the indent position. OneNote detected that I was creating an outline
and automatically changed the list formatting accordingly.
No matter how many levels or items you have in your
outline, you can interact with it immediately. The first method is
OneNote’s excellent selection model, which lets you select specific text
in your outline at common levels for the purpose of reordering or
otherwise formatting that text.
To select levels in an outline, follow these steps:
1. | Move the mouse pointer over the main outline heading and watch for the four-headed arrow icon that appears next to it (see Figure 7).
|
2. | Right-click the arrow icon and then, on the shortcut menu that appears, move the mouse over the Select command.
|
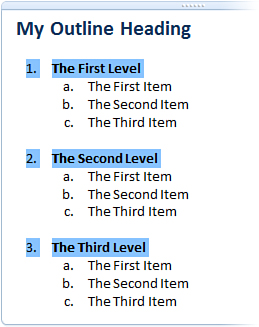
3. | On
the Select flyout menu, you can choose which level of the outline you
want to select. For example, choose All at Level 2 to select all of the
numbered headings in the list (see Figure 8).
|
While a level in your outline is selected, you can
apply bulk formatting to it (for example, you can make all of the
numbered headings bold or change them to red text) or you can use the
Increase Indent Position and Decrease Indent Position buttons on the
ribbon (Home tab, Basic Text group) to change the order of the selected
items in the outline.
|
If you’re working in a large and complex outline and
you’re not sure which level you’re at, move the mouse pointer over one
of the items at the level you want to select, and then choose Select All
at same level from the Select command that appears on the right-click
menu. Remember not to right-click text itself but the four-headed arrow
icon that appears next to it.
|
As mentioned at the beginning of this section, there
is another really great outlining feature in OneNote 2010, which lets
you move entire blocks of your outline around and also allows you to
control the amount of information that you see in your outline at any
one time. With the click of a mouse, you can collapse (and later expand
again) any level of notes.
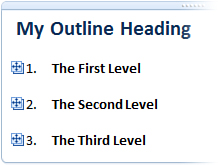
Let’s say that your outline has become quite lengthy
and, to gain oversight, you want to see only the numbered level
headings, not all of the detailed items below them. Hiding the details
requires far less scrolling through the full outline and you can then
more easily check to see whether the main points are still in the right
order. If they’re not, you can then move an entire level with all of its
subitems to a new location in the outline. For written projects such as
a book or a paper that you’re outlining for school, this is especially
useful.
In the sample outline, do the following:
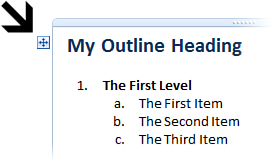
1. | Move
the mouse pointer over the first numbered level heading (in the
preceding example, “The First Level”) and watch for the four-headed
arrow icon that appears next to it (see Figure 9).
|
2. | Click
the arrow icon once. It will turn yellow to indicate selection, and all
of the text at this level—including the subitems below it—will be
selected.
|
3. | To
hide (collapse) the subitems below the numbered level heading,
double-click the arrow icon next to the heading. Only the text of the
level heading will remain shown, and the arrow icon will appear stacked
to let you know that it has been collapsed (see Figure 10).
|
4. | If
you want, you can click and drag a collapsed arrow icon to move the
heading and the subitems it contains to another location in your
outline. Once you’ve moved an item, you can double-click the collapsed
arrow item again to unhide the subitems below it.
|
Aside from organizing an outline for yourself, the
ability to show and hide detail in this way is helpful in other
situations, too. For example, you could type a list of vocabulary words
and then add their definitions in a level below them and then test your
knowledge of these words using the show/hide functionality, much like
paper-based flash cards. It’s a great way to study for any
question-and-answer-based subject.
Another situation where this feature comes in handy
is when you’re speaking during a presentation and you need to stay on
script. You can keep only the level headings shown to keep you on track
overall, but you can also easily double-click any of the headings to
remind you of important details that you might not remember in the
moment. This is an easier way to quickly locate information than staring
at the wall of text of an entire outline.
By the way, the simple outline example in the
screenshots isn’t meant to suggest that you must use a numbered list.
You can use any available style of bullets and numbering or choose not
to use them at all and only rely on multilevel indentation for your own
outlines.
However you decide to make use of OneNote’s useful outlining features, they’re sure to help you stay organized and save time.