Subpages in OneNote work
exactly like regular pages, but their tab labels appear slightly
indented. The main purpose of subpages is to let you visually structure a
group of related pages to help you recognize which of them contain
important notes or key subject areas and which of them contain
supplementary information that supports the subject of the main pages.
In terms of hierarchy, think of a normal page as a parent, whereas each
subpage is a child of that parent.
You can create a new subpage under any normal page,
or you can demote an existing page to a subpage and then drag it where
you want it. Within a group of pages and
subpages, you can have two levels of indentation for subpage tab
labels, which can help you organize information more easily. Depending
on their level, subpages may also appear lighter in color than normal
pages.
Creating a New Subpage
To create a new subpage in the current section, follow these steps:
1. | On the right side of the OneNote program window, click the page under which you want to insert a new subpage.
|
2. | At
the top of the page tabs on the right side of the OneNote program
window, click the small, downward-facing arrow right next to the New
Page button.
|
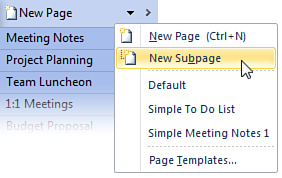
3. | On the menu that appears, click New Subpage (see Figure 1). OneNote creates a new page with a slightly indented tab label and a lighter tab color immediately below the page you were on.
|
4. | Type a page title in the header of the subpage to distinguish it from the other pages.
|
If you want to create additional subpages that relate
to the main page you had originally selected, repeat steps 2–4 for each
additional subpage that you want to create.
Demoting a Page to a Subpage
You can demote a page to a subpage with new, blank pages or with existing pages that already contain notes.
To demote an existing normal page to a subpage, follow these steps:
1. | Click the page tab that you want to change to a subpage.
|
2. | When selected, right-click the page tab.
|
3. | On
the menu that appears, click Make Subpage. OneNote slightly indents the
tab label and lightens the tab’s color to indicate that the selected
page is now a subpage of the next normal page preceding it.
|
OneNote supports two levels of subpage indentation to
help you organize groups of pages by their type of content. To demote
an existing subpage to the lowest level and further indent its tab
label, double-click to select the subpage, and then repeat steps 2–3 in
the previous steps. Note that for the second level of subpage
indentation, the tab color is even lighter than that of the first-level
subpage and that of normal pages.
|
You can demote existing pages to subpages more
quickly by using your mouse. Move the mouse pointer over the page tab
you want to demote, and then click the left mouse button. Slowly move
the page tab to the right, until you see a horizontal, two-sided arrow
as the mouse pointer. Drag the tab label to the right, taking care to
choose between the first (smaller) indentation level or the second
(larger) one. When the tab label of the page is indented at the level
you want, release the mouse button.
|
If the notes on a subpage gain in importance again
later on, you can promote it in level. For example, you can promote a
second-level subpage to a first-level subpage, or you can promote a
first-level subpage to a normal page.
Promoting a Subpage to a Page
You can promote a subpage to a page with new, blank subpages or with existing subpages that already contain notes.
To change an existing subpage back to a normal page, follow these steps:
1. | Double-click the subpage tab that you want to change to a page.
|
2. | When selected, right-click the page tab.
|
3. | On
the menu that appears, click Promote Subpage. OneNote removes the
indent from the tab label and darkens the tab’s color to indicate that
the selected subpage is now a normal page.
|
To promote an existing subpage from the lowest level
to the higher subpage level, double-click to select the subpage, and
then repeat steps 2–3 in the previous steps. Note that going from the
second level of subpage indentation to the first, the tab color is
darkened slightly but still lighter than normal pages.
|
Here, too, you can use your mouse to promote existing
pages to subpages more quickly. Move the mouse pointer over the subpage
tab you want to promote, and then click the left mouse button. Slowly
move the page tab to the left, until you see a horizontal, two-sided
arrow as the mouse pointer. Drag the tab label to the left, taking care
to choose between the first (smaller) indentation level (if the selected
page is a level 2 subpage) or the nonindented normal page level. When
the tab label is at the level you want, release the mouse button.
|
When you work with multiple groups of pages and
subpages, it can become difficult to retain oversight of your main pages
and how they should be organized. To help you keep your thoughts and
ideas organized, OneNote lets you collapse subpage tabs so that they’re
hidden from view. This lets you more easily scan the titles of your main
pages. Another benefit of collapsing subpages is that you can then drag
the tab of the parent page to another location and its collapsed
subpages are moved together with the group.
Collapsed subpages are still fully searchable—the same as normal pages.
Collapsing a Group of Subpages
The following steps show you how to hide the subpage
tabs below a parent page to reduce visual clutter or to keep the
subpages together with their parent page while moving that page to a new
location in the page tabs column.
To collapse a group of subpages, follow these steps:
1. | Make sure that the page tabs are currently expanded.
|
2. | On
the right side of the OneNote program window, move the mouse pointer
over the page tab of any parent page containing one or more subpages.
|
3. | Near
the right side of the parent page tab, click the small, upward-facing
arrow to collapse the subpages below. OneNote reminds you of the
collapsed pages by showing a slightly cascaded border effect underneath
the parent page tab and changing the direction of the small arrow to
face downward (see Figure 2).

|
While a parent page has its subpages collapsed, you
can reorganize it by moving its tab up and down the page tabs column.
The collapsed subpages will travel with it.
|
While dragging page groups up or down in the page tab
column, take care not to move the mouse to the left, or you may
inadvertently demote the parent page to a subpage of its own. If that
happens, the collapsed subpages will be expanded and shown. You can use
the Undo command on the Quick Access Toolbar (or press Ctrl+Z) to
correct the mistake, collapse the subpages again, and then try moving
the parent page again.
|