|
Linking and embedding data goes in either direction.
Just as a Project schedule can provide information for a status report
or presentation, other files can provide background information for the
tasks in your Project schedule. For example, you might link information
in a risk log spreadsheet to an at-risk task, so the most recent actions
and results appear in the Task Information dialog box. Likewise, you
could embed a Visio workflow diagram in the Gantt Chart timescale. You
can link or embed entire files into Project, or link cells from an
Excel spreadsheet to Project table cells. In addition, you can link or
embed portions of other files, like Excel charts or Visio drawing pages.
This section explains how to link and embed data into Project. When
you insert an object in a file, the dialog box (Object or Insert Object
depending on the program) offers a two-for-one deal in which you can
create an object and, at the same time, embed it in the container file.
Although you can edit this embedded object like any other—for example to
add formulas to a spreadsheet—the only time this approach makes sense
is when the information you create is an inseparable part of the
container file. That's because the embedded object you create in this
way exists only in that file. If there's any chance you might need the
information elsewhere, you should use its source program to create it,
and then embed the resulting file. To create a new embedded object, follow these steps: In the container file (an Excel spreadsheet, for example), select the location where you want the new object. Open the Object or Insert
Object dialog box. (In Office 2007 or 2010, click Insert→Text→Object or
Insert→Text→Insert Object. For example, in Excel, the Insert Object
icon looks like a small landscape. For Office 2003 and many
non-Microsoft programs, choose Insert→Object. If Project is the
container, open the Task Information dialog box and select the Notes
tab, or display the Notes pane in the Task Form. Then choose the Insert
Object icon. If the program you're using opens the Object
dialog box (like Word or Excel), then select the Create New tab. If the
Insert Object dialog box opens instead (like Project), then select the
Create New option. In
the Object Type list, select the type of object you want to create.
Your choice determines which program menus you see when you double-click
the object. For example, to create an Excel workbook, select Microsoft
Office Excel Worksheet. Click OK. A blank object appears in the container file. To add content to the object, make sure it's selected, and then use the program menus that appear. To
revert to the container file's parent program, simply click outside the
boundaries of the embedded object. To edit the object, double-click it.
|
1. Linking and Embedding Entire Files into ProjectInserting
an entire file into Project is perfect for easy access to additional
information—for example, a specifications Word document or a change
request tracking database. To see more of
the file, simply drag the boundaries of the inserted object. To see a
different part of the file, select the object and then edit it. When you work with entire files, the linking and embedding steps are almost identical: Open your Project file, and then select the location where you want to insert the other file. Only
some areas of a Project file accept inserted objects: the Gantt Chart
timescale, the Notes or Objects boxes in the Task Form or Resource Form,
and the Notes tab in the Task Information, Resource Information, or
Assignment Information dialog box. On the Notes tab in any of the Information dialog boxes, simply click the Insert Object button immediately above the Notes area. The Insert Object dialog box opens. If you want to insert objects in the Gantt Chart timescale, you must customize the ribbon to add the Object
command to a custom group (in the "Choose commands from" list, choose
All Commands, and scroll until you see the Object command). Select the "Create from File" option, and then choose the file you want to link or embed. Click
Browse to navigate to the folder that contains the file you want.
Double-click the filename, and the path and filename appear in the "File
name" box. To link to the file, be sure to turn on the Link checkbox. Initially, the Link checkbox is turned off, which means that Project will embed the file. To display the file as an icon until you want to see it, turn on the "Display as icon" checkbox. After you insert the link in Project, you will be able to open it by double-clicking it. Click OK. The object appears at the location you selected in your Project file.
2. Linking and Embedding Parts of Files in ProjectWith
some programs, you can extract portions of a file to link or embed. A
chart from an Excel spreadsheet, a slide from a PowerPoint presentation,
or a drawing page from a Visio document are all candidates for
inserting into a Project file. The advantage is that the inserted object
represents only that portion of the file, so linked objects have less data to update, and embedded objects don't take up as much room. To link or embed a part of a file into your Project file, follow these steps: In the source program, open the file and select what you want to show in your Project schedule. For
example, in Visio, drag across the shapes you want to link or embed in
Project. To select an entire Visio drawing page, make sure no shapes are
selected. For an Excel chart, select the chart. Press Ctrl+C to copy the selection to the Clipboard. In
Office 2010 programs, click Home→Clipboard→Copy. For Office 2003 and
non-Microsoft programs, choose Edit→Copy or, on the Standard toolbar,
click Copy. In
your Microsoft Project file, select the location where you want to
place the object, and then choose Task→Clipboard→Paste→Paste Special. Because
you must choose Paste Special from the ribbon, you can't insert these
partial objects in the Notes tab of the Information dialog boxes. You
can insert them in the Gantt Chart timescale and the Objects box in the
Task Form or Resource Form. (To display the Objects box in a form,
right-click the top part of the form, and then, in the shortcut menu,
choose Objects). In the Paste Special dialog box, select the Paste Link option to create a link to the source data. Initially,
Project selects the Paste option, which embeds the object. The Paste
Link option can be stubborn and appear grayed out. Make sure you've
saved the Project file at least once, so the program knows where the
file is stored and can define the link. If saving the file doesn't help,
try copying and paste-linking the information again. In the As box, select the type of object, as shown in Figure 1. The choices vary depending on what you copied to the Clipboard. 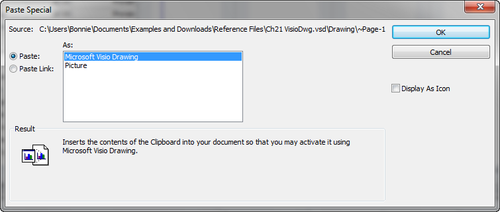
Note: The
Picture type appears in the As list whether you select Paste or Paste
Link. If you select the Paste option and the Picture type, then Project
inserts a picture as you'd expect. If you select Paste Link and Picture,
then Project acts as if you selected a type like Microsoft Visio
Drawing. Linking a picture of a Visio drawing actually inserts a linked
Microsoft Visio Drawing object. Double-clicking the object opens the
Visio file to the drawing page.
Click OK. The object appears in Project at the location you selected.
3. Linking Tabular Data in ProjectJust
as you can link Project table cells into other programs, you can bring
data from other programs into Project's table cells. When you link data
to Project cells, the values look as if you typed them directly into
Project, but they're actually linked to the source file, and change when
the source data changes. Project demands the right types of data in its
fields, so you have to make sure the data types are the same in both
places. The easiest way to keep data types in sync is to link column by
column: In
Excel or another table-based program, select the first column you want
to link (click the column heading), and then press Ctrl+C. Another advantage to linking
column by column is that the links don't break if you rearrange the
columns. For example, if you link several Excel columns at once, then
the Project link expects those columns to stay in the same order. If you
move one of the columns in the Excel spreadsheet, then the entire
Project link breaks. However, if you link each column separately, then
you can move the columns, and the links continue to work. In Project, display the view and table in which you want to link the data. Then select the first cell for the linked data. Select the top-left cell for the linked data. Project fills in the other cells to the right and below. Choose Task→Clipboard→Paste→Paste Special, and then select the Paste Link option. If you choose the Paste option, Project simply copies the values into the Project cell as text, numbers, dates, and so on. In the As box, select Text Data. As you learned on Section 2,
selecting an object type like Microsoft Office Excel Worksheet inserts a
linked object that you double-click to open and edit. By selecting Text
Data, Project fills in individual cells with linked values. Each linked
cell gets its value from the corresponding cell in the source file. Click OK. The
cells display values from the source file. To link other columns in the
source file, repeat steps 1 through 5 for each additional column.
|