Defining Project Properties
The
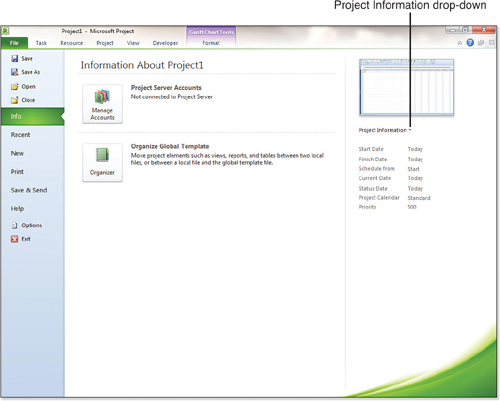
other area to find and define information about your project is the
Properties dialog box. Here, you can view and edit a number of options
that describe the project. To open the Properties dialog box, select
the File tab, Info, Project Information, Advanced Properties.
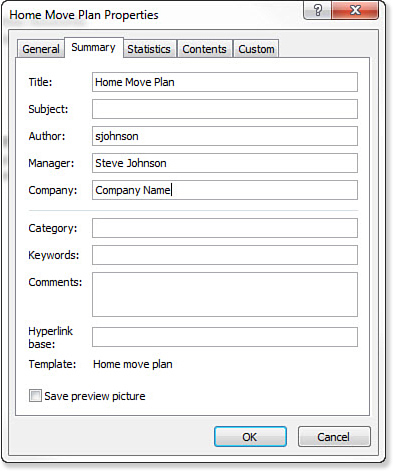
Figure 4
shows the Properties dialog box opened to the Summary tab. You can see
there are five tabs: General, Summary (the default selected tab),
Statistics, Contents, and Custom. The following sections will discuss
the options available within these tabs.
Summary Tab
The Summary tab is the default selected tab when you open the Properties dialog box (refer to Figure 4).
The first five fields (Title, Subject, Author, Manager, and Company)
are general information about the project and who is associated with it.
You have the ability to use any information from the
Properties dialog box as headers or footers of printed views or reports
for the project. The information from the Summary tab is especially
functional for this purpose. For example, each printed report could
have the project’s name (Title), the project manager (Manager), and the
company associated with the project at the top of the page. This can
help keep documents organized and make your project reports appear much
more professional.
The remaining fields—Category, Keywords, and
Comments—are useful when you search for the project on your computer.
If you have several projects in various stages, it might be difficult
to keep track of all of them. Filling in these fields helps keep all of
your projects organized into categories and then narrowed down by
keywords that quickly identify the specific project you are looking
for. You can keep notes on the project in the Comments field, which,
for example, might help you remember where you left off when last
working on the project. The Properties box is a great way to document
metadata (information about data) for your project. If in the future
you have trouble locating project files, you can search for words
entered in the Summary tab in the Open dialog box. Some of the fields
in the Properties dialog box are also utilized when using Windows
SharePoint Services to share your project with others.
Note
Pressing Enter will select the
OK button everywhere except when the Comments field is selected.
Pressing Enter in the Comments box moves you to the next line of text,
like in a Word document. |
The Hyperlink Base field is where you would enter
the main addresses to the hyperlinks associated with the project,
whether it is a link to a file on your computer, your server, or a web
address.
By default, the Save Preview Picture check box is
not selected. To select it, click inside the box. By selecting it, you
are telling Project to save a thumbnail sketch of the current view when
you save the file. You can browse these pictures when you search for
files using the File, Open command.
To enter information in any of the fields in the
Properties dialog box, simply select the field and type in the
information. Pressing Tab on your keyboard will select the next field
below the one you were just in. When you are finished entering the
information you want, click OK or press Enter. Click Cancel to exit the
box without making any changes. Clicking OK and Cancel have the same
function for all five tabs in the Properties dialog box.
Tip
It is good practice to enter
all the information you can in the Summary tab and everywhere else in
the Properties dialog box. This is an excellent place to put the
metadata of a project. If the information is not entered, a person
viewing the project will have to figure out what the project is and who
is managing it by sifting through the project itself and deducing. With
this information entered, it is clearly defined in one location in an
organized manner. In addition, many file storage systems use metadata
in their searches, so this increases the chances of your document being
returned in the search results. |
General Tab
The General tab provides information about the
project file: the filename, type, location where it is saved, and size.
It also displays the dates when the file was created, last modified,
and last opened. This tab is blank until the project file is saved for
the first time.
The Attributes section of the tab displays the
current file permission setting. You set the file permissions using the
File Properties dialog box, opened by right-clicking the project file
using Windows Explorer. By default, the Archive setting is checked when
the file is saved, but the file owner can set access settings.
Statistics Tab
The Statistics tab provides
helpful information about the work on the file. Included are dates when
the file was created, last modified, last accessed, and last printed.
The other section of the Statistics tab shows who last saved the file,
how many revisions have been made, and how much total time has been
spent editing the file. The information in the Statistics tab is
especially useful if there are multiple people accessing, editing, and
saving the project. It helps you to keep track of who did what to the
file.
Contents Tab
The Contents tab displays the most commonly reviewed
information about the project schedule. Included are the project start
and finish dates, the scheduled duration, work and cost amounts, and
the percentage complete for both duration and work. This is a handy
reference point for a quick project schedule review.
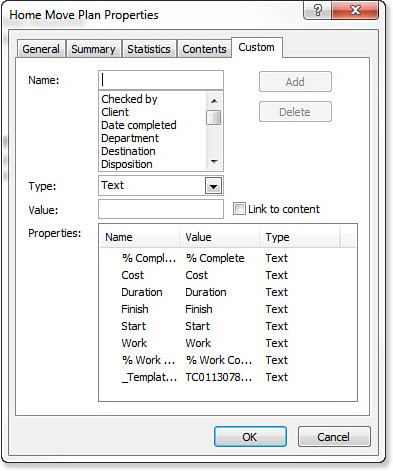
Custom Tab
The concept of custom properties is to give project
managers the ability to add project attributes to a project file. In
the Custom tab, you can add more properties to a file (or delete them).
You can then search for files by the values of these properties. This
can bring more meaning to your project file. The properties are listed
in the Properties list in the bottom of the Custom tab. Figure 5 shows the Custom tab in the Properties dialog box.
To create a custom property for a project, follow these steps:
1. | Open the Properties dialog box (File tab, Project Information, AdvancedProperties) and choose the Custom tab.
|
2. | Type a property name in the Name box, or choose from the list. The list includes commonly used properties.
|
3. | In
the Type box, use the drop-down list to define the type of data to
place in the field. You should use this option only when you type the
value of the property instead of linking it to a field in the project
file. When you link the property value to a field, the Type drop-down
list is unavailable. The allowable data types are Text, Date, Number,
and Yes or No.
|
4. | If
you chose Text, Date, or Number in the Text box (step 3), type a value
in the Value text box. If you chose the Yes or No option in the Type
box, you see Yes and No buttons in the Value box. Select either Yes or
No.
|
5. | Click
the Add button to add the property to the list in the Properties dialog
box. The newly created property appears in the Properties list box at
the bottom.
|
If you want to link a property value to a project field, follow these steps:
1. | Open the Properties dialog box (File tab, Info, Project Information, Advanced Properties) and select the Custom tab (see Figure 6).
|
2. | Type a property name in the Name box.
|
3. | Select
the Link to Content check box. The Type box is grayed out, and the
Value text box becomes a drop-down list. The name of the Value box
changes to Source.
|
4. | In the Source drop-down list box, choose the field that has the value you want the property to reflect.
|
5. | Click the Add button to add the property to the list in the Properties dialog box.
|
If you want to modify the value for a property, follow these steps:
1. | Select
the property name in the Properties list. This places the current name
and value in the text boxes at the top of the dialog box.
|
2. | Change the Type or Value field as needed, and the Add button automatically changes to Modify.
|
3. | If you change the Name field, you have to use the Add button to include it as a new property.
|
4. | You can then use the Delete button to remove the original, leaving the newly named version.
|
5. | Click Modify to complete the change.
|
To delete a custom property, select it in the Properties list and click Delete.
When
you are finished with the custom properties list, click OK, or select
another tab to work in. When you are finished with all the tabs, click
OK.