IT tutorials
 
Office
 

Microsoft Project 2010 : Viewing Baselines (part 1) - Tracking Gantt View and the Variance Table

- Free product key for windows 10
- Free Product Key for Microsoft office 365
- Product Key Free : Microsoft Office 2019 – Serial Number
3/30/2014 2:11:23 AM

After you've set the baseline—or before you set the baseline—switch views or format the existing view to allow for baseline data to be displayed. A typical task-based Gantt Chart view has two sides. On the left is the table or text area, and on the right is the bar area. Formatting one side doesn't format the other.

In other words, adding baseline fields to the table doesn't automatically change the Gantt bars to display the baseline. The reverse is also true: formatting the bars to display the baseline doesn't automatically add the baseline fields to the table or text area.

1. Tracking Gantt View and the Variance Table

Project includes predefined views and tables to display the baseline. One such view, which is formatted to display the baseline, is the Tracking Gantt view. Follow these steps to apply the Tracking Gantt view (see Figure 1):

  1. Select View tab => Task Views group => Gantt Chart drop-down list.

  2. From the list, click Tracking Gantt.

In the Tracking Gantt view, the Gantt bars are preformatted to display not only the baseline but also the critical path. After you set the baseline, you'll notice two sets of bars in the Tracking Gantt view. The bottom bars, which are gray, represent the baseline; the top bars, which are either blue (noncritical tasks) or red (critical tasks), represent your current plan. At first, these bars are the same length; but as you make changes to your current plan or record changes that are different from the baseline, the top bars move while the bottom baseline bars remain in place—unless you reset the baseline.

Figure 1. Tracking Gantt view

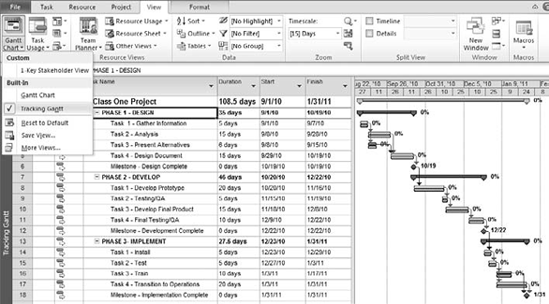
The Tracking Gantt view has the percentage complete to the right of each bar, which is useful when you start to record progress .

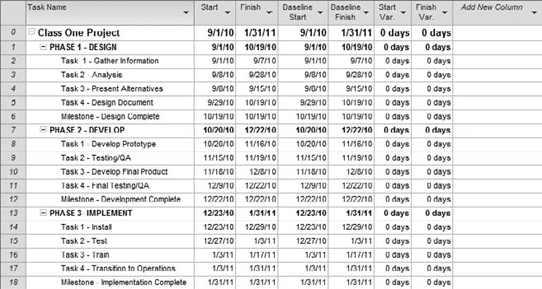
Because the Tracking Gantt view defaults to applying the Entry table, you may find it useful to change the table to the Variance table (see Figure 2): it includes the Baseline Start and Baseline Finish columns along with the Start and Finish Variance columns. Follow these steps to apply the Variance table:

  1. Go to View tab => Data group, and click the Tables button.

  2. Select the Variance table.

When you set a baseline, the current Start is equal to the Baseline Start, and the current Finish is equal to the Baseline Finish; therefore, there is no Start or Finish Variance. This is because when you set your baseline, Project copies whatever is in your current plan into the baseline plan; they're exactly the same until you make adjustments.

You can add columns in the Variance table by using Add New Column, as shown in Figure 2. This allows you to customize the table to suit your tracking needs. For example, I like to add the following:

  • % Complete

  • Finish Status (custom field with graphical indicators)

  • Duration (between Start and Finish)

You may find it useful to add other columns, such as Actual Start and Actual Finish, after you start recording data.

Figure 2.Variance table

 
Others
 
- Microsoft Project 2010 : Understanding and Setting Baselines
- Microsoft Project 2010 : Strategic Importance of Project 2010
- Microsoft PowerPoint 2010 : Animating a SmartArt Graphic (part 2) - Apply a Customized Animation to a SmartArt Graphic, Reverse the Order of a SmartArt Graphic Animation
- Microsoft PowerPoint 2010 : Animating a SmartArt Graphic (part 1) - Animate a SmartArt Graphic
- Microsoft PowerPoint 2010 : Coordinating Multiple Animations (part 2) - Set Time Between Animations,Modify an Animation
- Microsoft PowerPoint 2010 : Coordinating Multiple Animations (part 1) - Work with Multiple Animations, Modify the Animation Order
- Microsoft OneNote 2010 : Collecting and Researching Information - Inserting Documents and Files (part 3) - Inserting a Scanner Printout on a Page
- Microsoft OneNote 2010 : Collecting and Researching Information - Inserting Documents and Files (part 2) - Inserting a File Printout on a Page
- Microsoft OneNote 2010 : Collecting and Researching Information - Inserting Documents and Files (part 1) - Inserting a Copy of a File on a Page
- Microsoft OneNote 2010 : Collecting and Researching Information - Working with Links (part 2) - Creating a Link from a Picture, Modifying a Link in Your Notes
 
 
Top 10
 
- Microsoft Visio 2013 : Adding Structure to Your Diagrams - Finding containers and lists in Visio (part 2) - Wireframes,Legends
- Microsoft Visio 2013 : Adding Structure to Your Diagrams - Finding containers and lists in Visio (part 1) - Swimlanes
- Microsoft Visio 2013 : Adding Structure to Your Diagrams - Formatting and sizing lists
- Microsoft Visio 2013 : Adding Structure to Your Diagrams - Adding shapes to lists
- Microsoft Visio 2013 : Adding Structure to Your Diagrams - Sizing containers
- Microsoft Access 2010 : Control Properties and Why to Use Them (part 3) - The Other Properties of a Control
- Microsoft Access 2010 : Control Properties and Why to Use Them (part 2) - The Data Properties of a Control
- Microsoft Access 2010 : Control Properties and Why to Use Them (part 1) - The Format Properties of a Control
- Microsoft Access 2010 : Form Properties and Why Should You Use Them - Working with the Properties Window
- Microsoft Visio 2013 : Using the Organization Chart Wizard with new data
Technology FAQ
- Is possible to just to use a wireless router to extend wireless access to wireless access points?
- Ruby - Insert Struct to MySql
- how to find my Symantec pcAnywhere serial number
- About direct X / Open GL issue
- How to determine eclipse version?
- What SAN cert Exchange 2010 for UM, OA?
- How do I populate a SQL Express table from Excel file?
- code for express check out with Paypal.
- Problem with Templated User Control
- ShellExecute SW_HIDE
programming4us programming4us