Working with Tabs
By default, each time you press the Tab key, Word
moves the insertion point a half inch to the right. However, you can set
tab stops at desired points along the ruler so that when you press the
Tab key, the insertion point moves to that point automatically, instead
of stopping every half inch.
Do not try to line up text by pressing the space bar.
Even if the text looks evenly aligned on the screen, it won’t be lined
up when printed. Use tabs instead.
The following steps show you how to set your own tab settings:
Click the mouse pointer at the location you want to create a tabbed paragraph.
Tip
If you want to set tabs for multiple previously typed paragraphs, select the paragraphs before proceeding to Step 2.
Make sure the ruler display is turned on. If you don’t see your rulers, choose View > Show > Ruler.
Click
the Tab button located at the left end of the horizontal ruler as often
as needed until you see your desired tab alignment icon (see Figure 5). Some tab choices include:

 Left:
The Tab button defaults to the left tab symbol, which looks like an
“L.” When using a left tab, text appears with the left edge of the text
at the tab.
Left:
The Tab button defaults to the left tab symbol, which looks like an
“L.” When using a left tab, text appears with the left edge of the text
at the tab.
 Center:
When you select a center tab symbol, the Tab button looks like an
upside-down “T.” When using a centered tab, text centers at the tab
stop.
Center:
When you select a center tab symbol, the Tab button looks like an
upside-down “T.” When using a centered tab, text centers at the tab
stop.
 Right:
When you select the right tab symbol, the tab button looks like a
backward “L.” When using a right tab, text appears with the right edge
of the text at the tab stop.
Right:
When you select the right tab symbol, the tab button looks like a
backward “L.” When using a right tab, text appears with the right edge
of the text at the tab stop.
 Decimal:
If you display the decimal tab, the Tab button appears as an
upside-down “T” with a dot on the right. When writing out dollar and
cent amounts, for example, decimal points align to the tab.
Decimal:
If you display the decimal tab, the Tab button appears as an
upside-down “T” with a dot on the right. When writing out dollar and
cent amounts, for example, decimal points align to the tab.
 Bar:
Bar tabs are very different from the previous four tabs. Text doesn’t
position around bar tabs. Instead, Word inserts a vertical bar at the
top position and runs through the depth of the paragraph.
Bar:
Bar tabs are very different from the previous four tabs. Text doesn’t
position around bar tabs. Instead, Word inserts a vertical bar at the
top position and runs through the depth of the paragraph.
Click
on the horizontal ruler to set the tab for the current paragraph or the
currently selected paragraphs. Depending on the tab type you selected, a
left, right, center, decimal, or bar tab symbol appears where you
clicked the ruler.
Click in the paragraph and press the Tab key. Notice how the insertion point moves to the tab setting you created.
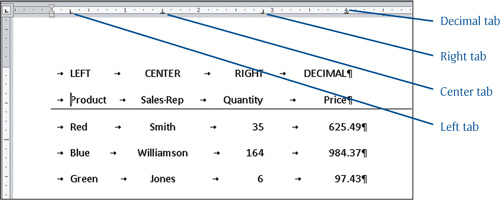
Type some text. The text you type appears on the page. In Figure 6,
you see examples of left, right, center, and decimal align tabs as you
might use them in a document. (To make the tabs easier to see, I’ve also
displayed the hidden characters.)
Tip
Pressing Enter continues the tab settings to the next paragraph.
Moving a Tab
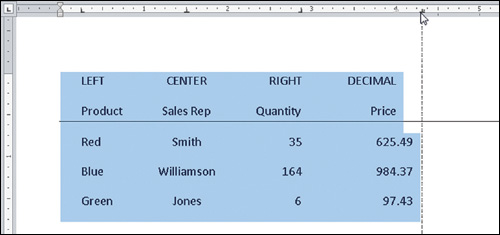
If you’re not happy with the position of your tab
stop, you can easily move it. Select to highlight the paragraphs that
have a tab you want moved, and then drag the tab to a new location on
the ruler bar. As you drag the tab, a vertical dotted line like the one
shown in Figure 7 illustrates the new tab position. When you release the mouse button, the text moves to the new tab position.
Deleting a Tab
Like
moving a tab, using the ruler makes deleting a tab a very simple
process. Select the paragraphs that have a tab you want to delete and
then drag the current tab setting off the ruler, into the body of the
document. A vertical dotted line appears. When you release the mouse
button, the tab disappears from the ruler and text realigns according to
your new tab settings. If there is no previous manual tab stop, the
default tab settings take effect.
Using the Tabs Dialog Box
If you want your tab stops at more precise positions
than you get by clicking the ruler, or if you want a dot leader before
the tab, use the Tabs dialog box. Select the text where you want to set
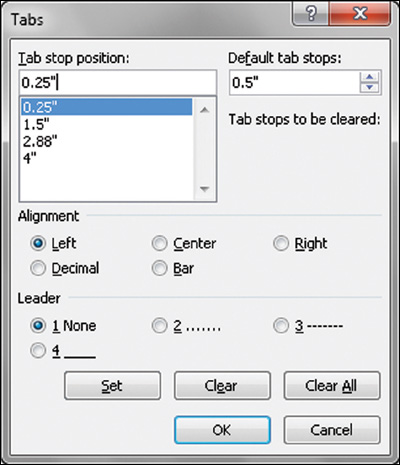
the tab. From the Home tab, click the Paragraph Dialog Box Launcher.
Click the Tabs button, which displays the Tabs dialog box shown in Figure 8.
Tip
Double-click any manual tab stop on the ruler to open the Tabs dialog box.
In the Tab Stop Position text box, type the location
you want for the new tab and choose an Alignment and optional Leader
style for the tab. Click the Set button. Repeat this action for each tab
you want set. Click OK to close the Tabs dialog box.
Tip
Alternatively, use the Tabs dialog box to change the Default Tab Stops setting from 0.5” to any desired amount.
Changing Line Spacing
Line spacing is the amount of vertical space between
each line of text. You might want to change line spacing when you want
to make a document easier to read, such as a contract, or to make room
for changes when writing a document draft. Like text alignment, line
spacing applies to complete paragraphs. Use the following steps to
change line spacing:
|
Word 2010 and 2007 use a default line spacing of
1.15. Earlier versions of Microsoft Word used single spacing (1.0) as
the default setting.
|
Select the text you want to change.
Choose Home > Paragraph > Line Spacing. A list of options appears (see Figure 9).
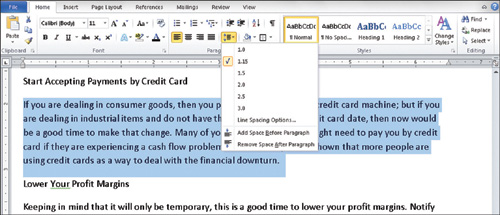
Select a line spacing option. Word applies the spacing you select to the highlighted text.
Tip
Shortcut keys for setting line spacing are Ctrl+1 for
single spacing, Ctrl+2 for double spacing, and Ctrl+5 for 1.5 line
spacing.
Adjusting Spacing Between Paragraphs
Paragraph spacing is the amount of vertical space
between each paragraph of text. Remember that whenever you press the
Enter key, you start a new paragraph. In early versions of Word, the
default was no spacing between paragraphs, so, traditionally, you would
press the Enter key a second time to leave space between two paragraphs.
Word 2010 and Word 2007 use a different default setting. The default
setting allows for 10 points of blank space at the bottom of every
paragraph, thereby eliminating the need to press the extra Enter key.
However, you have complete control over how much
spacing, if any, you want between two paragraphs. Similar to
indentation, paragraph spacing is controlled through the Paragraph
dialog box. From the Home tab, click the Paragraph Dialog Box Launcher,
which displays the Paragraph dialog box (see Figure 10).
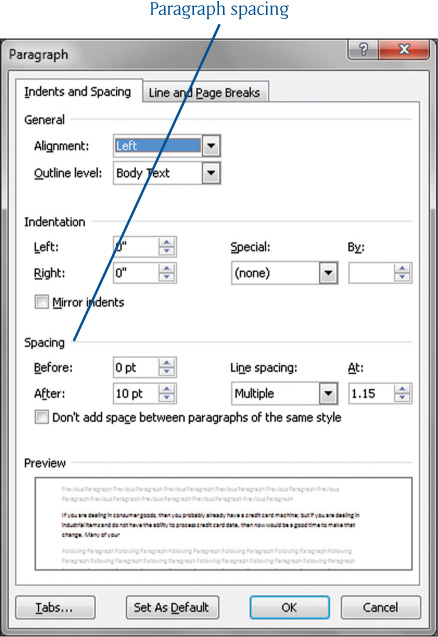
The
Spacing section is where you determine the amount of space you want
before or after each paragraph. Settings are measured in points and
range from –1 to 1584.
Tip
You can also change paragraph spacing by choosing Page Layout > Paragraph > Spacing.