Conventionally, users have used folders for
ages to organize their content. Folders give you a rich hierarchical
view of the organization of your data. Where they fall short, however,
is that in the real world sometimes one piece of content may belong in
two or more folders. For instance, is buying a diamond ring for your
girlfriend a financial decision or a romantic decision? The answer: it
is both! (Of course, she doesn't think so, though!)
Another issue with folders is that they are somewhat
inflexible. For instance, when a number of folders are set up, and they
are populated with content, sometimes it becomes hard to reorganize
them and the content between them. Think about this: when was the last
time your organization was completely shuffled around? To get around
all these challenges, the concept of tagging was invented. Tagging
simply refers to marking your content with strings that are pertinent
to the nature of the content. What is special, though, is that one
piece of content can have as many strings as you want. For instance,
rather than putting the diamond ring transaction in either the romantic
folder or the financial folder, you simply mark it with both romance
and finance tags; that way, it is findable under both.
Of course, these tags in any organization also need
their own structure. The world of tagging usually is not black or
white. On one end of the spectrum, the dictionaryterms)
is maintained by a committee locked in a room in the basement
somewhere! On the other end, users who are actually familiar with the
content that they're working on need to have the ability to add to this
dictionary of tags. The first instance in which the dictionary of these
terms is controlled hermetically is commonly referred to as metadata taxonomy.
The second instance, when participants of an organization who are
familiar with the content type they're working on add terms to this
dictionary, is referred to as folksonomies. of all these tags (perhaps a better word is
Also it is reasonable to expect that as the
dictionary of terms, both formal and informal, grow, over time you
would want to mark synonyms or even delete or deprecate terms.
In addition, between the range of committee-managed
tags and completely open folksonomies, you might have a midrange in
which you might want to assign administrators for certain terms sets.
The bottom line is that such flexibility in tagging categorization of
your data makes your data much more discoverable.
The good thing is that SharePoint 2010 allows you to
address all these scenarios! Let's see how. At the heart of the tagging
and metadata management infrastructure inside of SharePoint is the
managed metadata service, which you can find in central administration.
If you visit /_admin/ServiceApplications.aspx, you will see an instance
of the managed metadata service provisioned for you (see Figure 1).

The managed metadata service also works in
conjunction with the facilities in SharePoint used to synch content
types across site collections. In addition to synching content types across site
collections, the managed metadata service also allows you to publish
and consume keywords from other metadata service instances as
necessary. The other metadata service could potentially be located on a
completely different SharePoint farm. While you could use the
out-of-the-box instance of the managed metadata service, I'm going to
demonstrate the process of setting up your own metadata service
instance from scratch. Thus, select the out-of-the-box managed metadata
service instance, and choose to delete it. In the ensuing dialog box
that pops up, also choose to delete data associated with the service
applications (see Figure 2).

Next, on the same screen choose to create a new
managed metadata service. Choosing to create a managed metadata service
will ask you a few basic questions: the name of the new managed
metadata service, the database location in which the terms will be
stored, an application pool, among other such questions. I choose to
call my managed metadata service Winsmarts. Use the following settings for this service instance:
Name: Winsmarts
Database Name: Winsmarts_DB
Leave the failover server blank
Pick sp_admin as the application pool
Leave the content type hub dialog box blank
At the bottom of Create new managed metadata service is an interesting question, shown in Figure 3.
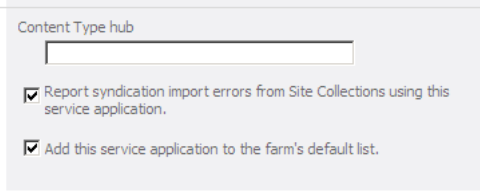
With
SharePoint 2010 you now have the ability to share and synchronize
content types across site collections. For now, just leave the content
type hub as blank and leave the two check boxes checked for now.
Once the managed metadata service is created, click
it to access the term store management tool. Go ahead and add a few
terms, as shown in Figure 4.

As you can see from the figure, I have set up a new
group of terms called Financial. At a group level (Financial), I can
choose to assign group managers or contributors. Contributors have the
ability to edit terms and term set hierarchies within this group, and
group managers can appoint other contributors as well.
At an individual term set level, you can specify a number of things:
You have the ability to appoint an owner of
a term set. The owner of the term set has the eventual responsibility
of maintaining the term set.
You have
the ability to specify a contact e-mail address for the term set.
Usually term sets that are locked down will need some ability for end
business users to be able to contact the person who can accept
suggestions for the term set. This contact e-mail address would be the
person who receives all these suggestions.
You have the ability to define stakeholders, who will be notified if any changes are made to the term set.
You
have the ability to define a close or open submission policy. A closed
submission policy would restrict the ability to make changes to only
owners of this term set. While this would keep the term set cleaner, it
would put more responsibility on the term set owner to maintain the
term set as it grows.
Finally you have a simple check box that makes the term said available for tagging existing content.
I set up the expenses term set settings to look as shown in Figure 5.

With your term set now set up, start using this term set in your SharePoint application. At http://sp2010, set up a list called My Expenses. This list will be based on the custom list site definition. Add another column in this list called Amount,
which will be based on type currency. Now the idea is that as I start
making expenses and documenting them in this list, I want to be able to
tag them with the Expenses term set, which makes my content more
discoverable. In order to be able to be able to tag the content, I need
to add a managed metadata site column to my list. Most ECM features
have been designed so they can be turned on or off in any site as a
feature. In order to use managed metadata in a blank site definition
site, run the following command:
stsadm -o activatefeature -url http://sp2010 -id 73EF14B1-13A9-416b-A9B5-ECECA2B0604C
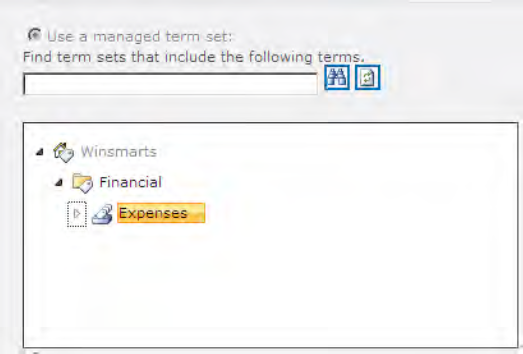
Once the feature is added, go ahead and add a new managed metadata column called Category, allow it to have multiple values, and point it to the managed term set Expenses. This can be seen as in Figure 6.
Now I'm going to add a new item to this list. You
will see that as you start typing in the category from the metadata,
SharePoint will prompt you with appropriate synonyms of the matching
terms in the term set (see Figure 7).
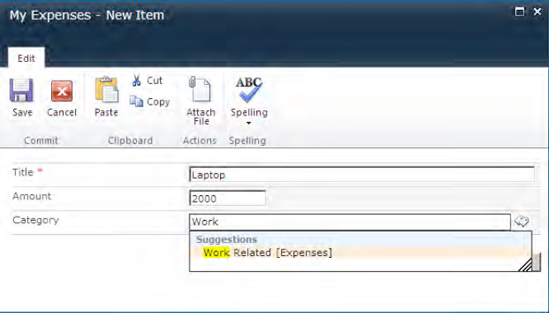
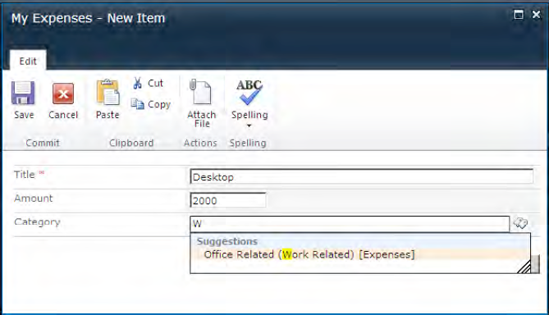
Notice that I said synonyms! Back in central administration, add another term called Office Related.
Then click Work Related and choose to merge the Office Related and Work
Related terms. Now try adding another item into the My Expenses list.
SharePoint is smart enough to prompt you with the actual tag even if
you were trying to type the previous tag. This can be seen in Figure 8.
There are numerous other facilities in the metadata
management of SharePoint 2010, including the ability to delete terms,
mark terms as orphans, deprecate terms, or even visit the term store
management tool under the site collection settings of http://sp2010.
Now assume that you have added a few items into your
overall expense. How did metadata tagging make your content more
discoverable? Under the site features, activate the Metadata Navigation
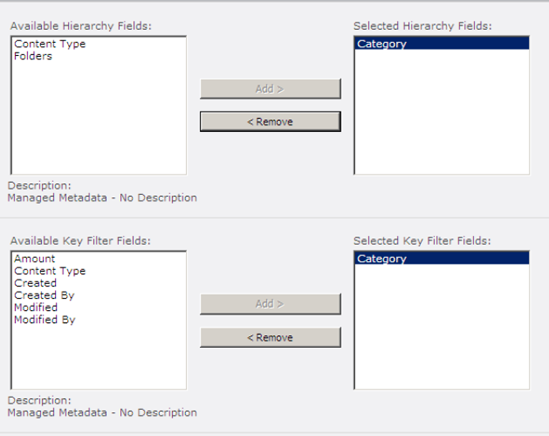
and Filtering feature. Back in the My Expenses list, visit Metadata
Navigation Settings under List Settings. Choose to configure the
Navigation Hierarchies and the Configure Key Filter section to navigate
and filter using the Category column, as shown in Figure 9.
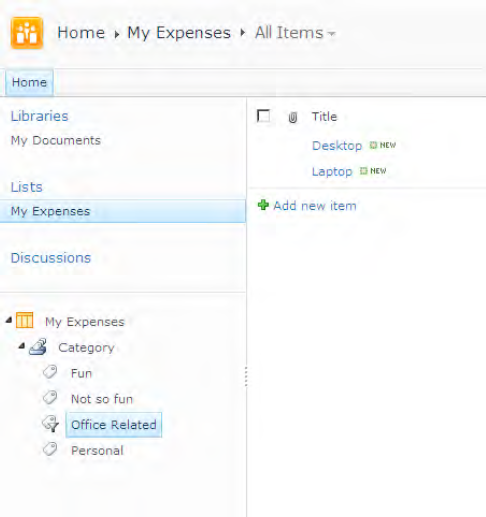
Now visit the My Expenses list once again. Note that
you now have the ability to browse for content using the tags that you
specified earlier. This can be seen in Figure 10.
The Key Filters section enables you to specify multiple tags as your filtering criterion (seeFigure 11).

What is really compelling about this set up is that
you can combine the metadata navigation and filtering with folders.
Those folders can have unique permissions on them, and metadata
navigation and filtering will start to present security trimmed content.
This is great, but one big downside of this approach
was that the metadata term set was very tightly controlled by the
metadata administrators. Sure, the metadata administrator could
potentially delegate the term set administration to other users, but
users who are familiar with the content will eventually want to suggest
more terms. In other words, they will want to specify their own
keywords to content all over SharePoint and perhaps filter by using
those keywords as well.
The SharePoint metadata architecture allows for a loosely controlled metadata setup commonly referred to as folksonomies.
You can set up any of the term sets to be open; then users can add
their terms to an existing term set. One common example of this is the
Enterprise keywords functionality that is built into SharePoint 2010
out of the box. To examine this, add a new document library and call it
My Documents. Under Document Library
settings, visit the Enterprise Metadata and Keywords Settings link, and
choose to add Enterprise Keywords to this list and enable Metadata
Publishing. Now choose to add a new document. You can add keywords to
this newly added document using both the Document Information Panel
(DIP) and the Edit Properties button on the ribbon in SharePoint 2010.
The keywords will also surface under the Enterprise Keywords section of
backstage view in Office applications. Figure 12 shows this view.

Figure 13 shows the DIP in an Office application.

Figure 14 shows Enterprise Keywords in a web browser.

Curiously, these keywords seem to underline
themselves as you type them. Not only that; as you try and reuse a
keyword that you previously used, SharePoint will prompt you to pick
from an existing keyword to let you create a new one (see Figure 15).
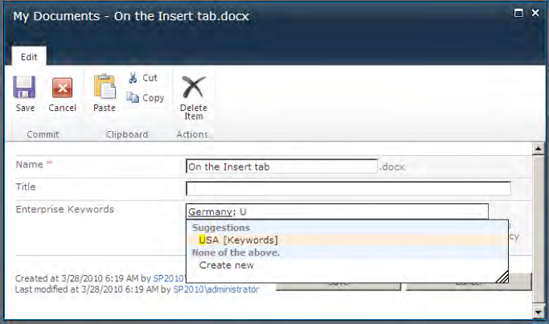
What is happening behind the scenes is that whenever
SharePoint encounters a new keyword, it adds it to the database behind
the scenes, gives it an ID, and ties it to the document that you are
editing in your site. But if you are typing in a keyword that
SharePoint has already seen, then SharePoint will prompt you to pick
from an existing keyword. Because the keywords are also built on the
managed metadata infrastructure, all the metadata concepts such as
hierarchies of keywords, synonyms, or deprecated or orphaned keywords.
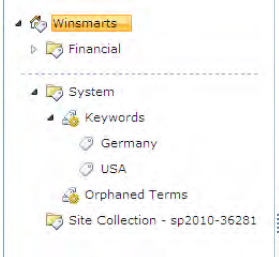
You can verify that by visiting the Keywords section under the System
group of the Winsmarts metadata service in central administration, as
shown in Figure 16.
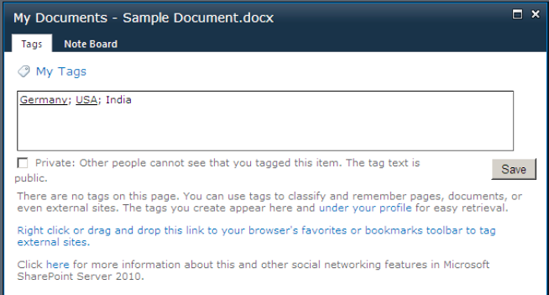
In addition to such keywords, you also have the
ability of tagging the content specifically for your needs. For
instance, select the document that you just added and from the ribbon
click the Tags and Notes button. You can now add some tags, as shown in
Figure 17.
Interestingly, these tags are also driven from the
same keywords group that the managed keywords are being driven from.
One of the most interesting tags is the I Like It tag. There is an I
Like It button on every single page and content inside of SharePoint,
so clicking that button will simply add the I Like It tag to the
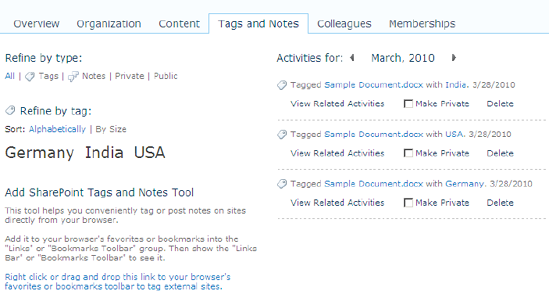
associated content. As you tagging, rating, and liking the content all
over SharePoint, this also surfaces in the activity feed in your site.
My activity feed is shown in Figure 18.
Now others in the organization can choose
to subscribe to the activity feed, and keep on top of the content that
is interesting to me.