When writing applications for
Windows Phone, you can use existing or new web services to communicate
with the server. Visual Studio enables you to make references to
existing web services, although the free version of Visual Studio for
the phone (Visual Studio Express for Windows Phone) does not support a
method of creating new web projects to host services. If you need to
create your own services to be hosted on your own servers, you will
need Visual Studio Professional or better.
You can consume a web service by adding a
service reference to your project. In Visual Studio, you can
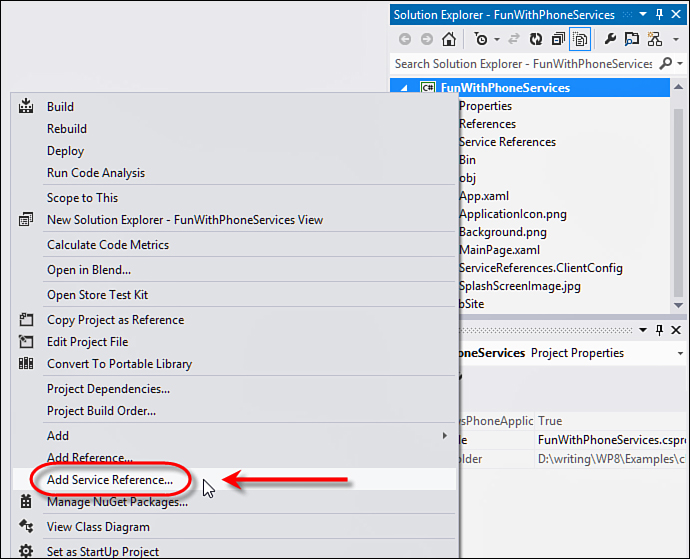
right-click the phone project and select Add Service Reference, as
shown in Figure 1.

FIGURE 1 Adding a service reference
This will open a dialog
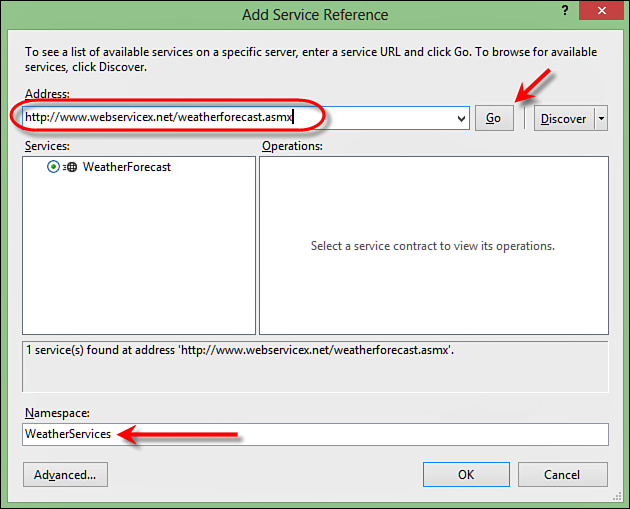
box in which you can enter a service’s address or just discover your
own web services. The dialog box has an address bar in which you can
simply enter the address of the web service; when you click the Go
button, Visual Studio will find your service, as shown in Figure 2.
After your service is discovered, you can specify the namespace and
click OK to generate a set of classes that will let you call the web
service.

FIGURE 2 The Add Service Reference dialog box
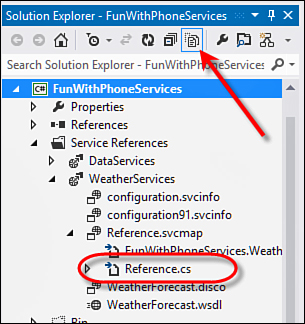
This will add the code that is required to interact with the web service.

FIGURE 3 Service files displayed
After the service
reference is added, you will have a number of new classes and
interfaces generated in the namespace that you specified in the dialog
box. The most important of these interfaces is a WebClient-like
class that exposes all the methods of the web service as asynchronous
methods. The name of this class depends on how the service was written,
but it always ends in “Client.” In this example the class is called WeatherForecastSoapClient. The service contains an operation called GetWeatherByZipCode, which the service reference splits into a Completed event and an Asynchronous call, as shown here:
// Open with default address/binding information
var client = new WeatherForecastSoapClient();
// Handle the Completed Event
client.GetWeatherByZipCodeCompleted += (s, a) =>
{
if (a.Error == null)
{
theList.ItemsSource = a.Result.Details;
}
else
{
MessageBox.Show("Failed to get weather data.");
}
};
// Get Weather Asynchronously
client.GetWeatherByZipCodeAsync("30307");
The results of the web service are passed into the Completed event as the Result
property of the second argument in the event handler. In this case the
result the web service returns contains a list of details for each day.
By assigning this to the ItemsSource of a control in the XAML, data binding will show the list of details.
In the previous example, you might have noticed
that you did not have to specify the server address. When the service
reference was added, a new file was added to your project, called ServiceReferences.ClientConfig. This file is the configuration for your service:
<configuration>
<system.serviceModel>
<bindings>
<basicHttpBinding>
<binding name="WeatherForecastSoap"
maxBufferSize="2147483647"
maxReceivedMessageSize="2147483647">
<security mode="None" />
</binding>
</basicHttpBinding>
</bindings>
<client>
<endpoint
address="http://www.webservicex.net/WeatherForecast.asmx"
binding="basicHttpBinding"
bindingConfiguration="WeatherForecastSoap"
contract="WeatherServices.WeatherForecastSoap"
name="WeatherForecastSoap" />
</client>
</system.serviceModel>
</configuration>
The key part of this configuration for the
phone is the address of the endpoint (shown in bold). For a public web
service such as the one in the example, you don’t need to change this.
But for services that you are going to host yourself, you will likely
have a test address (probably on your own machine) and need to change
this when you deploy your application to specify a production machine.
The best solution is to create a duplicate endpoint section and name
the endpoints something significant:
<client>
<endpoint address="http://www.webservicex.net/WeatherForecast.asmx"
binding="basicHttpBinding"
bindingConfiguration="WeatherForecastSoap"
contract="WeatherServices.WeatherForecastSoap"
name="Production" />
<endpoint address="http://localhost:8888/WeatherForecast.asmx"
binding="basicHttpBinding"
bindingConfiguration="WeatherForecastSoap"
contract="WeatherServices.WeatherForecastSoap"
name="Debugging" />
</client>
When you create the client object, you can
specify the name of the endpoint. For instance, if you wanted to use
the production web server in release builds, you could do the following:
// Open with default address/binding information
#if DEBUG
var client = new WeatherForecastSoapClient("Debugging");
#else
var client = new WeatherForecastSoapClient("Production");
#endif
Creating Your Own Services