2.2. Removing a Role
You can use either the graphical Server Manager console to
remove a role, or you can use the deprecated but still available
command-line utility ServerManagerCmd.exe. Or you can use the
Windows PowerShell Remove-WindowsFeature cmdlet. All have the same
functionality: they remove only the explicit role selected. They
will not usually remove any roles or role services that were added
during the initial role installation to support the role being
removed—unless the role, role service, or feature requires the
role that is being removed. That’s a bit confusing, isn’t it?
Okay, how about a specific example that makes it a bit clearer:
Let’s say you installed the Remote Desktop Services role with all its role
services. You’ll also have Network Policy And Access Services
installed, along with Web Server (IIS). You can uninstall the
entire Remote Desktop Services role, and neither the
Network Policy And Access Services nor Web Server (IIS) roles will
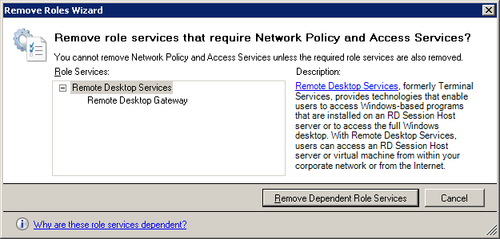
removed. But if you remove the Network Policy And Access Services role, it will
also remove the Remote Desktop Gateway feature, as shown in Figure 8.

To remove a role using the Server Manager console, follow
these steps:
Open the Server Manager console if it isn’t already
open.
Select Remove Roles from the Action menu to open the
Before You Begin page of the Remove Roles Wizard.
Read the advice on the Before You Begin page. It’s good
advice and a useful reminder. If you’ve read the page,
understand all its implications, and don’t ever want to see
the page again, select the Skip This Page By Default check
box. Personally, we leave it cleared.
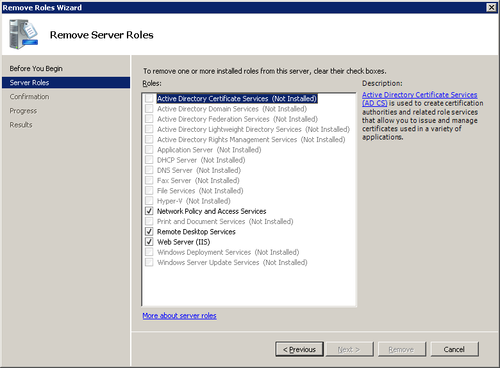
Click Next to open the Remove Server Roles page, as
shown in Figure 9. Clear
the roles you want to remove.

If there are any dependent features, you’ll be prompted
to remove them also, as shown earlier in Figure 8.
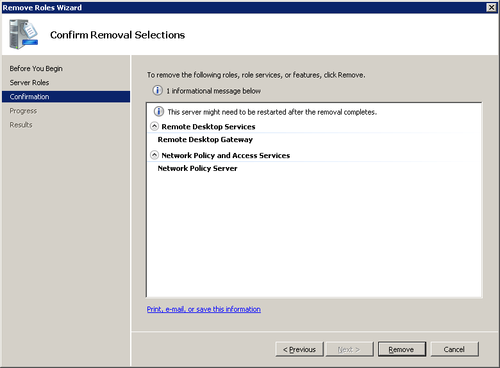
When you’ve cleared the check boxes for any roles you
want to remove, click Next to open the Confirm Removal
Selections page, as shown in Figure 10. This
page will often include one or more informational messages. Be
sure you understand all implications of removing the role or roles.
Note:
You can print, email, or save the information in the
Confirm Removal Selections page by clicking below the
informational window.
Click Remove to actually begin the removal.
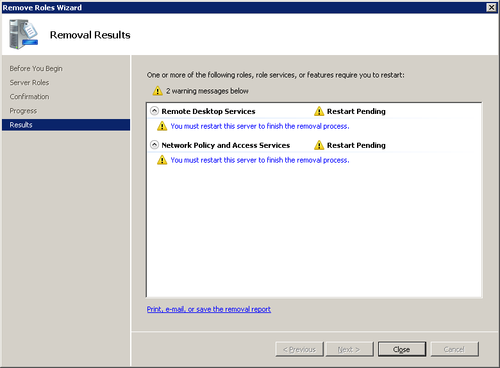
When the removal has completed, you’ll see the Removal
Results page, as shown in Figure 11. If any
of the roles or features require a restart, you’ll see a
message warning you that a restart is pending. In our
experience, removing just about anything requires a
restart.


Click Close, and then click Yes if prompted for a
restart.
If your removal requires a restart, be sure to log back
on with the same account you used to remove the role. The
removal can’t complete until you log back on with that
account. The Resume Configuration Wizard will open and
complete the removal of the roles you selected. Click Close
when the removal is complete.