If you’re using an Ethernet network adapter
to connect your computer to a DSL or cable Internet service, the
installer might set up your computer for you. “Self-install” providers
give you a set of instructions specific to your service. I can give you
a general idea of what’s required.
Caution
If your broadband service uses a network adapter (that is, an Ethernet adapter) to connect to a cable or DSL modem, you must take the following steps to secure your computer from hackers. |
1. | Click the Network icon in the taskbar and then click Open Network and Sharing Center.
|
2. | Under
View Your Active Networks, locate the icon that corresponds to the
network adapter that connects to your DSL or cable modem—it’s probably
labeled Local Area Connection.
Be sure that the label next to the network’s icon says Public Network, not
Home Network or Work Network. Because the connection hooks up directly
to the Internet, it must be designated as a Public network.
If the label says Home Network or Work Network, click on those words and select Public Network.
|
3. | Now,
for additional insurance, at the left, select Change Adapter Settings.
Locate the icon for the adapter that goes to your DSL or cable modem.
Right-click it and select Properties.
|
4. | Under
This Connection Uses the Following Items, uncheck File and Printer
Sharing for Microsoft Networks, and uncheck Client for Microsoft
Networks.
|
5. | If
your ISP requires you to set a specific IP address for the network
adapter, highlight Internet Protocol Version 4 (TCP/IPv4) and click
Properties. Check Use the Following IP Address, and enter the IP
Address, Subnet Mask, and Default Gateway provided by your ISP. You may
also be instructed to enter DNS server addresses.
|
6. | Click OK.
|
After
the adapter has been configured and attached to the DSL or cable modem
with a network cable, you configure the connection. The procedure you
should use depends on whether your ISP uses PPPoE or an always-on
connection. The following sections describe these procedures.
1. Configuring a PPPoE Broadband Connection
Most DSL and some cable Internet providers use a connection scheme called Point-to-Point Protocol over Ethernet (PPPoE).
This technology works a lot like a standard dial-up connection, but the
“call” takes place through the DSL circuit or TV cable instead of over
a voice connection. Windows 7 has PPPoE software built in, but the
setup process varies from provider to provider; yours should give you
clear instructions.
If you perform the procedure manually, the steps should look like this:
1. | Open the Network and Sharing Center window by clicking Start, Control Panel, View Network Status and Tasks.
Note Some
ISPs give you a CD-ROM with installation software that does the next
setup procedure for you. I intensely dislike this practice: Who knows
what other software—including adware and “customer support”
spyware—they’re installing? Personally, I lie to them, tell them I’m
installing the connection on a Macintosh or Linux computer that can’t
use their software, and ask for the information needed to perform the
setup manually. Sometimes this works, and sometimes it makes life
difficult. For instance, one major ISP I’ve worked with requires you to
set up the service account through a special website, so if you want to
shun its software, you need Internet access to set up your Internet
access. |
|
2. | Click
Set Up a New Connection or Network. Select Connect to the Internet and
click Next. If Windows says you are already connected to the Internet,
click Set Up a New Connection Anyway. If Windows asks, “Do you want to
use a connection that you already have?,” click No, Create A New
Connection.
|
3. | Select Broadband (PPPoE).
|
4. | Enter
the username and password assigned by your ISP. You might want to check
Show Characters before you enter the password, to make sure you enter
it correctly.
|
5. | In
most cases, you will want to let anyone who uses your computer use your
Internet connection. To make this easy, check both Remember This
Password and Allow Other People to Use This Connection.
|
6. | Enter your ISP’s name and click Connect.
|
At
this point, you’re prompted to sign on. Surprisingly, the procedure for
signing on and off is exactly the same as for dial-up Internet service.
2. Setting Up Dynamic IP Addressing (DHCP)
In
most cases, your ISP will use the DHCP protocol to configure client
network adapters. This is the default setting for all new network
adapters.
Some ISPs require you to give them the MAC address
of your network adapter. This is an identification number built into
the hardware that uniquely identifies your particular network adapter.
To find this number, follow these steps:
1. | Open a Command Prompt window by clicking Start, All Programs, Accessories, Command Prompt.
|
2. | Type ipconfig /all and press Enter.
|
3. | You
might need to scroll back, but find the title that reads something
similar to Ethernet Adapter Local Area Connection. Look for the name of
the adapter that goes to your broadband modem. This might be Local Area
Connection 2, if you’ve installed an extra adapter. Ignore any entries
that mention the word Miniport. If you have multiple adapters and can’t
tell which is which, unplug the network cable from all but the one that
goes to the modem and type the command again.
|
4. | Find
the line titled Physical Address. It will be followed by six pairs of
numbers and letters, as in 00-03-FF-B9-0E-14. This is the information
to give to your ISP.
|
Alternatively,
you might be instructed to set your computer’s name to a name that your
ISP provides. To do this, follow these steps:
1. | Log on using an Administrator account. Click Start, right-click Computer, and select Properties.
|
2. | Under Computer Name, Domain, and Workgroup Setting, click Change Settings. On the Computer Name tab, click the Change button.
|
3. | Enter the computer name as supplied by your ISP, as shown in Figure 1.
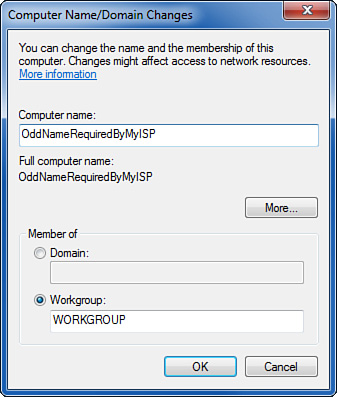
|
4. | Click More and enter the domain name specified by your ISP, as shown in Figure 2.
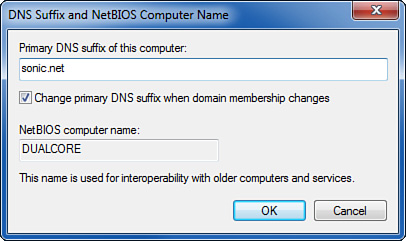
|
When
you close all these dialog boxes by clicking OK, you need to let
Windows restart. When it restarts, your Internet connection should be
up and running.