CONVERT volume /FS:NTFS [/V] [/CvtArea:filename] [/NoSecurity] [/X]
convert g: /FS:NTFS
2. Configuring Windows Home Server Backups
Before I cover the specifics of running backups, you
should configure the Windows Home Server backup settings to suit your
needs. In keeping with the overall simplicity of the backup feature,
there are only two things you can configure: the backup time and when
Windows Home Server performs Client Computer Backup Retention.
Configuring the Backup Time
When the backup time occurs, Windows Home Server does three things:
It backs up all the connected computers, one machine at a time.
If
you have automatic updates turned on, Windows Home Server installs any
pending updates and then restarts the system if an update requires a
reboot.
Every Sunday, Windows Home Server runs the Backup Cleanup
feature, which deletes old backups according to the schedule maintained
by the Client Computer Backup Retention policy (discussed in the next
section).
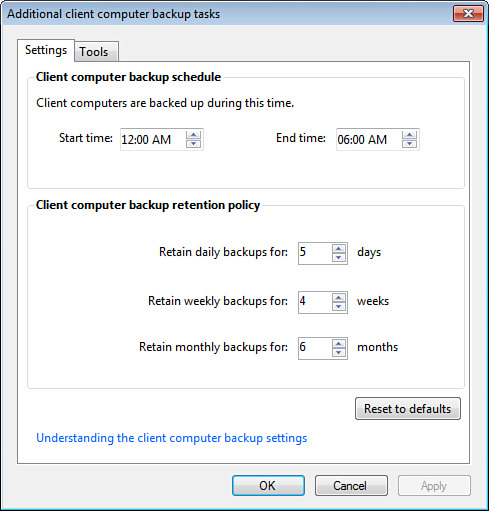
Windows Home Server’s default backup time runs from midnight to 6:00 a.m.
Note that if Windows Home Server hasn’t completed its
backups or maintenance by 6:00 a.m., it finishes whatever task it’s
currently running, and then it cancels the remaining operations and
reschedules them for the next backup period. If this is a problem on
your network, you might want to extend the backup time. Windows Home
Server supports backup periods as long as 23 hours (or as short as one
hour).
Here are the steps to configure Windows Home Server’s backup time:
1. | Log on to the Windows Home Server Dashboard.
|
2. | Click Computers and Backup.
|
3. | Click the Additional Client Computer Backup Tasks link to open the dialog box shown in Figure 1.

|
4. | Use the Start Time box to set the time you want Windows Home Server to begin its backup and maintenance period.
|
5. | Use the End Time box to set the time you want Windows Home Server to stop its backup and maintenance period.
Note
Make
sure the End Time value is at least one hour later and at least one
hour before the Start Time value. For example, if you leave the Start
Time at 12:00 a.m., the End Time can’t be earlier than 1:00 a.m. or
later than 11:00 p.m.
|
6. | Click OK to put the new settings into effect.
|
Configuring Client Computer Backup Retention
To avoid the unwelcome scenario of old backups
gradually usurping all your storage space, Windows Home Server regularly
deletes old backups. This Client Computer Backup Retention policy keeps
old backups under control by maintaining three deletion schedules:
The number of days to keep the first backup
of the day. (There is, by default, just one backup per day, but you can
also add backups by running them manually) The default value is five days.
The number of weeks to keep the first backup of the week. The default value is four weeks.
The number of months to keep the first backup of the month. The default value is six months.
The default values should be fine for most people,
but they could cause you to lose data in some relatively rare scenarios.
For example, suppose you create a document on Tuesday and
then permanently delete it (by pressing Shift+Delete to bypass the
Recycle Bin) on Wednesday. Assuming Tuesday wasn’t the first of the
month, the file will only reside in the daily backups (since it didn’t
make it into the first backup of the week on Monday). Windows Home
Server’s Client Computer Backup Retention will delete the Tuesday backup
on Sunday (because, by default, it only keeps five days’ worth of daily
backups), which means that if you suddenly yearn to have the file back
on Sunday (or later), you’re out of luck.
If you or your family members generate a lot of new
content, and if your Windows Home Server is swimming in storage space,
you might want to bump up the default values for extra safety. For
example, bumping up the value for the daily backup to 14, and the
monthly backup to 12, will make it less likely that you’ll lose
important information.
Caution
Even if you have tons of storage space on the server,
bumping up the number of saved backups can eat disk space in a hurry,
even with Single Instance Storage doing its duty. If you drastically
increase the number of saved backups, be diligent about keeping an eye
on how much space the backups are using. In the Windows Home Server
Dashboard, display the Storage Space tab, and check the PC Backups
value.
Follow these steps to configure Windows Home Server’s Client Computer Backup Retention Policy:
1. | Log on to the Windows Home Server Dashboard.
|
2. | Click Computers and Backup.
|
3. | Click the Additional Client Computer Backup Tasks link.
|
4. | In
the Client Computer Backup Retention Policy group, use the following
controls to set the number of backups you want to keep (see Figure 9.1, shown earlier):
- Retain Daily Backups For— Specify the number of days to keep the first backup of each day. The maximum number of days is 99.
- Retain Weekly Backups For— Specify the number of weeks to keep the first backup of the week. The maximum number of weeks is 99.
- Retain Monthly Backups For— Specify the number of months to keep the first backup of the month. The maximum number of months is 99.
|
5. | Click OK to put the new settings into effect. |