As soon as possible after you install Windows SBS 2011 on your server, you should begin addressing the items in the Getting started tasks
list on the Home page of the Windows SBS Console. Some of these tasks
link to wizards that help you to configure various server functions,
while others display help files that provide useful information about
administering your server and your network.
The following sections describe the functions of the various tasks in the list. As you finish each task, select its Completed check box to keep track of your progress.
1. Using the Windows SBS Console
For administrators working with Windows SBS for the
first time, it is a good idea to become familiar with the management
tools supplied with Windows SBS 2011, especially the Windows SBS
Console. Clicking the Using the Windows SBS console
link on the Home page opens a Help window that describes the basic
capabilities of the Windows SBS and provides links to more detailed help
pages on specific subjects.
Some of the other entries in the Getting started tasks list link to help files as well, including How can users access computers on the network? and How can I add a shared printer to the network?
Note:
MORE INFO If you migrated your server running Windows SBS 2011 from an earlier version of Windows SBS, an additional Migrate to Windows SBS task appears in the Getting started tasks list.
2. Connecting to the Internet
The Connect To The Internet Wizard is an important part of the Windows SBS 2011 setup process; many of the other wizards in the Getting started tasks
list cannot run until you complete it. If you installed your server
running Windows SBS 2011 before setting up an Internet access router on
your network, this wizard detects the router and configures the server
to use it for Internet access. The wizard also configures the DHCP
Server service on the computer to supply Internet Protocol (IP)
addresses and other Transmission Control Protocol/Internet Protocol
(TCP/IP) configuration settings to the client workstations that you will
be connecting to the network.
Tip:
You should run the Connect To The Internet Wizard
again if you ever install a new router on your network or reconfigure
your router to use a different IP address. You can access the wizard
from the Home page of the Windows SBS Console or by switching to the
Network page, selecting the Connectivity tab, and, in the Tasks pane, clicking Connect to the Internet.
To complete the Connect To The Internet Wizard, set
up your router on the network according to the manufacturer’s
instructions and then use the following procedure:
Log
on to your server running Windows SBS 2011 using an account with
network Administrator privileges. The Windows SBS Console appears.
On the Home page of the Windows SBS Console, click Connect to the Internet. The Connect To The Internet Wizard appears, displaying the Before You Begin page.
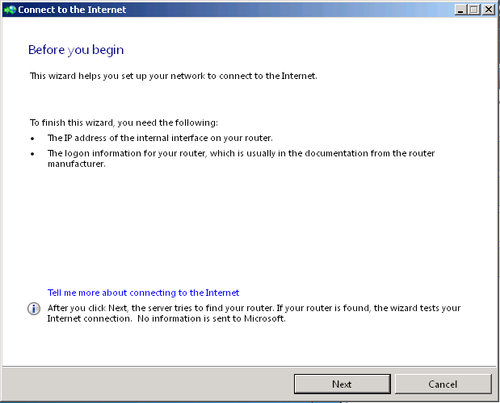
As noted on the Before
You Begin page, you should locate the IP address of your router’s
internal interface before you proceed with the wizard. Standalone router
devices usually have a web-based administration interface and a
factory-configured IP address that is specified in the product
documentation. To access the administration interface, you type that IP
address in a web browser and log in using the access password, also
specified in the product documentation.
Note:
MORE INFO TCP/IP routers, by definition, have two IP addresses because their function is to connect
two networks. The internal interface is the one connected to your
private network, for which the router uses an address in the designated
private IP address ranges. The external network interface is the one
connected to your Internet service provider’s (ISP’s) network, which
typically has a Dynamic Host Configuration Protocol (DHCP) server that
assigns an IP address to the router.
Click Next. The Detecting The Existing Network page appears.
The wizard attempts to detect a router on the network and access its settings. If the attempt is successful, the Detecting
The Router And Configuring Your Network page appears. This page
specifies the IP address of the router’s internal interface, which
becomes the Default Gateway address for all your network computers, and
the IP address that the wizard configures your server to use.
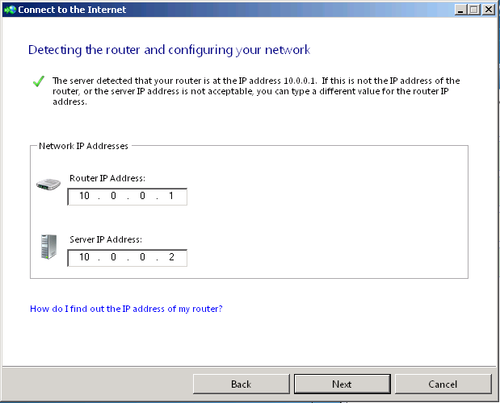
If there is a router on your network, and the wizard fails to detect it, the wizard leaves the Router IP address and server IP address text boxes blank. Click Cancel to exit the wizard, troubleshoot your router, and restart the wizard.
If the Router IP address and Server IP address values that appear on the page are correct, click Next. If the Router IP address and Server IP address fields are incorrect or blank, then troubleshoot your router (if necessary), supply the correct values, and click Next. The wizard configures your server, and the Your Network Is Now Connected To The Internet! page appears.
Click Finish. The wizard closes.
Note:
MORE INFO The
previous procedure assumes that you have a properly functioning router
connected to your network and configured to access the Internet.
The basic function of the Connect
To The Internet Wizard is to configure your server with an IP address
on the same network as your router, and a Default Gateway address that
is the same as the router’s IP address. This enables the server to
access the Internet through the router. In addition, the wizard
configures the DHCP Server service on the computer running Windows SBS.
The Windows SBS 2011 setup program installs the DHCP
Server role during the server installation whether a router is present
on the network or not, leaving the DHCP Server unconfigured and the
service stopped. The wizard configures the DHCP Server by starting the
service and creating a scope. In DHCP parlance, a scope is a range of IP addresses that the server can allocate dynamically to clients on the network as needed.
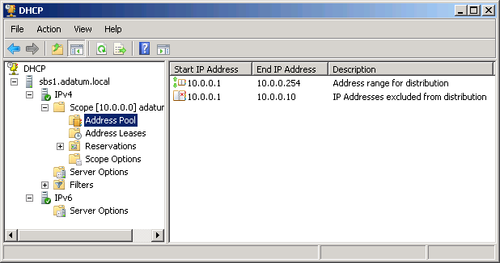
As you can see in the DHCP Console, shown in Figure 1, the wizard has created a scope consisting of the IP addresses from x.x.x.1 to x.x.x.254
on the network it detected from the router. The wizard has also created
an address exclusion for the scope, which prevents the service from
allocating the IP addresses from x.x.x.1 to x.x.x.10.
This exclusion range includes the address of the router, the Windows
SBS server address, and additional addresses for any other servers that
you might want to install on the network at a later time.
Note:
In Figure 4-4,
the DHCP scope is using the 192.168.2.0 network address because this
happens to be the private network address that the router uses. Your
router might use a different address, and the wizard configures the DHCP
scope accordingly.
In addition to the range of IP addresses and the
exclusion range, the wizard also configures the DHCP scope with scope
options, as shown in Figure 2. Scope options are additional TCP/IP configuration settings that the DHCP server delivers to clients along with an IP address.
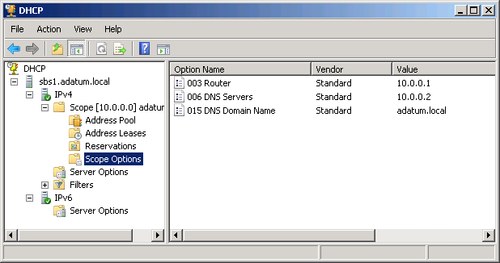
The scope options that the wizard configures are as follows:
003 Router Specifies the IP address of the router, which the client should use for its Default Gateway address
006 DNS servers
Specifies the IP address of the server running Windows SBS 2011, which
functions as a DNS server and which the client should use for its
Preferred DNS Server address
015 DNS Domain name Specifies the name of the internal domain that you created during the Windows SBS 2011 installation
If the wizard fails to detect a router on the network, you can still specify values for the Router IP address and Server IP address
fields. After you confirm that you want the server configuration
process to continue, the wizard configures the TCP/IP and DHCP Server
settings just as if a router were present and then displays pages that
help you to configure your router for Internet access.
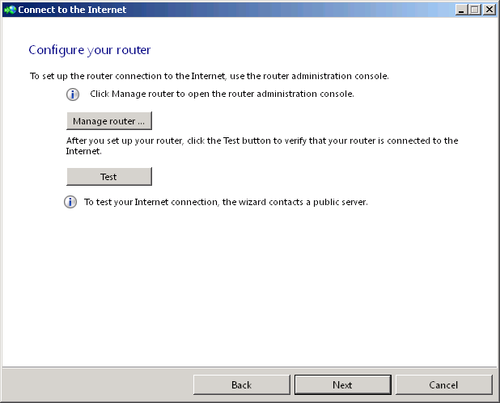
The Configure Your Router page, shown in Figure 3,
enables you to connect to your router’s administration console so that
you can manually configure it and then test its Internet connectivity.
This function assumes that the router uses web-based configuration and
the standard port number (80) for its interface. If the router is
configured to use a nonstandard port number for the administrative
interface, you can connect to it with a web browser using a uniform
resource locator (URL) that specifies both an IP address and a port
number, as in the following example: http://10.0.0.1:4096.
If the router uses a different type of administrative interface,
consult the router manufacturer’s documentation to determine how to
access it.
Before you proceed with the other wizards in the Getting started tasks
list, you must complete this wizard successfully by connecting to the
Internet through a router on your network. The Windows SBS Console does
not permit the other wizards requiring Internet access to launch until
the Connect To The Internet Wizard succeeds.
3. Customer Feedback Options
Selecting the Customer feedback options link causes a Customer
Experience Improvement Program dialog box to appear, which asks if you
want to allow Windows SBS to send information about your system hardware
and usage trends anonymously to Microsoft for analysis.