1. The Windows 7 Screen
Before
getting to the specifics of working with Windows 7, take a few seconds
to familiarize yourself with the basic screen elements, including the
desktop, the Start button, the taskbar, and the notification area. You
will interact with these screen elements throughout your Windows 7
career, so getting familiar with them early on will help you in the long
run.
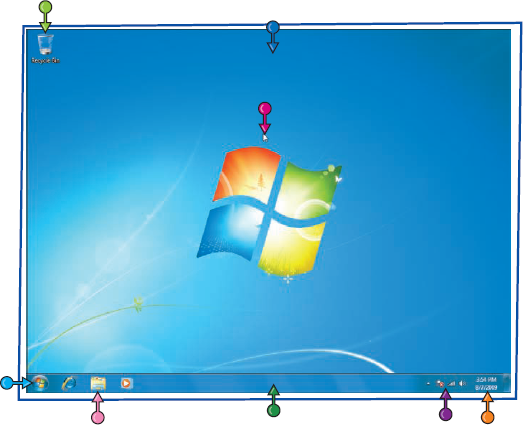
Desktop Icon
An icon on the desktop
represents a program, a Windows 7 feature, or a document. A program you
install often adds its own icon on the desktop.
Mouse Pointer
When you move your mouse, this pointer moves along with it.
Desktop
This is the Windows 7 "work area," meaning that it is where you work with your programs and documents.
Time and Date
This is the current time and
date on your computer. To see the full date, position the mouse over the
time. To change the date or time, click the time.
Notification Area
This area displays small
icons that notify you about things that are happening on your computer.
For example, you see notifications if your printer runs out of paper or
if an update to Windows 7 is available over the Internet.
Taskbar
The programs you have open
appear in the taskbar. You use this area to switch between programs if
you have more than one running at a time.

Start Button
You use this button to start programs and launch many of Windows 7's features.
Taskbar Icons
You use these icons to launch some Windows 7 features with just a mouse click.
2. Using a Mouse with Windows 7
Windows
7 was built with the mouse in mind, so it pays to learn the basic mouse
techniques early on because you will use them for as long as you use
Windows. These techniques include clicking the mouse, double-clicking,
right-clicking, and clicking-and-dragging.
If
you have never used a mouse before, remember to keep all your movements
slow and deliberate, and practice the techniques in this section as
much as you can.
Using a Mouse with Windows 7
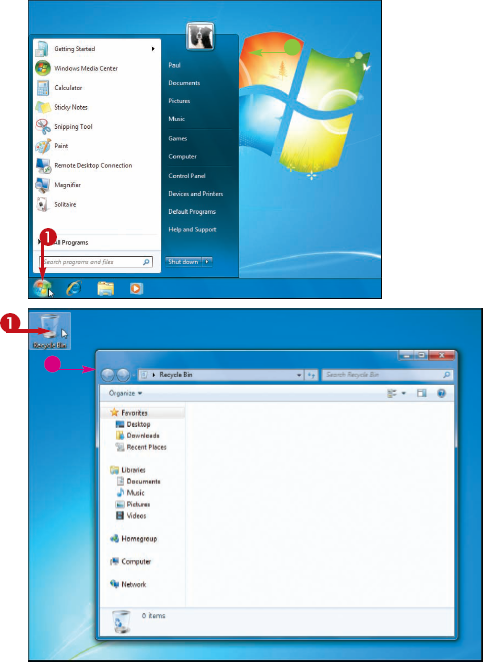
click the mouse
1 Position the mouse  over the object you want to work with.
2 Click the left mouse button.
• Depending on the
object, Windows 7 either selects the object or performs some operation
in response to the click (such as displaying the Start menu).
Double-click the mouse
1 Position the mouse over the object you want to work with.
2 Click the left mouse button twice in quick succession.
• Windows 7 usually performs some operation in response to the double-click action (such as displaying the Recycle Bin window).

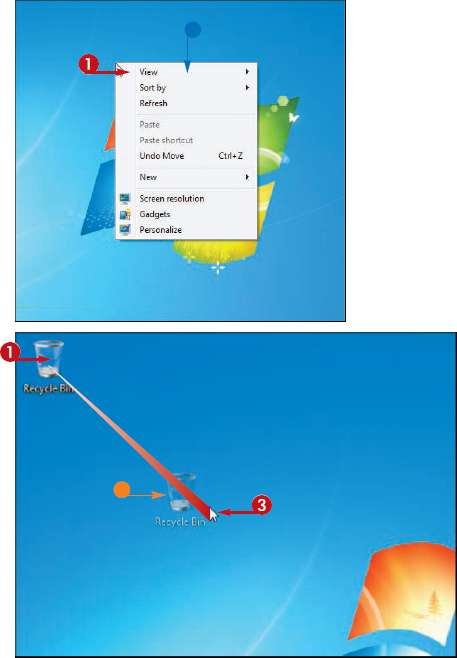
Right-click the mouse
1 Position the mouse  over the object you want to work with.
2 Click the right mouse button.
• Windows 7 displays a shortcut menu when you right-click something.
NOTE
The contents of the shortcut menu depend on the object you right-clicked.
CLICK AND DRAG THE MOUSE
1 Position the mouse  over the object you want to work with.
2 Click and hold the left mouse button.
3 Move the mouse to drag the selected object
• In most cases, the object moves along with the mouse  .
.
4 Release the mouse button when the selected object is repositioned.

Why does Windows 7 sometimes not recognize my double-clicks?
Try to double-click as
quickly as you can, and be sure not to move the mouse between clicks. If
you continue to have trouble, click Start, Control Panel, Hardware and Sound, and then Mouse to open the Mouse Properties dialog box. Click the Buttons tab. In the Double-click Speed group, click and drag the slider tothe left (toward Slow).
How can I set up my mouse for a left-hander?
Click Start, Control Panel, Hardware and Sound, and then Mouse to open the Mouse Properties dialog box. Click the Buttons tab. Click Switch primary and secondary buttons ( changes to
  ).
).