1. Special View Modes
Other types of views are found in CorelDRAW.
In addition to viewing quality and resolution, you might have the need
to change the page order in a multi-page document for a tidier
presentation. Hey, you could certainly do with a preview setting that
eliminates the workspace and puts the focus on your artwork!
The following sections explore these features, how to
work with them, and how to provide views of your work you might not
even have considered. You’re going to love this stuff.
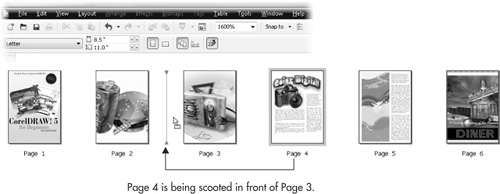
Page Sorter View
CorelDRAW Page Sorter view
becomes available as a special view mode when your document has at
least one page; two or more pages will be more useful, because it’s
silly to try to sort one page (and impossible if you have less than one
page). To go into Page Sorter View mode, choose View | Page Sorter View.
While viewing a document in the Page Sorter, you can browse several
pages at one time and manage their properties as a collection instead of
thumbing through single pages. While you’re using this view, your pages
and all their contents are displayed in miniature, but no other view in
CorelDRAW can show you a complete document page flow and offer you the
chance to reorder pages and their properties in one fell swoop. The Pick
tool is the only available tool in this view, and the property bar
displays several options unique to this document view. You can reorder
pages by dragging them to different locations in the current order, or
right-click specific pages to rename, insert, and delete them (see Figure 1).
Full-Screen Preview
To fill the entire screen with a view of your current
document page at the current zoom level, use View | Full-Screen
Preview, or press the F9 shortcut key. This view hides all of the
CorelDRAW interface—including your cursor—and shows only the current
view rendered in Enhanced view mode (the Full-Screen Preview default
view). To return your view to Normal, press any key or click either
mouse button.
Note
Depending on any desktop utilities you might have installed, there might be a conflict between the F9 shortcut
to get to Full-Screen Preview and something such as a desktop calendar
or local weather applet. You can use a number of remedies: you can
define a different keyboard shortcut, use the View menu or the pop-up
menu instead of a keyboard shortcut, or remove the desktop utility that
probably doesn’t tell you the correct weather in Kazakhstan anyway.
While
you’re using Full-Screen Preview, the view mode and page border view
appearance is set according to preferences in the Options dialog. To
access these options, choose Tools | Options (CTRL+J)
and click Display under the Workspace category on the left side of the
dialog to access the Display options. Full-Screen Preview options,
located in the lower part of the dialog, let you choose either draft or
enhanced (the default) view as the view mode, and either show or hide
the page border.
Previewing Selected Only
The Preview Selected Only command, available
from the View menu, lets you preview only what’s selected on the page
before entering this mode. This option works using the Full-Screen
Preview preferences and takes a toggle state either On or Off when
selected. There are two caveats to using this command: if no objects are
selected, the Full-Screen Preview offers a nice, energy-wasting white
blank screen; you’ll also get similar all-white views if the selected
object is not in view before entering this mode. The result you get with
Preview Selected Only depends entirely on what’s framed in the document
window at what viewing resolution you have defined before using the
command.
2. Using the View Navigator
The View Navigator is a pop-up viewer that is
indispensable for navigating your entire document page when you’ve
zoomed in to 10,000 percent and need to quickly move to a different
design area without zooming out to get your bearings. The View Navigator
pop-up window is at the point where the vertical and horizontal scroll
bars meet at the lower-right corner of the document window. To open the
View Navigator pop-up, click-hold the button, the magnifying glass icon.
Click-holding the icon
displays a pop-up thumbnail that represents the outermost region of the
page and the application’s desktop. The preview frame—the tiny rectangle
with the crosshairs through it—within the View Navigator window
indicates the viewing limitations according to your current Zoom
settings. Click-drag within the View Navigator pop-up window to pan
around your drawing in the document window; it’s panning by proxy. As
you drag, releasing the mouse button ends the navigation.
In Figure 2
you can see the View Navigator put to the test. Let’s say you need to
view or edit one of the gumballs in the machine. At 100 percent viewing
resolution this would be a true hassle; luckily, by zooming in, it’s
easy to see the gumballs to such a detailed extent that you could wipe
the foolish grin off the center one with the Shape tool, simply by
homing in on this roguish piece of candy by panning the window using the
View Navigator.