IT tutorials
 
Office
 

Microsoft PowerPoint 2010 : Preparing a Slide Show - Setting Up a Slide Show

- Free product key for windows 10
- Free Product Key for Microsoft office 365
- Product Key Free : Microsoft Office 2019 – Serial Number
4/22/2014 9:40:51 PM
PowerPoint offers several types of slide shows appropriate for a variety of presentation situations, from a traditional big-screen slide show to a show that runs automatically on a computer screen at a conference kiosk. When you don’t want to show all of the slides in a PowerPoint presentation to a particular audience, you can specify a custom show or only a range of slides to show. You can also set show options to run continuously or without narration or animation, and change the pen or laser pointer (New!) color.

Set Up a Show

1. Click the Slide Show tab.

2. Click the Set Up Slide Show button.

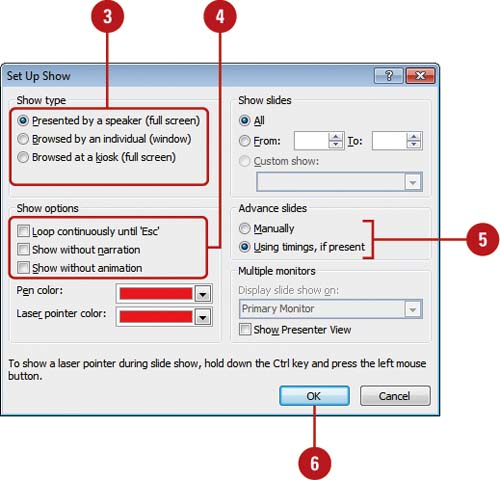
3. Choose the show type you want.

  • Click the Presented by a speaker option to run a full screen slide show.

  • Click the Browsed by an individual option to run a slide show in a window and allow access to some commands.

  • Click the Browsed at a kiosk option to create a self-running, unattended slide show.

4. Select or clear the following show options check boxes:

  • Loop continuously until ‘Esc’. Select to replay the slide show again until you stop it.

  • Show without narration. Select to not play narration.

  • Show without animation. Select to not play animation.

5. Select the Manually or Using timings, if present option.

6. Click OK.

7. Click the Resolution list arrow, and then click Use Current Resolution, or select a resolution.

8. If you have multiple monitors, click the Show Presentation On list arrow, and then select a monitor.

For Your Information: How Do You Choose a Screen Resolution?

The quality of a display system depends on its screen resolution, how many pixels it can display, and how many bits are used to represent each pixel. The screen resolution signifies the number of dots (pixels) on the entire screen. A higher screen resolution, such as 1024 by 768, makes items appear smaller, while a lower screen resolution, such as 640 by 480, makes items appear larger, which can help make a slide show easier to view.


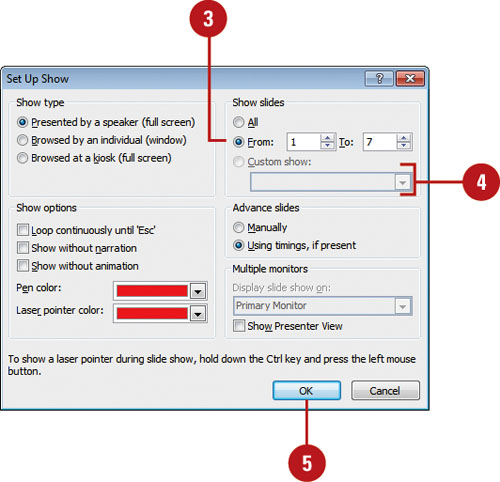
Show a Custom Show or Range of Slides

1. Click the Slide Show tab.

2. Click the Set Up Show button.

3. To show a range of slides, click the From option, and then enter the first and last slide numbers of the range you want to show.

4. To show a custom show, click the Custom Show option, and then select a custom show.

5. Click OK.

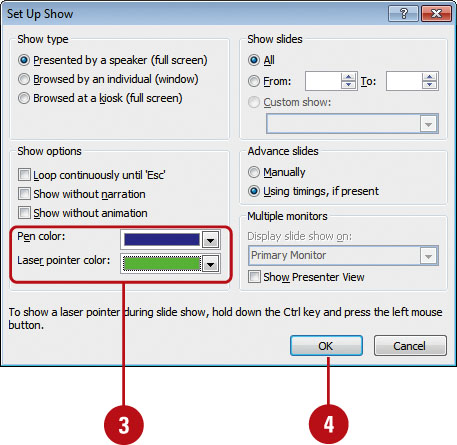
Set Pen and Laser Pointer Color

1. Click the Slide Show tab.
2. Click the Set Up Show button.

3. Click the Pen or Laster pointer color list arrow, and then select a color.

4. Click OK.

Did You Know?

You can turn your mouse into a laser pointer. In Slide Show view, hold down Ctrl, click the left mouse button, and then begin pointing (New!).
 
Others
 
- Microsoft PowerPoint 2010 : Preparing a Slide Show - Recording a Narration
- Microsoft PowerPoint 2010 : Preparing a Slide Show - Adding Slide Timings
- Microsoft PowerPoint 2010 : Preparing a Slide Show - Using the Animation Painter
- Microsoft PowerPoint 2010 : Preparing a Slide Show - Triggering Animations
- Microsoft OneNote 2010 : Inserting Documents and Files (part 3) - Inserting a Scanner Printout on a Page
- Microsoft OneNote 2010 : Inserting Documents and Files (part 2) - Inserting a File Printout on a Page
- Microsoft OneNote 2010 : Inserting Documents and Files (part 1) - Inserting a Copy of a File on a Page
- Microsoft OneNote 2010 : Working with Links (part 2) - Creating a Link from a Picture,Modifying a Link in Your Notes, Removing a Link from Your Notes
- Microsoft OneNote 2010 : Working with Links (part 1) - Creating a Link from Typed Text,Creating a Link from Selected Text
- Microsoft Access 2010 : Relating the Information in Your Database - Establishing Relationships in Access
 
 
Top 10
 
- Microsoft Visio 2013 : Adding Structure to Your Diagrams - Finding containers and lists in Visio (part 2) - Wireframes,Legends
- Microsoft Visio 2013 : Adding Structure to Your Diagrams - Finding containers and lists in Visio (part 1) - Swimlanes
- Microsoft Visio 2013 : Adding Structure to Your Diagrams - Formatting and sizing lists
- Microsoft Visio 2013 : Adding Structure to Your Diagrams - Adding shapes to lists
- Microsoft Visio 2013 : Adding Structure to Your Diagrams - Sizing containers
- Microsoft Access 2010 : Control Properties and Why to Use Them (part 3) - The Other Properties of a Control
- Microsoft Access 2010 : Control Properties and Why to Use Them (part 2) - The Data Properties of a Control
- Microsoft Access 2010 : Control Properties and Why to Use Them (part 1) - The Format Properties of a Control
- Microsoft Access 2010 : Form Properties and Why Should You Use Them - Working with the Properties Window
- Microsoft Visio 2013 : Using the Organization Chart Wizard with new data
Technology FAQ
- Is possible to just to use a wireless router to extend wireless access to wireless access points?
- Ruby - Insert Struct to MySql
- how to find my Symantec pcAnywhere serial number
- About direct X / Open GL issue
- How to determine eclipse version?
- What SAN cert Exchange 2010 for UM, OA?
- How do I populate a SQL Express table from Excel file?
- code for express check out with Paypal.
- Problem with Templated User Control
- ShellExecute SW_HIDE
programming4us programming4us