If you’re using OneNote to take notes just
for yourself, an important part of collecting information and doing
research is to keep track of where important information came from, in
case you later want or need to return to its source.
If you’re using OneNote to also share your notes,
information, and research with other people, pointing them to more
information (or to additional information that relates to it) becomes
just as important. In this section, you’ll learn how to create and use
links—sometimes also called hyperlinks—to achieve both goals.
You might have noticed that when you take screen
clippings from a web page by using the Insert Screen Clipping command
on the ribbon, OneNote automatically inserts into your notes a link
back to the source page where the screen clipping was taken (see Figure 1).
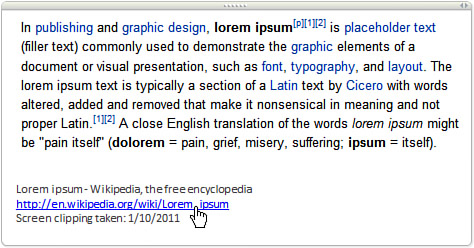
Automatic source links make it easy for you to
revisit the origins of an imported selection of text, a picture, or a
screen clipping again in the future—for example, when you want to check whether the original information has been updated or supplemented since you captured it.
Such automatically created links are easy enough to
deal with: You can keep and click them when you want or need to, you
can ignore them, or you can delete them when they’re no longer needed.
Now it’s time to learn how you can create and modify your own links from the text and pictures that make up your notes.
Creating a Link from Typed Text
While typing notes on a page in your notebook, you
can quickly and easily have OneNote create a hyperlink by including
certain parts of a link URL (short for uniform resource locator, better
known as a web address that you type into a web browser).
To create a link from typed text, follow these steps:
1. | Click anywhere on the page and begin typing the following sentence, followed by a space: For more information, visit
|
2. | After the space, type www.office.com.
As soon as you typed the prefix for World Wide Web, OneNote converted
the text to an underlined blue style, which is a universal indicator
for clickable text (also called hypertext, which is where the official
term hyperlink got its name).
|
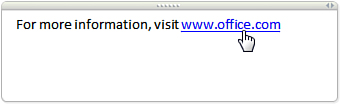
3. | When
you now move the mouse pointer over the blue underlined text of the web
address, the pointer changes to a hand icon, indicating you’re hovering
over a clickable link (see Figure 2). If you click the text, OneNote will launch your web browser and open the web page that the link points to.
|
|
The link prefix “www” (for World Wide Web) is a now
widely accepted short form for a full hyperlink URL, which OneNote also
recognizes. For example, you could have typed out the long form of the
web address (in this case, http://www.office.com) and OneNote would create the same clickable link to the Microsoft Office home page on the Internet.
OneNote recognizes other prefixes as well, such as
the “mailto:” prefix for creating clickable links that open an e-mail
form (for example, mailto: [email protected]) and the “ftp.” prefix for pointing to an FTP file exchange server (for example, ftp.microsoft.com).
For links that you want to create which OneNote does
not automatically recognize, you can create links from typed text that
you select. Proceed to the next procedure to learn how.
|
Creating a Link from Selected Text
To manually create links from text in your notes, you can use OneNote’s Link command. Follow these steps:
1. | In
your notes, select the text from which you want to create a link. If
the link will be from a single word, double-click the word to select
it. To select multiple words (for example, “Microsoft Office”), click
and drag a selection with the mouse over the words you want to format
as a link.
|
2. | When the text you want is selected, click the Insert tab on the ribbon. |
3. | In the Links group, click Link.
|
4. | In the Link dialog box, type the full website URL (for example, http://www.office.com) into the Address box and then click OK.
|
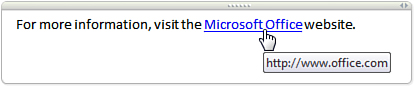
Unlike an automatic hyperlink, which exposes the web
address right in the text, links manually created from actual notes
text won’t reveal their destination unless you move the mouse pointer
over the link to reveal its URL in a ToolTip that appears (see Figure 3).
In most cases, links embedded in actual
notes text are more useful because such links have immediate context
and make your notes more readable than if a bunch of geeky URLs appear
littered throughout your notes. This might not be an issue for you
personally, but it’s something to consider when you share your notes
with other people.