IT tutorials
 
Office
 

Developing Custom Microsoft Visio 2010 Solutions : Creating SmartShapes with the ShapeSheet (part 6) - Adding Right-Click Actions to the SmartShape

- Free product key for windows 10
- Free Product Key for Microsoft office 365
- Product Key Free : Microsoft Office 2019 – Serial Number
4/17/2014 1:54:09 AM

Adding Right-Click Actions to the SmartShape

The notes shape is still missing the two right-click actions : one to open a Shape Data dialog and one to call some custom code. You can set up both of them now and then transition into the section about VBA programming to make the second item actually work.

Adding Actions Using the ShapeSheet
1.
Open the ShapeSheet for the notes shape.

2.
Insert an Actions section and make sure it has two rows in it. This is similar to the procedure for adding user-defined cells. Action rows are used to add custom right-click menu items to a shape’s context menu.

3.
Name the first action row Properties and the second one CreateNewNote.

4.
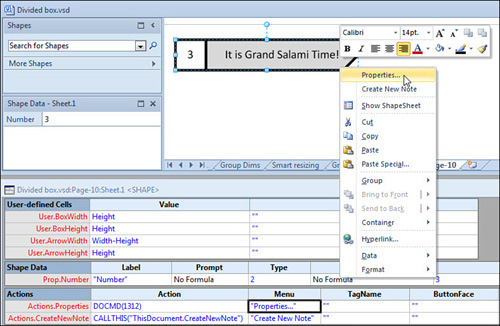
Set the Action and Menu cells for the rows as follows:

Actions.Properties.Action = DOCMD(1312)
Actions.Properties.Menu = "Properties..."
Actions.CreateNewNote.Action =
CALLTHIS("ThisDocument.CreateNewNote")
Actions. CreateNewNote.Menu = "Create New Note"

The Menu cells expect strings. If you have trouble, make sure there are double quotation marks on both sides of the text. Whatever you type in the Menu cell will show in the right-click menu.

The Action cell does the actual work. Actions can be performed in a number of ways such as setting ShapeSheet formulas, calling Visio functions, or invoking macros or add-on code. The first action uses the DOCMD ShapeSheet formula to call command 1312. This is the command id for showing the Shape Data pop-up window. The second Action uses the CALLTHIS function to access a VBA macro that you will write later on.

Figure 10 shows how the Actions section for the notes shape should look.

Figure 10. Actions defined in the ShapeSheet appear when right-clicking the shape.

5.
Close the ShapeSheet and then right-click the modified shape and choose Properties. A pop-up version of the Shape Data window should appear. Here, you can edit the Number field.

6.
If you choose Create New Note from the right-click menu, nothing happens. This action calls macro code that you create in the next section.

That wraps up the ShapeSheet portion of this project, and you’ve achieved quite a lot! You’ve created a smart-sizing arrow. You grouped the arrow with the number box and created resizing smarts that keep the box square, and the arrow using the remaining space. You linked the box’s text to a Shape Data field in the group, and you configured the notes text so that it is nicely aligned within the arrow. To top it all off, you added custom right-click actions that show Shape Data and call VBA macros. Phew! Now it’s time to write that macro, and then discuss ways to deploy your SmartShape in a stencil with a template.

 
Others
 
- Developing Custom Microsoft Visio 2010 Solutions : Creating SmartShapes with the ShapeSheet (part 5) - Modifying the Text Block Using the ShapeSheet
- Developing Custom Microsoft Visio 2010 Solutions : Creating SmartShapes with the ShapeSheet (part 4) - Linking Subshape Text to Shape Data Fields
- Developing Custom Microsoft Visio 2010 Solutions : Creating SmartShapes with the ShapeSheet (part 3) - Controlling Grouped Shapes with the ShapeSheet
- Developing Custom Microsoft Visio 2010 Solutions : Creating SmartShapes with the ShapeSheet (part 2) - Creating Smart Geometry in the ShapeSheet
- Developing Custom Microsoft Visio 2010 Solutions : Creating SmartShapes with the ShapeSheet (part 1) - Introducing the ShapeSheet
- Developing Custom Microsoft Visio 2010 Solutions : Introducing the Notes Shape, Using the Developer Ribbon Tab
- Microsoft Excel 2010 : Working with Graphics - Inserting Clip Art, Inserting a Picture from File
- Microsoft Excel 2010 : Working with Graphics - Using Drawing Tools
- Microsoft Excel 2010 : Automating Repetitive Tasks by Using Macros - Running Macros When a Workbook Is Opened
- Microsoft Excel 2010 : Automating Repetitive Tasks by Using Macros - Running Macros When a Button Is Clicked
 
 
Top 10
 
- Microsoft Visio 2013 : Adding Structure to Your Diagrams - Finding containers and lists in Visio (part 2) - Wireframes,Legends
- Microsoft Visio 2013 : Adding Structure to Your Diagrams - Finding containers and lists in Visio (part 1) - Swimlanes
- Microsoft Visio 2013 : Adding Structure to Your Diagrams - Formatting and sizing lists
- Microsoft Visio 2013 : Adding Structure to Your Diagrams - Adding shapes to lists
- Microsoft Visio 2013 : Adding Structure to Your Diagrams - Sizing containers
- Microsoft Access 2010 : Control Properties and Why to Use Them (part 3) - The Other Properties of a Control
- Microsoft Access 2010 : Control Properties and Why to Use Them (part 2) - The Data Properties of a Control
- Microsoft Access 2010 : Control Properties and Why to Use Them (part 1) - The Format Properties of a Control
- Microsoft Access 2010 : Form Properties and Why Should You Use Them - Working with the Properties Window
- Microsoft Visio 2013 : Using the Organization Chart Wizard with new data
Technology FAQ
- Is possible to just to use a wireless router to extend wireless access to wireless access points?
- Ruby - Insert Struct to MySql
- how to find my Symantec pcAnywhere serial number
- About direct X / Open GL issue
- How to determine eclipse version?
- What SAN cert Exchange 2010 for UM, OA?
- How do I populate a SQL Express table from Excel file?
- code for express check out with Paypal.
- Problem with Templated User Control
- ShellExecute SW_HIDE
programming4us programming4us