Understanding Visio’s Coordinate System
The coordinates for shapes and pages are the same as
you learned in algebra and geometry, namely Cartesian coordinates. The
origin is at the lower-left of a shape or page; positive directions are
to the right and up.
The Pin of a shape is the same as the rotation point
that you see when you mouse over the “lollipop” handle above a shape.
In the ShapeSheet, you have seen four cells that define that pin: PinX,
PinY, LocPinX and LocPinY cells.
Imagine pinning a note to the wall. The location of
the hole made in the wall is defined by PinX and PinY, relative to the
lower-left corner of the wall. The location of the hole in the note is
defined by the LocPinX and LocPinY. These are relative to the
lower-left corner of the note. In this analogy, the wall is the page,
and the note is the shape.
Shape developers talk about “local” coordinates and
“parent” coordinates. For a shape, LocPinX, LocPinY and Geometry
coordinates are local to the shape. PinX, PinY and Angle are relative
to the parent: the page, or a containing group.
Budding shape developers are often tripped up by the
difference between local and parent coordinates, especially when
working with subshapes inside a group.
Controlling Grouped Shapes with the ShapeSheet
You’ve just seen how to smarten the geometry points of a single shape. Next, you try smartening the subshapes within a group.
There are numerous reasons to create grouped shapes.
If you need multiple text blocks in a shape, or if you need different
line or fill colors and styles, you need to group shapes together.
Grouping shapes can also simplify programming by isolating different
behaviors in separate subshapes, as you see shortly.
Be warned that once you start adding ShapeSheet
smarts to a group and its member shapes, ungrouping becomes very
destructive. If you need to alter parts of your group, be sure to
subselect the appropriate shapes, or open the group window by
right-clicking and choosing Group, Open Group. Ungrouping can blow away
a lot of your ShapeSheet work, so don’t do it!
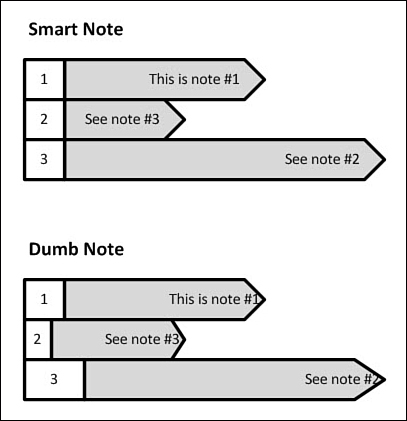
In the next example, you incorporate your pointy box
into a well-behaved notes shape. The arrow is grouped together with a
number for easy identification. The entire shape exhibits behavior
similar to the arrowhead in that the number box doesn’t change when you
stretch the whole shape. Figure 6 contrasts the way the smartened shape resizes with an unsmart box grouped with the arrow.
Creating Smart Resizing with Grouped Shapes
1. | Drop a copy of the previously created pointy box on a fresh, empty page.
|
2. | Draw
a square to the left of the arrow using the Rectangle tool, so you have
the basis of the notes shape shown in the top shapes of Figure 6.
|
3. | Select
the rectangle and pointy box, then group them together. Pressing Ctrl+G
is the fastest way to do this, but notice the Developer tab has a
dedicated Group button in the Shape Design group.
|
4. | Select
the new group and click the Shape Name button in the Shape Design group
on the Developer tab. In the pop-up, you should see that the shape has
an ID of 3 and that its name is Sheet.3.
|
5. | Subselect
each shape in the group and repeat the preceding step. The box on the
left should be named Sheet.2, and the arrow should be Sheet.1. If your
ids are different, be sure to note which id is for the square and which
is for the pointy box. Shape IDs generally reflect the order in which
the shapes were created on the page. The sheet notation is useful when
you’re referencing ShapeSheet cells in other shapes.
|
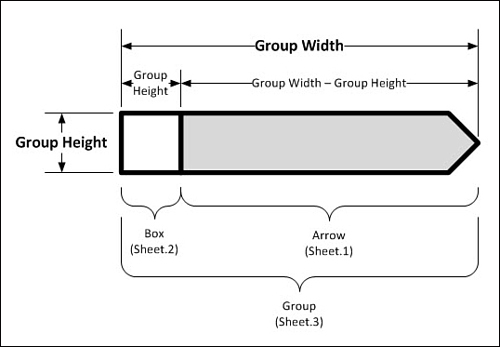
6. | Before you add smarts to the shape, let’s agree on terminology. Figure 7
gives names and shows the conceptual dimensions for each part of the
shape, and shows the sheet IDs for each part as well. I will refer to
the pieces as Group, Box, and Arrow for the rest of this example, and
they will have IDs 3, 2, and 1, respectively. If your shapes have
different IDs, you might have to translate some of the IDs in the
following steps.
|
7. | Open the ShapeSheet for the group.
|
8. | To
control the size of the subshapes, it is convenient to add parameters
at the group level. This makes it easy to make changes without digging
into subshapes. Start by adding user-defined cells to the group. Unlike
Shape Data fields, user-defined cells are accessible via the ShapeSheet
only, so they remain invisible to end users. Think of them as data
fields for developers.
To add user cells, right-click anywhere in the ShapeSheet window and choose Insert Section.
|
9. | In
the Insert Section dialog, check User-Defined Cells. The User-defined
Cells section appears in the ShapeSheet, with one row named User.Row_1.
You can freely rename Row_1 to something more meaningful, but you can
only use numbers, letters and the underscore symbol.
|
10. | The
notes shape needs four user cells, so add three more. To add User rows,
right-click in any cell of Row_1 and choose Insert Row. You can quickly
repeat this action two more times by pressing F4.
|
11. | You
change the name of user cells in the same way that you edit cell
formulas. Change the names of your rows and enter formulas in the Value
column so that your User section looks like this:
User.BoxWidth = Height
User.BoxHeight = Height
User.ArrowWidth = Width - Height
User.ArrowHeight = Height
Note, you get “User.” for free, don’t type this when changing row
names! You have now defined the important size parameters for the
subshapes. |
12. | The
four parameters are currently calculating away in silent anonymity
because no other cells reference them. Let’s hook up the Box subshape
to the first two. Start by subselecting the Box and showing its
ShapeSheet.
|
13. | Enter these formulas in the Shape Transform section of the Box shape. Note what happens to the shape after each change:
Width = GUARD(Sheet.3!User.BoxWidth)
Height = GUARD(Sheet.3!User.BoxHeight)
LocPinX = GUARD(0)
LocPinY = GUARD(0)
PinX = GUARD(0)
PinY = GUARD(0)
The width and height of the box refer to the user-defined parameters stored in the group’s ShapeSheet. Note the cross-sheet referencing syntax for these two formulas: Sheet.ID + exclamation point + cell-name.
User-defined rows have two cells: Value and Prompt. The full names of
the cells are, for example: User.BoxWidth.Value and
User.BoxWidth.Prompt. Since the Value cell is the default, Visio lets
you use more compact notation and leaves “.Value” off, as we did in our
formulas above.
The pin is located at the center of a shape by default. You can reduce
calculation by moving it to the lower-left corner, which is point 0,0.
The formulas you just entered cause the LocPin to be in the lower-left
corner of the box, and its Pin to be in the lower-left corner of the
group. Zeros across the board! Note that this changes the rotation
point of the shape to the lower-left corner as well. But we won’t be
rotating the box, so this is just fine.
The GUARD function prevents users from accidentally moving the shapes
and breaking the smart formulas. It also tells Visio to preserve the
formulas when the shape is copied. |
14. | Now you’re ready to link the Arrow to the Group’s parameter cells. Subselect the Arrow shape and show its ShapeSheet.
|
15. | Enter these formulas in its Shape Transform section, as you did in the previous steps:
Width = GUARD(Sheet.3!User.ArrowWidth)
Height = GUARD(Sheet.3!User.ArrowHeight)
LocPinX = GUARD(Width)
LocPinY = GUARD(0)
PinX = GUARD(Sheet.3!Width)
PinY = GUARD(0)
Similar to what you did with the Box, these formulas simplify the
positioning calculations by moving the LocPin to an edge—this time to
the lower-right corner of the arrow and of the group.
If you resize your group, the Box should stay square, the point of the
Arrow should maintain its shape, and there should be no gaps between
the two subshapes. |
16. | Be sure to save your file as you work. While the notes shape is now much smarter, you’re still not done with it! |