1. | Start a new blank drawing, and draw a simple rectangle on the page.
|
2. | Show
the ShapeSheet for the rectangle. Select the rectangle, go to the
Developer tab and click the Show ShapeSheet button in the Shape Design
group. Note that this button has a drop-down list that lets you choose
from shape, page, or document, so pages and documents have ShapeSheets,
too.
|
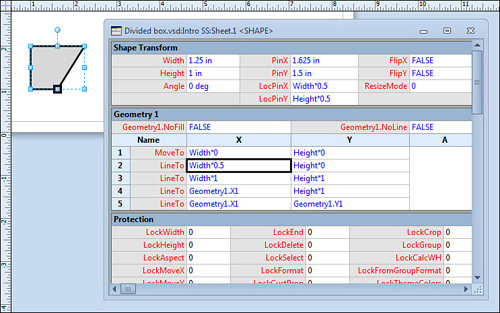
3. | You see a ShapeSheet window similar to the one in Figure 1. Note that the ShapeSheet Tools contextual tab appears.
|
4. | Switch
between formulas and values by clicking the two leftmost buttons in the
ShapeSheet Tools tab on the Ribbon. Note how the cells in the
ShapeSheet window change between number-and-units such as “4 in.” and
formulas such as “Width*0.5” (F5 also toggles formulas and values.)
|
5. | Right-click
anywhere in the ShapeSheet window and choose View Sections. A list of
mysterious-sounding ShapeSheet sections appears. By default, all
sections are checked to be visible. However, if you can’t find a
section you are looking for later on, be sure to visit View Sections to
see if the section has been hidden.
|
6. | Resize the ShapeSheet window so that you can see your rectangle and the ShapeSheet at the same time (View, Window, Arrange All).
|
7. | Enter
different numbers for Width, Height, Angle, PinX, and PinY and watch
what happens to your shape. PinX and PinY specify the horizontal and
vertical positions of your shape on the page. You can enter different
measurement units along with your values, such as 1.25cm, 3.04m, 72pt, and so on.
|
8. | Make
sure that the ShapeSheet is displaying values and then resize, move,
and rotate the shape in the drawing window. Notice what happens to
values in the Shape Transform section of the ShapeSheet. What you do in
the drawing window shows in the ShapeSheet, and what you do in the
ShapeSheet shows in the drawing window.
|
9. | Switch
to view formulas. Note that all the Geometry formulas are expressed as
percentages of width and height. There is no requirement for this, but
it is the default.
|
10. | In the Geometry 1 section, click in the X2 cell, where it says “Width*1.0.”
|
11. | Change the formula to Width*0.5.
You can either type in an entire formula or edit the existing one. To
get into formula editing mode, double-click a cell, or select a cell
and press the F2 key. When you finish changing the formula, press
Enter. Your shape and ShapeSheet should look similar to Figure 3.
|
12. | Notice that Geometry1.X1 and Geometry1.X4 both have the same x-location.
They are on the left side of the shape and have the X formula
“Width*0.” You can reference one cell from another, similar to the way
you do in Excel. Because both cells have the same location, practice
creating a reference.
|
13. | To
create a cell-to-cell reference, click on the Geometry1.X4 cell. Press
the equal key; then click on the Geometry1.X1 cell. You should see
“=Geometry1.X1” in the X4 cell. Press Enter to finish the formula. Your
shape should not visually change, but your ShapeSheet should look
exactly like Figure 3.
This is also a great way to find out the name of any cell in the
ShapeSheet. Select any cell, type “=”, then click another cell. You
will see the name of the target cell in the source cell. Press Esc to
cancel the editing and leave the source cell unchanged.
|
14. | You
can add points to your shape from the ShapeSheet. You want to create a
pointed box, so you need one more point. This coincides with one more
row in the Geometry section.
|
15. | Insert
a new point just after point 2 in Geometry1. Click on the X or Y cell
in row 2. Right-click and choose Insert Row After. A new row appears,
Geometry1 now has six rows.
|
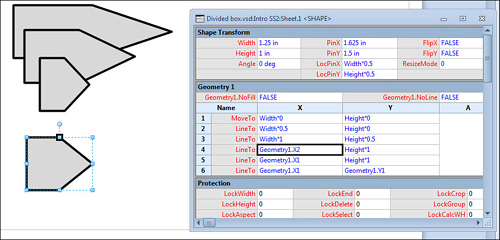
16. | Change the X formula of Geometry1.X3 to Width*1.0.
|
17. | Make a reference from Geometry1.X4 to Geometry1.X2 so that Geometry1.X4 = Geometry1.X2. Figure 4 shows how your shape and its ShapeSheet should appear.
|
18. | Notice
that points 2 and 4 control the shape of your arrowhead. They are at
the midpoint of the shape, so the head becomes longer when you stretch
the shape, as shown in Figure 4.
You really want the head to maintain a constant sharpness, regardless
of the shape’s length. This means that points 2 and 4 need to be a
fixed distance from the right side.
|
19. | To make the point a fixed size, change the formula in Geometry1.X2 to =Width − 0.25in.
Notice that both the top and bottom head points move. The reason is
that X4 references X2. Now, if you resize the shape, the point retains
a consistent sharpness. You have just replaced a proportional formula
with a parameterized, fixed-offset formula.
|
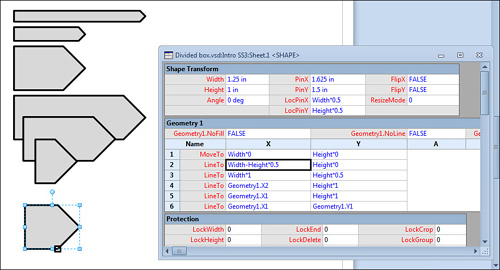
20. | Notice
that if you make the height of your arrow shorter or taller, the point
gets sharper or duller. The arrow still needs to be smarter. You can do
this by making the length of the head a function of the height of the
shape. Change Geometry1.X2’s formula to =Width-Height*0.5. Figure 5 shows the final ShapeSheet, along with examples of the shape with various widths and heights.
|
21. | Save your document . |