4. Resetting a Baseline
At any time, you can reset the baseline. When you do
this, the old baseline values disappear and are replaced with whatever
values are in your current Finish, Start, Duration, Work, and Cost
fields. The old baseline values are lost, unless you choose to save
multiple baselines.
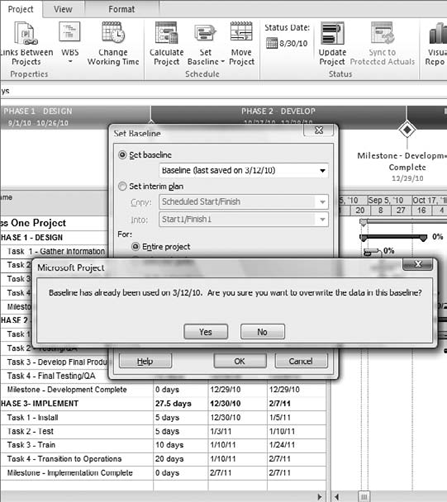
To reset the baseline, follow these steps (see Figure 5):
Select Project tab => Schedule group => Set Baseline => Set Baseline.
In
the Set Baseline dialog box, Set Baseline is selected by default (with
the date the baseline was last saved in parentheses). The For: Entire
Project option is also selected by default. Click OK.
A "Baseline has already been used" message appears. Click Yes.
The baseline has now been reset. A new date is now
associated with the baseline and will appear in the Set Baseline field
in the Set Baseline dialog box the next time you access it.
5. Multiple Baselines
You can keep multiple baselines for a project.
Project allows you to maintain up to 10 baselines plus the core
baseline. This comes in handy when you have a major change in
scope—enough to warrant a baseline reset (a change significant enough
to change the original agreement or intent of the project deliverables).
Another common occurrence is project
reprioritization. Perhaps you started your project, but part way
through, it was put on hold and pushed out to the future. When this
occurs, and you restart the project, it may be necessary to reset the
baseline. Instead of erasing the original baseline, you can save it to
another of the baseline options.
|
I recommend that you save an interim baseline into
baselines 1, 2, 3, and so on before you reset your baseline. This
allows you to keep the core (or original) baseline as the current
baseline. This is important, because all the custom views, tables,
filters, and earned value formulas default to using the core baseline
values, not baseline 1 or baseline 2 or other baseline values.
|
To take advantage of the multiple-baseline option,
you should follow a two-step process: first, save an interim plan;
second, reset the core baseline. This way, your current baseline is
always in the core baseline values; you have backed-up baselines in the
baseline 1 through 10 values, depending on how many times you reset the
baseline.
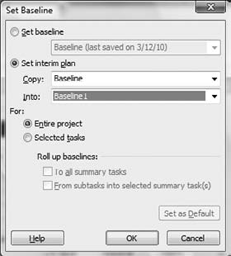
To save a backup or an interim baseline plan, follow these steps (see Figure 6):
Select Project tab => Schedule group => Set Baseline drop-down list => Set Interim Plan.
In the Set Baseline dialog box, select Baseline from the Copy drop-down list.
Select Baseline 1 from the Into drop-down list. (For the second backup, select Baseline 2, and so on.)
For: Entire Project is selected by default. Click OK.
You've now backed up, or saved, your core baseline
into the baseline 1 fields. You can repeat this process the next time
you want to reset the baseline, but copy it into baseline 2, and so on.
Saving an interim plan doesn't reset the baseline, nor does it change
the baseline data in the view you've applied.
After you save an interim baseline plan, you can
safely reset the baseline without losing the original baseline data,
because that information is stored in the baseline 1 fields. To reset
the baseline, follow the steps associated with Figure 6.
The Tracking Gantt view is formatted to display only
the core baseline values and not baseline 1 through baseline 10 values.
To view multiple baselines in the Gantt chart, select the
multiple-baselines view, shown in Figure 7, as follows:
Select View tab => Task Views group => Gantt Chart drop-down list => More Views.
In the More Views dialog box, click Multiple Baselines Gantt.
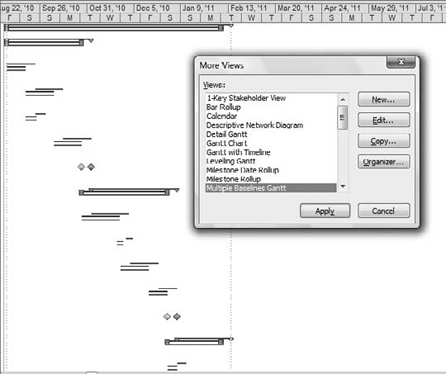
Each baseline is represented by a separate colored line in the Gantt chart, as shown in Figure 7.
You can add any of the baseline 1 through baseline 10 fields to any
table, create your own Variance fields using the other baseline fields,
or add other baseline bars in the Gantt bar area by reformatting the
bar styles.
If you set a baseline for manually scheduled tasks
that don't have start date, duration, or finish date information, and
the field is left blank, then the baseline information is blank as
well. In other words, the baseline fields are also manually adjustable.
However, the start and finish dates are internally recorded as the
current date. So, if you later enter dates for a manually scheduled
task, you still get a calculated variance. You can also manually enter
different baseline information, and Project uses that to calculate
variance. If you have text in the Start, Duration, or Finish field,
it's copied into the baseline fields as well.
This also impacts how the variance is calculated,
because the behavior is different depending on the values in each
field. If you have incomplete schedule data for manually scheduled
tasks, then setting the baseline and analyzing variance calculations
won't be very useful.