Before you set a baseline, it's important to
understand what a baseline is and what fields are incorporated into the
baseline plan. In this section, you'll also learn how to set a baseline.
1. Understanding Baselines
You can think of a baseline as a snapshot of your
original schedule. After you've created your plan and obtained buy-in
from project stakeholders, and before you begin the project, you should
set a baseline. Doing so will allow you to effectively compare your
original plan to what actually takes place throughout the project
execution stage, thus enabling you to make better decisions and take
corrective action.
When you set a baseline in Project, it looks at what
is in your current plan and copies it into the baseline plan. The
following five fields are copied:
Start
Finish
Duration
Work
Cost
Project includes time-phased data in the baseline in
case you need to view work or cost in either task or resource views
over a specific time period.
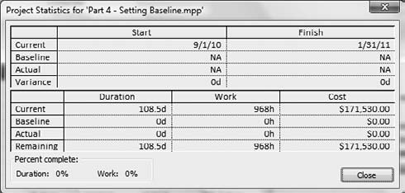
One way to better understand the core fields that are baselined is to view the Project Statistics dialog box (see Figure 1). You can access the Project Statistics dialog box as follows:
Go to Project tab -> Properties group, and click Project Information.
In the Project Information dialog box, click Statistics.

The Project Statistics dialog box provides an
overview of the project from a current, baseline, and actual plan
perspective. Notice that in Figure 1,
the Baseline and Actual fields display have NA, because the baseline
hasn't been set and no status has been recorded for actuals. When you
set the baseline, the contents of your current schedule fields are
copied to the baseline fields. At this time, the current plan and
baseline plan are exactly the same—there is no variance between them.
After you start your project and begin to update the
schedule, you can compare what takes place to the baseline. Your
current plan will no longer be the same as your baseline plan, unless
everything goes 100% as planned—which is rarely the case.
2. Setting a Baseline
The default Gantt Chart view, which is based on the
default Entry table, isn't formatted to display the baseline. To set a
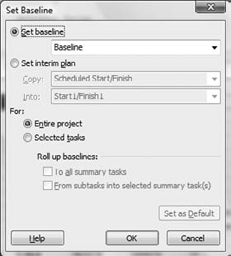
baseline (see Figure 2) follow these steps:
Go to Project tab => Schedule group, and click the Set Baseline button.
Set Baseline is selected by default. For: Entire Project is also selected by default. Click OK.
You've now set your first baseline for the entire project.
If you click the Set Baseline drop-down list, in the
Set Baseline dialog box, you see that you can set up to 10 other
baselines in addition to the original (or core) baseline. Project
allows up to 11 baselines to be set and stored in one project plan.
The original baseline is what most of the tables,
views, and filters are based on. This is a key consideration if you
decide to set multiple baselines.
