Excel has drawing tools that you can use to draw on
a worksheet or chart. In this task, you learn about the advantages of
using Excel drawing tools to point out information on a worksheet.

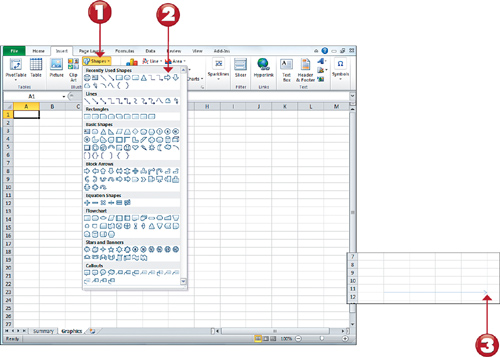
1. On the Insert tab, Click the Shapes drop-down.
2. Click any of the drawing tools’ buttons—for example, the Arrow. The mouse pointer turns into a plus sign.
3. Click and drag in the worksheet to draw an arrow; release the mouse
button when the arrow is the length you want it to be. (The pointer end
will be at the point of release.)
Note: Quick Color and Style
If you click on any shape, you
will see a new Drawing Tools Format tab. There, you can apply some
predefined styles for your shapes by choosing a style from the Shape
Styles gallery. |
Tip: Using AutoShapes
You’ll notice that the Shapes
Command (on the Insert tab) includes tools for drawing common shapes,
such as lines, circles, squares, and so on. If you aren’t much of an
artist or if you want to try some prefab symbols, insert an AutoShape.
You can select from several lines, connectors, basic shapes, arrows,
flowchart symbols, stars, callouts, banners, and more. |

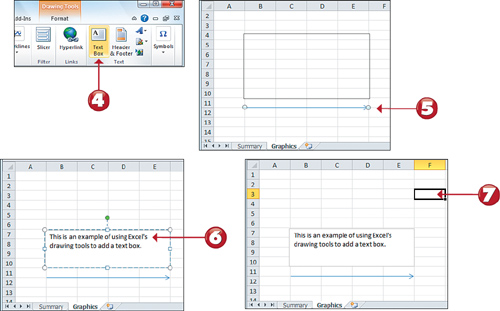
4. As another example, click the Text Box command on the Insert tab. The mouse pointer turns into an insertion pointer.
5. Click and drag in the worksheet to draw a text box; release the mouse button when the box is the size you want it to be.
6. Type the text you want to enter in the text box.
7. Click anywhere outside the text box to see how it looks.
Note: Text Boxes
Use text boxes to move,
resize, and format them. This is an excellent alternative to formatting
a cell in a worksheet where real estate can be limited. |
Tip: Modifying Drawing Objects
A drawn object is like a
picture—you can edit it as needed. To resize a drawn object, click the
object; then drag the sizing handles to the size you want and release
the mouse button. To move the object, click the object and drag it to
the desired location. |