Inserting Clip Art
Clip
art adds visual interest to your Excel worksheets. With Microsoft clip
art, you can choose from numerous professionally prepared images,
sounds, and movie clips. After you add graphics, you can move them
around in the worksheet and even assign text wrapping.

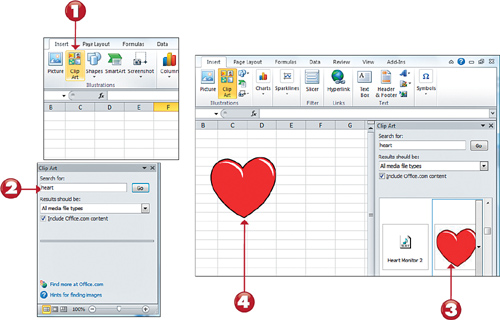
1. Click the Clip Art button on the Insert tab to open the Clip Art task pane.
2. Type a description for the clip art you are looking for in the Search for Text box, and press Enter (or click the Go button).
3. If Microsoft has clip art that matches the description you type, it
displays in the Clip Art task pane. Click an image in the results list
to insert it into your worksheet.
4. The clip art is inserted into your worksheet.
Tip: The Picture Tools Format Tab
If you click on any
picture or clip art, you will see a new Picture Tools Format tab.
There, you will find tools to crop, format, adjust contrast, apply
effects, and most anything else you would typically do to a picture. |
Inserting a Picture from File
Often
times, you will want to embed your own company-approved pictures into
your worksheet. A good example of this is a company logo. Excel is
quite flexible and allows you to insert varying types of picture files:
Bitmap files, JPEG files, PNG Files, TIF files, PCX files, and many
more.

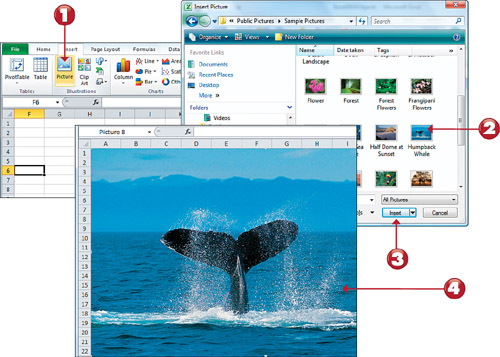
1. On the Insert tab, click the Picture button to open the Insert Picture dialog box.
2. Locate the file you want to use, and click it to see a preview. (You might need to select Preview from the dialog box Views button).
3. Click the Insert button.
4. The image is inserted into your worksheet.
Tip: Manage Overlapping Picture Objects
If you have multiple
pictures on your worksheet, you can manage how the pictures overlap
each other. Right-click on each picture and select either Send to Back
or Bring to Front. This way, you can better control the layout of your
pictures, and even layer your pictures to create robust visualizations. |