Creating a Separate Stencil for Shape and Code Delivery
If you want to use the notes shape with any number of drawing types, you should distribute a stencil rather than a template.
Also, because the sample shape has supporting VBA
code, it makes a lot of sense to distribute a stencil to contain both
the shape and shape-related code.
Having VBA code in a template has the drawback that
the code is copied and saved with every drawing that is created. This
is not only wasteful, but makes updating the code nearly impossible.
And VBA code can’t be stored in a shape. Putting code in a stencil
alleviates the problem of having copies of your code saved with every
drawing, but the stencil must be open for the code to run. This is hard
to guarantee, so your users must be informed of this.
Creating a new stencil to hold the notes shape is
easy enough, but copying the VBA code to the stencil is a bit trickier.
Let’s look at both of these procedures.
Creating a New Stencil
1. | Start Visio with no documents open.
|
2. | On the Developer tab, click the New Stencil button. A new, unsaved stencil appears with a title such as Stencil1.
|
3. | Retrieve a copy of the notes shape. Open Chapter 11.vsd and copy the shape.
|
4. | If the drawing window obscures the stencil window, you can tile them by going to the View tab and clicking Arrange All.
|
5. | Switch
back to the stencil by clicking its caption, or by clicking Switch
Windows in the bottom right of Visio’s main window or by pressing
Ctrl+Tab until you see the stencil.
|
6. | Right-click in the stencil window and paste. The notes shape becomes a new master, with the name Master.1.
|
7. | Rename the master to Notes shape.
|
8. | Save the stencil as Notes Shape Stencil.vss.
|
When you copy the code from the drawing to the
stencil, you can’t put it in ThisDocument; you have to put it in a
different module. Because of this requirement, you also have to update
the ShapeSheet formula that calls the code.
Copying VBA Code to a Stencil
1. | Starting where you left off with Notes Shape Stencil.vss and Chapter 11.vsd open, and bring up the VBA environment.
|
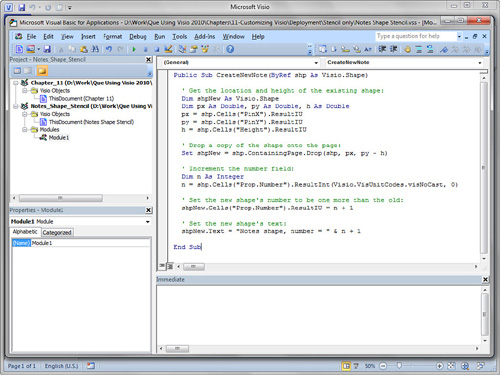
2. | In the Project Explorer, note that there are two projects: one for the document and one for the stencil.
|
3. | Open the ThisDocument code module and copy the subroutine CreateNewNote.
|
4. | Right-click
on the Project Explorer node for the stencil and choose Insert, Module.
A new item named Module1 should appear in the Modules folder, as shown
in Figure 3.
|
5. | Double-click Module1 to bring up its code window and then paste the copied code into the window.
|
6. | Note the project name for the stencil. In Figure 3, it is Notes_Shape_Stencil. You need this name for modifying the ShapeSheet formula in the Notes shape master.
|
7. | Back in Visio, close Chapter 11.vsd.
|
8. | Because
the code for the shape now resides in Module1 of the
Notes_Shape_Stencil project, you have to make a slight change to the
Action formula for the notes shape. Double-click the Notes shape master
to open its editing window.
|
9. | In the master-editing window, show the ShapeSheet for the notes shape.
|
10. | Change the Actions formula as follows:
Actions.CreateNewNote =
CALLTHIS("CreateNewNote","Notes_Shape_Stencil")
Notice that ThisDocument. is removed from the first argument and that the stencil’s project name is added as a second argument. |
11. | Close the master-editing window.
|
12. | Save the stencil.
|
13. | Open a new drawing, drag the notes shape into it, and test that the code works by right-clicking the shape.
|
Creating a Template with a Separate Stencil
Of course, you might still want to distribute a
template but with the notes shape stencil and supporting code. In this
case, you use a separate stencil that contains the VBA code, as you
just created. Then you open a new, blank drawing (with no code in it),
add backgrounds, titles, logos and other pre-drawn graphics, then open
the Notes Shape Stencil via More Shapes. Save the document as a
template, and you’re done!
To deploy, you send both files: the stencil and
template. Users can place both files in a directory and set up the
templates file location to point to this directory so that the template
appears in the New screen.
Alternatively, the stencil can be placed in
the My Shapes folder where it is easily opened for use with other
drawings. The template expects the stencil to be in the same folder,
but Visio is smart enough to searches through My Shapes as well, if the
stencil isn’t found in the same directory as the template file.