Now that you have a super-smart notes shape
that has custom ShapeSheet behavior and is linked to a macro, it’s time
to share it with your team...or the world! There are several ways to go
about this; let’s explore them.
Creating a Template with a Document Stencil
Most Visio templates open several stencils that are
separate files. This is great if a template needs access to lots of
shapes and stencils. However, for solutions that need only a few master
shapes, it makes sense to put these masters in the local document
stencil.
Creating a Template with Shapes in the Document Stencil
1. | Open
a copy of your notes shape file, to serve as your new
template. Note that the Open button in the Open dialog within Visio is
actually a drop-down list, from which you can choose “Open as Copy.”
|
2. | Show
the document stencil for the drawing. In the Shapes window, choose More
Shapes, Show Document Stencil. A blank stencil should appear with the
title Document Stencil. This is the collection of master shapes that
belong to the drawing file itself.
|
3. | Copy
the latest, final version of the notes shape, then right-click in the
document stencil window and choose Paste. The notes shape magically
appears in the stencil as a new master, with the name Master.1. You can
also drag and drop to the Document Stencil.
|
4. | “Master.1”
is dull and non-descriptive, so rename the master. Select Master.1 and
press F2 to edit the text. Or, right-click the master and choose Rename
Master. Change the name to “Notes shape.”
|
5. | Clean
up the drawing file by removing extra pages and deleting shapes from
pages. Configure the page size and orientation as desired. Add
backgrounds, title blocks, and company logos that make the template
more useful.
|
6. | Clean
up the VBA code. The template only requires the code for CreateNewNote,
so that the notes shape will function properly. Open the VBA editor and
remove all code except for the CreateNewNote subroutine. Be sure to
look in the Project Explorer for modules you might have created by the
macro recorder. For example, right-click the NewMacros item under
Modules and choose “Remove NewMacros.” Click No to not export before
deleting.
|
7. | Save the file as a template. Go to File, Save As. In the dialog, enter the filename Notes Shape Template 1, and in the Save as Type box, choose Template (*.vst).
|
To distribute this template to your team, you have only one template file to send around instead of a template plus a stencil.
When users double-click on Notes Shape Template
1.vst in Windows Explorer, Visio opens an unsaved copy of the drawing,
and the Notes shape master is visible in the document stencil.
Dealing with Macro Security Warnings
Because the template contains VBA code, you see a
warning alerting you to the presence of macros and asking you to enable
or disable them. You can change the level of macro security by visiting
File, Options, Trust Center, Trust Center Settings, Macro Settings.
Users that have the highest setting will not see any warning about your
macros, and the CreateNewNote code won’t run at all.
Rather than loosen your macro security settings, you
can also specify certain directories on your system that contain
trusted code. To add a trusted location, visit File, Options, Trust
Center, Trust Center Settings, Trusted Locations, and then add the
path. Files with VBA macros stored in a trusted location do not present
a macro security alert, and will run just fine. Perhaps members of your
team could create a trusted folder called “My Team” and place
macro-enabled templates and stencils from fellow employees in this
folder.
Displaying Templates in Choose a Template
Usually, you start new drawings by visiting the
template gallery at File, New, Choose a Template. It’s nice to have
your custom templates can show up in this screen as well. You can
inform Visio of special folders that contain your content, so that your
custom templates appear in the Backstage area.
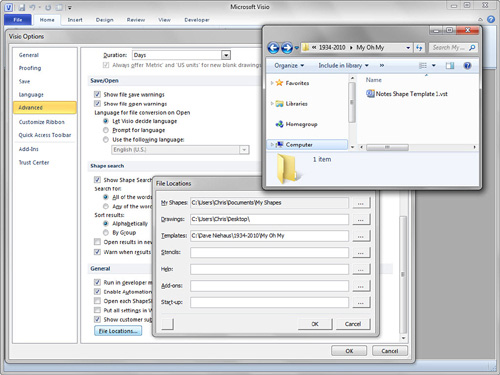
Go to File, Options, Advanced. Scroll down to the
bottom of the options and click the File Locations button. In the
dialog that appears, enter the path where you would like to store your
custom templates, as shown in Figure 1.
You can have multiple locations for custom
templates. Just separate multiple paths with semicolons. After you
click OK, you need to restart Visio for the changes to take effect, but
thereafter your custom template will appear in the new gallery, as Figure 2 shows.