Using the Macro Recorder to Generate Code
The Immediate window allows you to quickly try bits
of code, and the IntelliSense drop-down lists make it even easier to
discover functions for Visio objects.
Visio also has a macro recorder that generates VBA
code while you manipulate objects onscreen. You can then modify and
reuse this code. Using the recorder is a great way to learn how to
program Visio, too.
Recording a Macro
1. | Start with a page that contains the notes shape.
|
2. | Click
the macro recording button located at the bottom left of the main Visio
window. The icon is a rectangle with a blue header and red dot. The
Record Macro pop-up appears.
|
3. | Leave the suggested name—Macro1—and click OK to begin recording.
|
4. | Duplicate the notes shape by Ctrl+dragging a new copy.
|
5. | Click
the stop recording button at the bottom of the screen. This is the same
button as the record macro, but now it has a blue square for an icon.
|
6. | Switch over to VBA and locate the Modules folder in the Project Explorer on the left. Expand the Modules folder. The NewMacros code module appears.
|
7. | Double-click on NewMacros. The code window on the right should display your new macro called Sub Macro1().
|
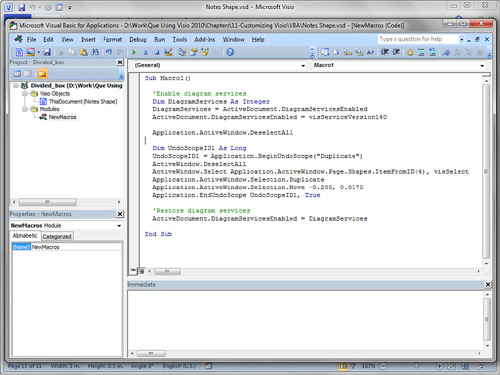
8. | The code for duplicating your shape is in the subroutine Macro1, as shown in Figure 4. You can copy this and paste it into your own Subs or slightly modify it. The sky’s the limit!

|
Here are a few things to note about the code in Figure 4 and macro recording in general:
- Two lines
start with an apostrophe and appear green in the VBA editor. These are
comments that have no effect on how the code runs, but remind humans of
the intent of the code. Comments are a good thing. Use them to document
the purpose of your code blocks.
- When you record macros
in Visio 2010, six lines are added regarding DiagramServices that
aren’t really related to the actions you performed. In Figure 4, these are the first four lines and the last two lines. Don’t worry about understanding them right now.
- The macro recorded the selection of a particular shape. In Figure 4,
find the line that ends with ...ItemFromID(4), visSelect. (It’s the
longest line.) If you try to reuse this macro for a page that doesn’t
have a shape with ID=4, the code fails. Note: this ID is the same ID
that we have talked about earlier when referring to shapes in
ShapeSheet cells.
- To make a macro that duplicates
selected shapes and moves them a specific amount, just delete this line
plus the two lines that end with ...DeselectAll.
- Visio
wraps the macro in an “undo scope.” This creates a named set of
commands that can be undone in one action. Even if the code performs
many operations, one undo restores your drawing to its original state.
The name of the undo scope is shown in the Undo/Redo buttons at the top
left of the Visio window.
- Macro code isn’t
perfect. You’ve just seen that Visio inserted a bunch of extra stuff
like Diagram Services and undo scopes that muddy the code. Plus,
selecting a shape by ID is not something you can easily re-use without
modification. So use the macro recorder to learn which commands are
needed for particular operations. However, be prepared to clean up the
code that is generated, and modify it for general use.