The critical path can be defined like more long way through your project and as a whole determines the date of completion for the project. The tasks which are on the critical path do not contain not slackness, thus if these tasks slip, a delay will have like consequence the chain of the tasks in your project. It is important to review the critical path of your project because it determines if your project can be accomplished within the deadlines.
Not knowing your critical path and what you can do to reduce it can cause problems, such as the following:
The overall project schedule might be extended unnecessarily.
As
the project manager, you need to monitor the schedule to guard against
slippage. If tasks are not on the critical path, improving the speed of
delivering them will not change the project end date.
The
critical path can and does change very quickly during the life of a
project. As the project manager, you must continuously monitor the
amount of slack available for tasks so that unexpected problems do not
arise.
Your sponsor or client might be
willing to shorten the schedule by using different task scheduling
techniques or spending more money. You need to be able to identify
these opportunities to your sponsor or client.
What Is My Current Critical Path?
The critical path is the longest path of linked
tasks in the project and includes all tasks that impact the overall
project end date if any of them are delayed. Some tasks have slack and,
therefore, are not considered critical. Free slack is the amount of
time a task can be delayed without delaying any successor tasks. Total
slack is the amount of time a task can be delayed without delaying the
finish date of the project. In addition to critical tasks, your project
contains the near-critical tasks, tasks that are considered high risk
and can potentially become critical. If a near-critical task slips and
it is close to critical, it can jeopardize your critical path. This
scenario is often overlooked, but when reviewing your critical path,
pay attention to the tasks that can become critical if project
conditions change.
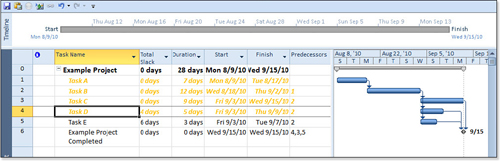
You can use Microsoft Project to help you
distinguish your critical path by applying a different text style to
these tasks using the Text Styles tool. To do so, select the Format
tab, Format, Text Styles. In the Text Styles dialog box under Item to
Change, select Critical Tasks. Select a distinct font style, color,
background color, and so on to help you visually distinguish critical
tasks, as shown in Figure 1.

By default, Microsoft Project critical tasks are
tasks with total slack less than or equal to 0. You can change the
tolerance level and set the total slack to a different number you feel
more comfortable with. To do so, open the Options dialog box by
selecting the File tab, Options, Advanced, Calculation Options for This
Project and change the number displayed in the Tasks Are Critical If
Slack Is Less Than or Equal To option to, say, 4 days. As a result,
additional tasks that are near-critical are then added and become part
of the critical path, as shown in Figure 12.2.
Caution
Be aware of the impact of
manually scheduled tasks on the critical path. A manually scheduled
task scheduled to finish last on the project will always be “The”
critical path. A manually scheduled task with a duration that extends
beyond the end of the project but without a specified end date will
wipe out critical path calculations completely. Always be sure your
manually scheduled tasks are scheduled to finish before at least one
auto-scheduled task to eliminate these issues. If manually scheduled
tasks should be included in the critical path calculation, it’s a
strong indication that their task mode should be changed to
Auto-Scheduled. |
You can display the Total Slack column in your
current view to help you distinguish between the true critical tasks
and the near-critical ones. To do so, click the column header,
right-click, and then select Insert Column. In the Column Definition
window, select Total Slack under Field Name and then click OK. Tasks
whose Total Slack is less than or equal to 0 are your critical tasks,
and tasks with slack greater than 0 that are still marked as part of
your critical path are the near-critical ones.
How Can I Reduce the Duration of My Critical Path?
You will encounter situations when you need to
reduce your project’s total duration. Here are two established methods
for reducing your schedule duration and therefore the critical path:
Crashing—
This common project management term refers to a method used to decrease
the duration of an activity by assigning more resources. The
distinguishing point of crashing when compared to the second method
(fast tracking) is that crashing employs changes to resources to reduce
the critical path. Be cautious because when you add more resources, you
also add more cost, so be aware of the tradeoff conditions when using
this method.
Fast tracking— This
common method is used to reduce your project’s critical path duration
by shortening a sequence or path of activities via overlapping or
accomplishing activities in parallel. The fast-tracking method takes
advantage of changes made to the activities schedule to reduce the
critical path. This method might increase the quality risks to your
project because activities are started before the original intended
sequence.
Both of these methods achieve the same result but have different effects on your project.
When decreasing the critical path duration, you do
have to be aware of the effects this has on the rest of your project
attributes, such as scope, cost, and quality. All these variables are
interdependent, so when you change one variable, one of the other
variables has to change in order for the project to maintain balance.
For example, if you crash your project schedule by adding additional
resources to the project, your project cost will increase to
accommodate for the pay of the added resources. Similarly, if you use
the fast-tracking method and break a critical task into smaller tasks
worked on by different resources, the quality of the project may suffer
because the work is being divided between a lot of different people.
Strategies for Crashing the Schedule
As it was mentioned in the previous section,
crashing the schedule is a technique used to help you reduce your
critical path by making changes to the way the resources are scheduled
in your project. This section discusses methods you can use to crash
your project schedule.
Assigning Additional Resources
The first method for crashing your project schedule
is to assign additional resources to the critical path tasks. Adding
resources will in turn decrease the duration, thus shortening the
critical path. When using this method, be aware of the effects it has
on the rest of your project. If you have unlimited use of resources,
this method can be a great way to reduce the critical path without it
having any effects on your overall project. However, if you have to pay
for the additional resources you add, you are increasing the overall
cost of your project, which can put your project over budget. Carefully
weigh your options to make sure that the tradeoffs you are making are
worth it.
Scheduling Overtime
Another way to crash your schedule is to arrange
overtime for the resources already assigned to the critical path tasks.
This option can work well, but you must ensure that the resources are
available to work overtime and that the amount of overtime is
reasonable and not going to burn out your resources. You can schedule
overtime by modifying the task’s calendar to schedule resources to
work, for example, on Saturdays. Besides having negative effects on
your resources, this method can also influence other aspects of your
project, such as budget, if your resources are contracted to be paid
overtime.
Strategies for Fast Tracking the Schedule
As
mentioned previously, fast tracking is a technique used to reduce your
project’s critical path duration by making changes to the way tasks are
scheduled within your project. This section discusses methods you can
use to fast track your schedule.
Parallel Scheduling
The first option is to revise the task dependencies
to allow more parallel scheduling. This overlaps the activities within
your schedule to shorten the overall critical path duration. There are
times when this option is not feasible because the critical path tasks
have Start-to-Finish relationships, and one cannot be started until the
previous one is fully completed. In addition, this can have an effect
on your project resources. For example, if you have the same resource
working on the two tasks that you schedule to be performed in parallel,
either the resource will be unable to complete his or her assignments
or he or she will have to work overtime. This, in turn, can have an
effect on your budget, if this resource gets paid an additional rate
for the overtime hours. Make sure you evaluate the consequences of
parallel scheduling and ensure that this will not cause further
problems within your project.
Decomposing Tasks
The second option for fast tracking is to break
critical tasks into smaller tasks that can be worked on simultaneously
by different resources. The tradeoff of using this method is that it
can potentially decrease the quality of work being performed on the
tasks because you have many different people performing separate parts
of the task. This can cause inconsistencies in the final product. In
addition, ensure that the resources are available to perform the work
that you schedule to prevent having resource-overallocation problems in
the future.
Changing the Scope of Your Project
Changing the scope of your project is
really a third technique that does not fit under either crashing or
fast tracking the schedule, but it does enable you to reduce the length
of your critical path. This option, however, generally requires the
involvement of your project sponsors in that you must receive their
approval. This option is commonly used on product development projects.
For example, if the goal of a project is to release software as soon as
possible, you may need to remove some of the features from the original
design in order to have the project finish on time. The removed
features can then be released as a patch later in the product life
cycle or moved to a consecutive phase of the product release.