Password-Protecting a File
In
order to password-protect a file, you can enter a password (up to 17
characters) in the Protection Password field of the Save Options dialog
box. The password you create is case sensitive and supports all text
characters, including symbols, numbers, and spaces. When you click OK, a
confirmation is displayed requesting you to reenter the password. Click
OK to save your changes.
Every time you or anybody
else opens your project file, the password must be entered in order to
view the file. If the password does not match the password you entered
in the Save Options dialog box, a warning is displayed, requesting that
you or the other user try again. There is no limit to how many attempts a
user can make for entering the password.
Caution
It is
recommended that you select a password you can easily remember or that
you write it down in a safe location. If you happen to forget the
password to your own project file, the data in that project file is
completely unrecoverable until the correct password is entered, and
there is no one who could help you open it without your password. So,
use this feature with caution, and always remember your password! |
To remove a password from a password-protected file, follow these steps:
1. | After opening the protected file using the password, select the File tab, Save As from the main menu.
|
2. | In the Save As dialog box, select Tools, General Options.
|
3. | In the Save Options dialog box, simply erase all characters in the Protection Password box and click OK to save your changes.
|
Saving a Read-Only File
Read-only files can be a great
way to protect your project data from being edited by other people. It
does not mean that others cannot make any changes to the file, however.
They will just be unable to save it to the same project filename. The
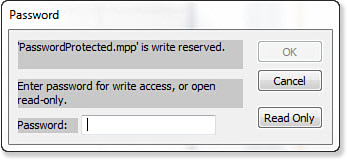
Write Reservation Password feature enables you to do just that. If you
enter a write-reservation password, when the project file is opened, a
warning is displayed, stating that the file is write-reserved (see Figure 4).
If the user provides the correct password, he or she is able to view
the project in regular mode and make changes to it under the same
project name. In addition, if the user does not know the password, he or
she has the ability to open the file in read-only mode. Read-only mode
prevents the user from making changes to the project file under the same
name. However, the user can save the file under a different name to
include the changes.
Saving the file with a
write-reservation password ensures that only the users authorized to
make changes to the project file can make any direct changes.
To
remove the write-reservation password after opening the protected file
using the password, open the Save Options dialog box (select the File
tab, Save As, Tools, General Options), clear the text in the Write
Reservation Password field, and then click OK.
Saving a File as Read-Only Recommended
The Read-Only Recommended
feature does not prevent users from opening the project file in
read-write mode. It only warns them of the preference you have added,
and gives them a choice to accept it or bypass it. This option is not
very effective when protecting your project file from being modified by
other users.
Using the Always Create Backup Option
The option for creating a
backup file is activated by selecting the Always Create Backup check box
in the Save Options dialog box (select the File tab, Save As, Tools,
General Options). When you select this option, each time any user saves
changes to the file, the original file is saved with the original name
and the .bak extension. The active version of the file is then saved
under the original project name with the .mpp extension. This option
enables you to still access the previous version of your file, without
overwriting the data.
Saving the Workspace
A workspace in Microsoft
Project is a pointer to all currently opened project files, although a
separate copy of each file is not created in the workspace. This feature
is very useful when working on multiple files. For example, if you have
two projects open and leave the office to go home, you can save your
entire workspace to reopen it where you left off in the morning. This
feature can also be useful to capture the files that you work with
regularly, bypassing the need for you to open each project separately
each time you work. Project does not let you select multiple files using
the Open dialog box; therefore, creating a workspace is a great
workaround for this issue.
To save a workspace, the Save
Workspace command has to be added to the Quick launch bar. Select Save
Workspace, and in the Save As dialog box, enter the name for the
workspace and its location (by default, Resume.mpw displays). The
workspace file will be saved with the .mpw extension. Microsoft Project
prompts you to save changes to each file that was modified during that
session.
Note
If you
are saving a file that you just created and have not saved yet, you are
prompted to include it in the workspace. New project files that are
empty are not added to the workspace. |
Project 2010 Safe Mode
Microsoft Project 2010 supports a
safe mode feature that is enabled when your system experiences
instability, such as Registry corruption or an unexpected crash. This
allows Microsoft Project to continue working on your project files in a
safe mode, with some of the features disabled.
Caution
Continuing
to work in an unstable environment can be risky. When instability
occurs, save your work, close all open files, close all open
applications, and restart Windows. |