Some organizations require the use of a work
breakdown structure to align project tasks with accounting systems,
business strategies, and so on. It is a method of making sure that all
work is accounted for, and decomposed into small enough packages for
tracking and management. In Project, a work breakdown structure (WBS) is
represented as an elaborate outline, providing each task with a WBS
code that identifies where it falls within your project plan.
For example, let’s say you have a project with the task structure shown in Table 1.
Table 1. Example Task Structure
| Task Name | | |
|---|
| Design Phase | | |
Identify requirements
| | |
Conduct survey
| | |
Prioritize results
| | |
Write specification document
| | |
| Develop Phase | | |
Code product
| | |
Write code
| | |
Test code
| | |
In a WBS code, each indent
level in your task structure is given a set of letters, numbers, or
characters that you define. For example, the phases in the example may
be given a set of characters; the tasks may be given a number; and the
subtasks may be given a lowercase letter. In Project, you can also
assign a prefix for the code, to indicate the task’s project. If you use
the combination of characters, numbers, and letters just described,
with a prefix of “EX_” to indicate that this is an example project, the
WBS codes might be assigned as shown in Table 2.
Table 2. WBS Codes
| Task Name | WBS Code | |
|---|
| Design Phase | EX_Design | |
Identify requirements
| EX_Design_1 | |
Conduct survey
| EX_Design_1.a | |
Prioritize results
| EX_Design_1.b | |
Write specification document
| EX_Design_2 | |
| Develop Phase | EX_Develop | |
Code product
| EX_Develop_1 | |
Write code
| EX_Develop_1.a | |
Test code
| EX_Develop_1.b | |
Note
how the tasks and the WBS codes are starting to look like an outline.
Project also includes an automatic outline scheme that simply uses
increasing numbers, separated by periods, to indicate where a task falls
within a project. Table 3 shows the example tasks, WBS codes, and their corresponding Project outline numbers.
Table 3. Outline Numbers
| Task Name | WBS Code | Outline Number |
|---|
| Design Phase | EX_Design | 1 |
Identify requirements
| EX_Design_1 | 1.1 |
Conduct survey
| EX_Design_1.a | 1.1.1 |
Prioritize results
| EX_Design_1.b | 1.1.2 |
Write specification document
| EX_Design_2 | 1.2 |
| Develop Phase | EX_Develop | 2 |
Code product
| EX_Develop_1 | 2.1 |
Write code
| EX_Develop_1.a | 2.1.1 |
Test code
| EX_Develop_1.b | 2.1.2 |
To display outline numbers for your project, with the Gantt Chart view displayed, click the Format tab on the ribbon and then select the Outline Number check box in the Show/Hide group. The outline numbers appear to the left of each task’s name.
Setting Your Project’s WBS Code Structure
You can set your project’s
WBS code structure at the beginning, before you have tasks added, if
you know enough about how many levels of tasks you might use and what
information the code needs to capture. You may, however, have an easier
time building out your WBS code structure after you know what your
project’s tasks really look like.
Follow these steps to set up a WBS code structure for your project:
1. | On the Project tab of the ribbon, in the Properties group, click WBS and then click Define Code.
|
2. | If you want to use a prefix to identify which project the tasks belong to, type a prefix in the Project Code Prefix box, as shown in Figure 1.

|
As you build out your WBS code structure, the Code preview box shows an example of what your code will look like for a task at the lowest level in your project.
|
|
3. | Use the columns and rows in the Code mask table to build out your WBS code structure. Each row represents an indent level for tasks in your project. Figure 2 shows a defined code mask.
- Sequence— Choose whether you want to use Numbers, Uppercase Letters, Lowercase Letters, or Characters.
|
If you choose to use Characters, the Code preview
box shows an asterisk (*) as a placeholder for the characters, and you
can type the characters in the WBS field for your project after you have
your code structure set up.
|
- Length—
Choose the number of characters you want to use for this part of your
WBS code. If you choose one character and the number of tasks at this
level goes beyond nine, a WBS code will not be assigned, and you’ll
receive an error message. Also, if you choose two or more characters,
single-digit numbers will begin with a zero (01, 02, 03, and so on). If
you want to avoid both of these circumstances, leave it set to Any.
- Separator—
Choose a character to separate this part of your WBS code from the next
part. You can choose one of the built-in separators (period, hyphen,
plus sign, or slash), or type one of your own.
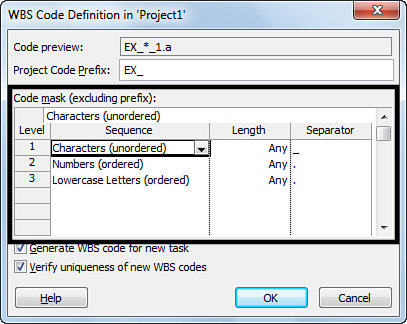
|
4. | Select the Generate WBS code for new task check box if you want to automatically create a WBS code for each task you add to your project.
|
5. | Select the Verify uniqueness of new WBS codes check box if you want each WBS code to be unique. This can be helpful if you have used the Characters option in the Sequence column. |
6. | Click OK to save your WBS code structure.
|
After you have your WBS code structure set up, the next step is to display the WBS code in the Gantt Chart view, so you can see the fruits of your labor.
To display the WBS column, follow these steps:
1. | With the Gantt Chart view displayed, right-click the column that you want to appear to the right of the WBS column.
|
2. | Click Insert Column and then scroll down and click WBS from the menu that appears. Figure 3 shows the Gantt Chart view with the WBS code displayed.

|