IT tutorials
 
Office
 

Microsoft Word 2010 : Creating an Outline (part 3) - Building an Outline - Expanding and Collapsing Parts of an Outline , Reorganizing an Outline

- Free product key for windows 10
- Free Product Key for Microsoft office 365
- Product Key Free : Microsoft Office 2019 – Serial Number
10/15/2014 3:27:48 AM
Expanding and Collapsing Parts of an Outline

If a heading contains multiple subheadings, you can “collapse” the main heading to hide the subheadings and create more space on the screen. You can expand a collapsed heading to see its subordinate headings again. Here’s how:
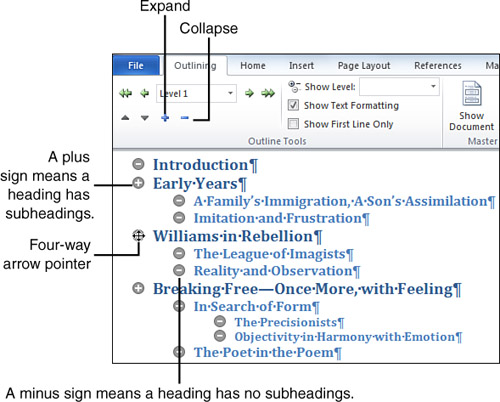
1.
Point to the plus sign that appears before a heading that contains subheadings. The pointer changes to a four-way arrow, as shown in Figure 5.
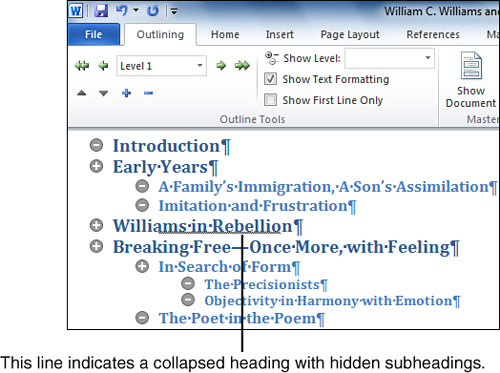
Figure 5. Preparing to collapse a heading that contains multiple subheadings.

2.
Double-click the plus sign to collapse the heading and hide its subheadings. A thick line appears under the collapsed heading, indicating that it contains hidden subheadings, as shown in Figure 6.

Figure 6. A black underline indicates that a heading contains hidden subheadings.

3.
To expand the collapsed heading, double-click its plus sign again.

You can also expand or collapse a section by clicking its heading and then clicking Expand or Collapse on the Outlining tab.

Reorganizing an Outline

In Outline view, you can reorganize an entire document in seconds simply by rearranging its headings. You can move headings around in the following ways:
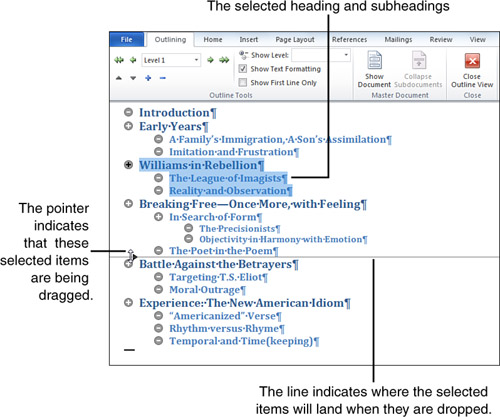
  • Click the icon to the left of a heading to select it (and any subordinate headings underneath it). Drag the icon up or down, and then drop it in the desired position. As you drag, a black line indicates where the heading will land when you drop it, as shown in Figure 7.

    Figure 7. Dragging a heading and its subordinate headings to a new location.

  • Click a heading’s icon to select it (and its subheadings, if any), and then click the Move Up or Move Down button on the Outlining tab. The heading moves up or down one position each time you click a button.

  • To move a major heading but leave its subordinate headings where they are, click the major heading (not its icon) to place the insertion point in it. Then click the Move Up or Move Down button.

If you’re going to move a heading that contains subheadings, collapse the heading before selecting it. This hides the subordinate headings so they don’t trip you up. Don’t worry; when you move a heading, its subheadings move right along with it.

 
Others
 
- Microsoft Word 2010 : Creating an Outline (part 2) - Building an Outline - Adding Headings to an Outline, Promoting and Demoting Headings
- Microsoft Word 2010 : Creating an Outline (part 1) - Working in Outline View
- Microsoft Excel 2010 : Working with Graphics - Inserting a Diagram,Inserting an Object
- Microsoft Excel 2010 : Working with Graphics - Inserting WordArt, Using Smart Art in Excel
- Microsoft Excel 2010 : Working with Graphics - Using AutoShapes
- Microsoft PowerPoint 2010 : Preparing a Slide Show - Working with Fonts
- Microsoft PowerPoint 2010 : Preparing a Slide Show - Creating a Self-Running Presentation
- Microsoft PowerPoint 2010 : Preparing a Slide Show - Hiding Slides
- Microsoft PowerPoint 2010 : Preparing a Slide Show - Creating a Custom Slide Show
- Microsoft Project 2010 : Work Breakdown Structure Numbering (part 2) - Editing Custom WBS Codes, Renumbering the Custom WBS Codes
 
 
Top 10
 
- Microsoft Visio 2013 : Adding Structure to Your Diagrams - Finding containers and lists in Visio (part 2) - Wireframes,Legends
- Microsoft Visio 2013 : Adding Structure to Your Diagrams - Finding containers and lists in Visio (part 1) - Swimlanes
- Microsoft Visio 2013 : Adding Structure to Your Diagrams - Formatting and sizing lists
- Microsoft Visio 2013 : Adding Structure to Your Diagrams - Adding shapes to lists
- Microsoft Visio 2013 : Adding Structure to Your Diagrams - Sizing containers
- Microsoft Access 2010 : Control Properties and Why to Use Them (part 3) - The Other Properties of a Control
- Microsoft Access 2010 : Control Properties and Why to Use Them (part 2) - The Data Properties of a Control
- Microsoft Access 2010 : Control Properties and Why to Use Them (part 1) - The Format Properties of a Control
- Microsoft Access 2010 : Form Properties and Why Should You Use Them - Working with the Properties Window
- Microsoft Visio 2013 : Using the Organization Chart Wizard with new data
Technology FAQ
- Is possible to just to use a wireless router to extend wireless access to wireless access points?
- Ruby - Insert Struct to MySql
- how to find my Symantec pcAnywhere serial number
- About direct X / Open GL issue
- How to determine eclipse version?
- What SAN cert Exchange 2010 for UM, OA?
- How do I populate a SQL Express table from Excel file?
- code for express check out with Paypal.
- Problem with Templated User Control
- ShellExecute SW_HIDE
programming4us programming4us