3. Publishing Shared Folders
Now that you've created and published a printer, you'll see how the same thing can be done to shared folders.
Exercise 2
walks through the steps required to create a folder, share it, and then
publish it in Active Directory. This exercise assumes that you are
using the C: partition; however, you may want to change this
based on your server configuration.
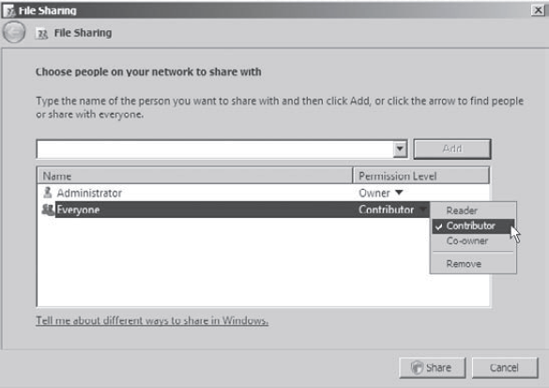
Create a new folder in the root directory of your C: partition, and name it Test Share. Right-click the Test Share. Choose Share. In the File Sharing dialog box, enter the names of users you want to share this folder with. In the upper box, enter Everyone,
then click Add. Note that Everyone appears in the lower box. Click in
the Permission Level column next to Everyone and choose Contributor
from the pop-up menu. Then click Share.
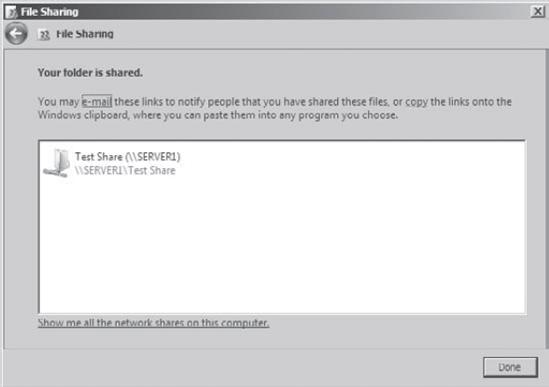
You see a message that your folder has been shared. Click Done.
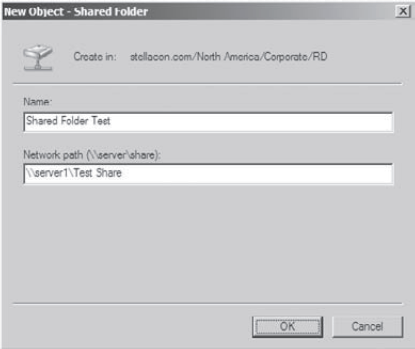
Open the Active Directory Users And Computers tool. Expand the current domain, and right-click the RD OU. Select New => Shared Folder. In the New Object - Shared Folder dialog box, type Shared Folder Test for the name of the folder. Then type the UNC path to the share (for example, \\server1\Test Share). Click OK to create the share.
|
Once you have created and published the Shared
Folder object, clients can use the My Network Places icon to find this
object. The Shared Folder object will be organized based on the OU in
which you created the Shared Folder object. When you use publication,
you can see how this makes it easy to manage shared folders.
4. Querying Active Directory
So far you've created several Active Directory
resources. One of the main benefits of having all of your resource
information in Active Directory is that you can easily find what you're
looking for using the Find dialog box. Recall that we recommended that
you should always enter as much information as possible when creating
Active Directory objects. This is where that extra effort begins to pay
off.
Exercise 3
walks you through the steps to find specific objects in Active
Directory.
Open the Active Directory Users And Computers tool. Right-click the name of the domain and select Find. In
the Find Users, Contacts, And Groups dialog box, select Users,
Contacts, And Groups from the Find drop-down list. For the In setting,
choose Entire Directory. This searches the entire Active Directory
environment for the criteria you enter. Note
that if this is a production domain and there are many objects,
searching the whole directory may be a time-consuming and
network-intensive operation.
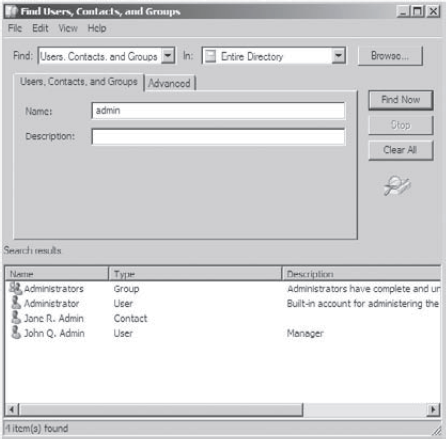
In the Name field, type admin and then click Find Now to obtain the results of the search. Now
that you have found several results, you can narrow down the list.
Click the Advanced tab of the Find Users, Contacts, And Groups dialog
box.
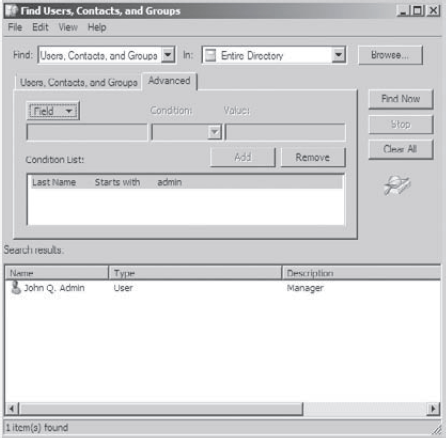
In the Field drop-down list, select User => Last Name. For Condition, select Starts With, and for Value, type admin.
Click Add to add this condition to the search criteria. Click Find Now.
Now only the Users that have the last name Admin are shown. When
you have finished searching, close the Find Users, Contacts, And Groups
dialog box and exit the Active Directory Users And Computers tool.
|
Using the many options available in the
Find dialog box, you can usually narrow down the objects you're
searching for quickly and efficiently. Users and systems administrators
alike find this tool useful in environments of any size.