1. Controlling Posting Dates when not posting by batch
Transactions in Dynamics GP can be posted
individually or as part of a batch. When posting as part of a batch, the
batch gets a posting date that can be different from the date of the
transaction. For individual transaction posting too, the posting date
can be different from the transaction but the way to accomplish this is
not obvious.
When not posting in a batch
the posting date on a transaction is the date that the transaction will
have in the general ledger. The document date (Order Date, Invoice Date,
and so on) is just that, the date of the document and it is used to
calculate aging for sales and purchase transactions. Controlling posting
dates is very useful when the timing of a transaction doesn't match the
month it needs to be posted in. For example, my auditors once sent a
bill in July for audit work done back in January. In this scenario I
didn't want to post the transaction in January because January was
closed. I did need the January date in Dynamics GP to ensure that we
didn't wait to pay them on thirty-day terms. We probably should have
made them wait for six months as it took them so long to bill us but why
irritate the auditors needlessly?
In Dynamics GP I set the Document Date to a January date so that the bill would age and be selected for payment properly. However, the Posting Date was a July date putting the transaction in the current month for the general ledger.
In this recipe, we'll take a look at posting a transaction with a posting date different from the transaction date.
How to do it...
To post a transaction with different posting and transaction dates:
1. In Dynamics GP select Purchasing from the Navigation Pane. Select Transaction Entry on the Purchasing Area Page.
2. This opens the Payables Transaction Entry window. Press Tab to go to the Doc. Date field and click on the blue arrow:

3. The Payables Date Entry window will open to display the Posting Date field. Add thirty days to the date in the Posting Date field and click on OK:
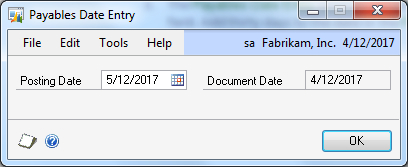
4. Now, when the transaction is completed and posted with the help of the Post button the posting date will be thirty days later than the document date.
How it works…
This is one of those
exquisitely simple items that is hidden just enough that users don't
find it. The ability to separate the posting date from the transaction
date is an important accounting tool that is often not present in
lower-end systems. The fact that Dynamics GP supports this in both batch
and transactional posting is one small difference between an Enterprise
Reporting System and simple accounting software.
2. Reducing posting steps with better Printing Control
When posting a transaction in Dynamics GP, a series
of posting reports print by default. Typically there is a posting report
with full posting details, a distribution summary report, a
distribution detail report, and in many cases a checkbook report.
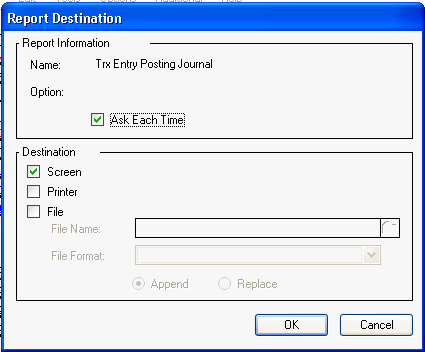
Reports are often set to ask for the type of output (Printer, Screen, or File)
each time. If this setting is turned on each report will open a window
allowing the user to change the report destination when the report is
run. This significantly increases the amount of time it takes to simply
start the printing process because the user has to make a choice each
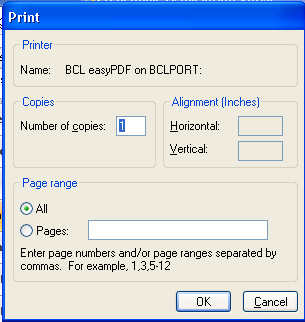
time. Additionally, reports set to print to a printer will open a window
allowing users to set the number of copies or limit printing to certain
pages:
This means it's not uncommon to have eight windows
open and four reports print every time a user posts. Even worse, the
summary and detail distribution reports are subsets of the posting
report so some information is duplicated across three reports. With this
big of a mess, users often click through the prompts without actually
reading these. They print reports that they don't really need and cancel
reports they should print:
There is a better way. Reports can be turned off,
routed only to the screen, or sent to file. The printer prompt can be
turned off as it's rarely used. All of this can save several minutes
each time transactions are posted, quickly adding up to a savings of
hours in the course of a month along with reduced printed waste. In this
recipe, we'll see how to control printing during posting. For our
example, we'll look at controlling printing when posting a payables
transaction entry.
Getting ready
Prior to changing the printing of posting reports,
administrators should evaluate what reports really need to be printed or
saved at the time of posting. Posting reports can be reprinted at a
later date as much of the data is duplicated across reports.
Consequently, there is often no need to print any of the reports.
To show the range of options for our example we will
send the posting report to a file, the summary report to a printer, and
we'll turn off the detail report and any other reports.
How to do it...
To get control of posting reports:
1. Select Administration from the Navigation Pane and Posting under the Posting heading on the Administration Area Page to open the Posting Setup window.
2. In Series, select Purchasing. In Origin, select Payables Trx Entry.
3. In the lower section find the report labeled Trx Entry Posting Journal. Select the checkbox on the left under the Print heading next to Trx Entry Posting Journal. Deselect all of the four center checkboxes. Then, select the one under the file folder icon. Press Tab to go to the Path field and enter c:\AP Posting.txt.
This process sets the AP Transaction Entry Posting Journal to default to printing to a file located in the c: drive and named AP Posting.txt. The folder icon in the top right of this section of the page can also be used to browse and select a file location.
4. Select the checkbox next to Trx Distribution Summary under the Print heading. Deselect any checkboxes in the middle and select the checkbox under the printer icon.
This activates the Transaction Distribution Summary Report and sends it to the printer by default.
5. Deselect any other checkboxes under the Print heading to turn off the remaining reports and click on Save to continue:
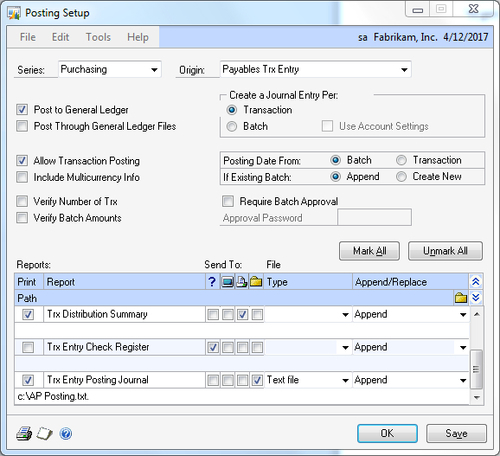
Now, when a payables transaction is posted, the
posting report will append to a file and the Transaction Distribution
Summary Report will print to the printer.
How it works...
In most cases there is no need to print any posting
reports. However, setting posting reports to ask every time these are
printed is the least efficient of all of the options. As posting reports
can be reprinted in Dynamics GP, once users are past the initial
insecurity of using the system, posting reports should generally be
turned off. However, if posting reports are required for control
purposes the number and types of automatic reports should be limited and
sent to a file for easy retrieval, e-mailing, and archiving.
There's more...
Printing posting reports makes less sense when users
know how to reprint these on demand and there is a way to turn off the
rarely used System Print Dialog.
Posting reports
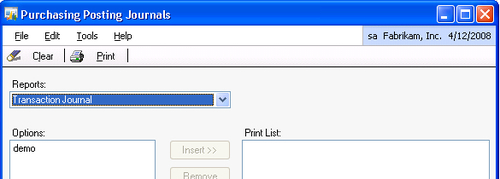
Posting reports are found in the Reports section of each module. To continue on the theme of a payables transaction, select Purchasing from the Navigation Pane. Then select Posting Journals on the Area Page under Reports. The first option is the Transaction Journal. Other posting journals can be selected for printing with the drop-down menu:
The only exception to this is the posting report for
General Journal entries. The report exists; it's just called a
Cross-Reference report instead of a posting journal.
System Print Dialog
The other window that is frequently skipped during
printing is the Print window. This window displays when printing to a
printer. It provides the option to print more than one copy of a report
or to print only certain pages of the report.
To turn off the system print dialog:
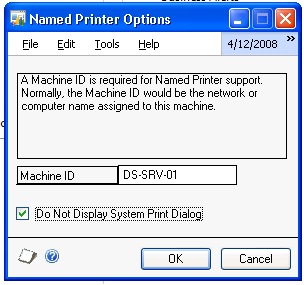
1. Select Administration from the Navigation Pane. Select Named Printers from the Area Page under Setup. Enter the system password if prompted.
2. Select the checkbox marked Do Not Display System Print Dialog and click on OK twice:
3. Select a default printer for Dynamics GP and click on OK.
4. Click on Save to assign the default printer to Named Printers. Then select File | Close to close the window:
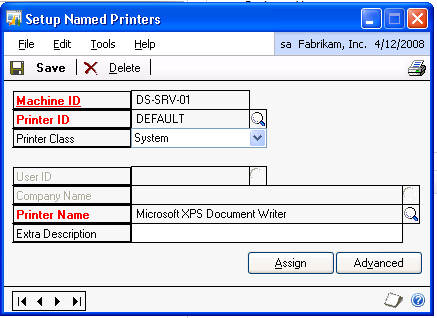
If the Named Printers feature
has already been set up, then steps 3 and 4 won't appear as an option.
This process turns off print options for this printer for all users on
this workstation.