The Secure Store service can
be referred to as a core service because several other services require
this service to be set up and configured in order to function. A part of
its offering is a secure database that stores credentials associated
with application IDs. These IDs are used to access content from external
data sources. This is accomplished by creating unattended accounts that
are stored within the Secure Store database. An example of this will be
seen in an upcoming recipe with Excel Services configuration. The
Secure Store will be used to house the ID that will access the data
sources that the dashboards will display. These are external data
sources such as SQL Server or SAP. MOSS 2007 also provided this
functionality through the use of the application proxy ID. The problem
with this scenario is that it does not follow the least privileged
account rules.
SharePoint 2010 uses the new Secure Store and a
completely separate ID from the proxy. This means now an account can be
set up with only the rights it needs to access the proper data.
In this recipe, you will be shown how to set up the secure store.
Getting ready
Central Administration must be set up and you must be
a Service Administrator for the Secure Store service. The Farm
Administrator also has permissions to perform this action.
Create an Active Directory account, which will be
configured as the identity for the application pool created for this
service application.
How to do it...
1. Open up the SharePoint 2010 Central Administration website.
2. Under the section titled Application Management, click Manage service applications.
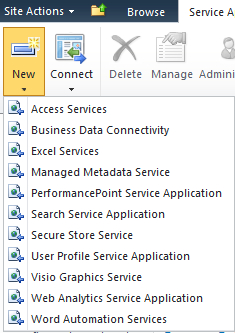
3. On the ribbon, in the top left corner, is a New button. Click the arrow to see all the services that can be created. Select the Secure Store Service option as seen in the following screenshot:
4. A form appears with the following fields to be filled in:
Name: Fill in the Service Application Name.
Database Server: SQL Server machine name.
Database Name: The name of the Secure Store database to be created. You can modify the GUID at the end of the name.
Database Authentication: Choose the Windows authentication radio button.
Failover Database Server: Fill this in if you have a server configured for this operation. This will not create a failover database.
Application Pool: Create a new application pool and give it an appropriate name.
Associate a security account: Use configurable and an existing domain account that was created as part of the requirements.
Audit Log: By default, this is enabled and the textbox is populated with the default value of 30 days.
Click OK. The Secure Store application will be created and the page will navigate back to the listing of service applications.
5. Once the new Secure Store Application is created, click on it.
6.
A key must be generated to encrypt the database. This is done based on a
pass phrase. The pass phrase must be at least eight characters long and
must have at least three of these four elements—uppercase characters,
lowercase characters, numeric characters, and special characters. The
following screenshot shows the presentation screen:
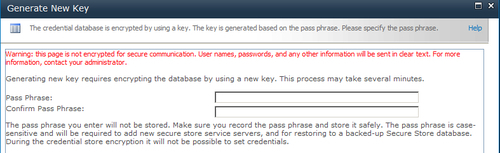
7. Click OK after filling in the Pass Phrase and the Confirm Pass Phrase textbox.
The service is now operational.
How it works...
At the heart of the Secure Store service is the
Secure Store database that will contain credentials to be used for
accessing external data sources. These credentials are encrypted and
decrypted via the key that was generated when the pass phrase was
created.
The information that is filled out in step 4 is the
identity of the database, the authentication method, the application
pool it uses, and a potential Failover Database Server. The failover
database server would need to be set up independently as identifying a
server as failover does not configure it.
There's more...
PowerShell can be used in place of the UI to create
the Secure Store service application. Before creating a new Secure Store
service application, ensure that the Secure Store service is running.
This can be confirmed by doing the following:
1. Open Central Administration.
2. Click System Settings.
3. Click Manage Service on Server under the Server section.
4. Ensure the Secure Store Service says started.

Using the following PowerShell command, we can create the Secure Store Service application:
New-spsecurestoreserviceapplication Name $serviceapplicationame partionmode:
<false> sharing:$false databaseserver $dbserveraddress applicationpool <apppool>
 administrators <adminscommaseparated> auditingenabled:<true> auditlogmaxsize 30
Using the following PowerShell command, we can generate/refresh the key:
Update spsecurestormasterkey serviceapplicationproxy <proxy> passphrase <farmpassphrase>
Update-securestoreapplicationserverkey serviceapplicationproxy <proxy> passphrase <farmpassphrase>
Using the following PowerShell command, we can get a listing of running services:
More info
The encryption key should be
backed up because you may need to use it again in case you have to
restore a backed up Secure Store database or if you add a new
application server to the farm.