The BizTalk Administration
Console and BTSTask command-line application are the two applications
that allow a user to export, import, and install a BizTalk MSI file.
Please note that the BTSDeploy tool from BizTalk Server 2004 has been
deprecated and is no longer included; therefore, scripts should be
migrated to the BTSTask tool. Exercise 3 walks you through the process of importing a BizTalk application using the BTSTask tool.
|
To perform this exercise, please ensure that you completed Exercise 2 successfully. Then follow these steps:
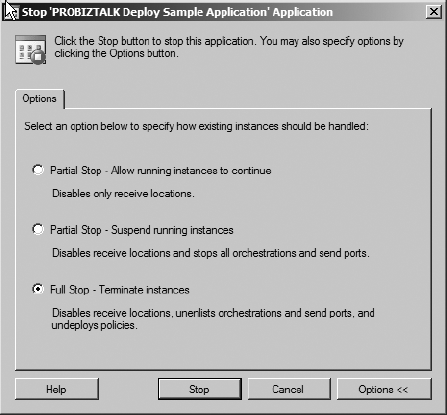
Remove the PROBIZTALK Deploy Sample Application: In the BizTalk Server 2009 Administration Console, expand BizTalk Server 2009 => BizTalk Group => Applications => PROBIZTALK Deploy Sample Application. Right-click the PROBIZTALK Deploy Sample Application, and then select Stop. In the Stop 'PROBIZTALK Deploy Sample Application' window shown in Figure 13, select the Full Stop – Terminate instances radio button, and then click Stop.
In the BizTalk Server 2009 Administration Console, right-click the PROBIZTALK Deploy Sample Application, and then select Delete. In the confirmation message box, click the OK button. Then, close the BizTalk Server 2009 Administration Console.
Import the PROBIZTALK Deploy Sample Application: Open the Visual Studio 2008 Command Prompt. In the Visual Studio 2008 Command Prompt, execute the following command: BTSTask
ImportApp /Package:C:\ProBizTalkSample.msi /Environment:Testing
/ApplicationName: "PROBIZTALK Deploy Sample Application" /Overwrite. If the script was executed successfully, the content of the command prompt will resemble Figure 14.

|
3. Typical Deployment Cycle
In the previous sections,
you learned how to deploy a BizTalk solution manually and using the MSI
export and import method. In this section, you will learn how to move a
BizTalk application from the development environment all the way to
production using the steps outlined in the preceding two sections. There
are five main steps to move an application from one environment to
another:
Deploy assemblies from BizTalk solutions using Visual Studio 2008:
In this step, the BizTalk developers deploy a BizTalk solution on their
development environment. This means to both GAC the files locally as
well as to deploy the bits to the Configuration database. Once the
developers have tested their BizTalk application adequately, they
proceed to the next step.
Add BizTalk artifacts to the deployed BizTalk application:
In this step, the BizTalk developers or the integrators add artifacts
to the BizTalk application in order to deploy their solution to another
environment or BizTalk Server Group. Typically, this step involves
creating new binding files specific to the next target environment,
adding processing scripts to automate as much as possible the
installation of the BizTalk MSI application to the next target
environment, and adding any other BizTalk artifacts (like certificates
and readme files) necessary on the target environment.
Export the BizTalk application to an MSI file:
In this step, the developers or the integrators proceed to export the
complete BizTalk application to an MSI file using the BizTalk
Administration Console or the BTSTask command-line tool. They will have
to decide whether or not they want to create one or more MSI packages
and what BizTalk artifact they want to include in them.
Import and install the MSI file:
Once the MSI package or packages are ready, it is time to import and
install them on the target environment. The MSI file will register all
BizTalk artifacts in the target environment's BizTalk Management
Database. It will also copy and register in the GAC or in the Windows'
registry all .NET assemblies and COM libraries on the BizTalk servers
where the packages are installed. Please keep in mind that you must
install the MSI file on each BizTalk server in a BizTalk Server Group.
Start the application and verify that it is functioning correctly:
At this point, the BizTalk developer or integrator starts and tests the
newly installed BizTalk application. Once that person is satisfied with
the results, he can repeat steps 2 through 5 to deploy the BizTalk
application to other staging environments until he eventually releases
the BizTalk application to production.