2. Testing in the POC Phase
A successful proof of concept will demonstrate
that the proposed technical solution is feasible and help identify any
gaps or weaknesses in the original design. To accomplish this, you need
to test all functional components of the design and demonstrate how the
system performs under stress. You should begin the POC phase with a
comprehensive test plan that validates all functionality and yield
performance metrics that will project the performance in the live
environment.
Functional Testing
Start by assembling a list of features you will
implement in your ConfigMgr deployment with criteria to validate each
feature. Functional testing verifies that each feature operates
correctly. Some of the common areas of functional testing include the
following:
Site system installation. Confirm that your POC deployment successfully
meets these criteria.
Client installation—
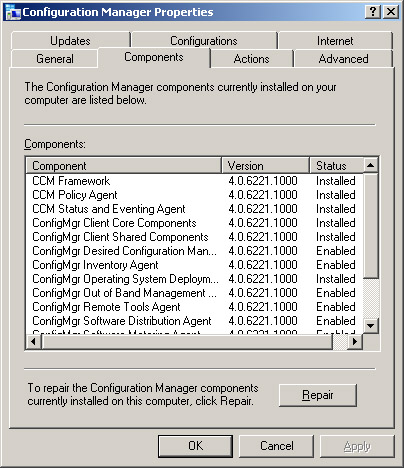
Test each client installation method you plan to use in production. To
confirm that the client agent and required components are installed and
enabled, open Control Panel on the client system and view the Components
tab of the Configuration Management applet. Figure 3
shows the component status displayed in Control Panel. You should also
review the Client Deployment Failure Report and run the following status
message queries:
Both these queries should return zero systems in their output.
Client inventory—
Schedule client inventory and review the results. Again, you do not
want any errors or warnings. You can run the following status message
queries to view possible errors or warnings during inventory collection:
Clients That Reported Errors or Warnings During Inventory File Collection.
Clients That Reported Errors or Warnings While Creating a Hardware Inventory File.
Clients That Reported Errors or Warnings While Creating a Software Inventory File.
Backup and recovery— As part of your POC, validate your backup and recovery processes for all site systems.
Service delivery—
Design functional tests and success criteria for each service you plan
to deliver, such as software deployment, software updates, or remote
administration.
Stress Testing
One of the most challenging aspects of POC
testing is generating a load approximating the load your systems will
experience in a live environment. Client activity, which scales linearly
with the number of client systems, generates much of the load on
Configuration Manager site systems. As the number of clients increases,
site systems will experience a heavier load from activities such as the
following:
Processing inventory data
Processing other client data such as heartbeat discovery data, state messages, status messages, and software-metering data
Processing requests to the management point for policy downloads
Concurrent connections to distribution points
Updating larger collections and running queries and reports against larger data sets
Tip: Scripting to Simulate Larger Client Loads
One way you can simulate some aspects of a
larger client load is with scripting. For example, you can use a script
provided by Microsoft (http://technet.microsoft.com/enus/library/bb633207.aspx)
to initiate a Machine Policy Retrieval and Evaluation Cycle from a
client workstation. You could add logic to the script to invoke the
policy retrieval cycle repeatedly and run the script from multiple
clients, simulating the load a management point at a busy site might
experience.
The SMS Object Generator (smsobjen.exe) is a
tool Microsoft provided to simulate various objects for load-testing
various versions of SMS. The SMS Object Generator is included with the
SMS 2.0 Resource Kit tools, which are part of the BackOffice Resource
Kit, version 4.5. Microsoft has not updated this tool for Configuration
Manager 2007, and testing shows some but not all functions of this tool
work with ConfigMgr. The tool is able to generate data discovery records
(DDRs), which you can use to populate the ConfigMgr database with
simulated client systems. These objects appear as legacy clients.
However, Configuration Manager will not successfully process the
inventory data generated by the tool. This is not surprising because the
inventory data format for legacy clients is not supported in ConfigMgr
2007. You can use the tool to simulate the following:
Using this tool allows stress testing the
server components used for processing discovery, inventory, and status
messages. By creating objects at a child primary site, you can also
generate a load for the components involved in replicating data to the
parent site. Populating the database with a large number of simulated
client systems also enables you to create large collections for stress
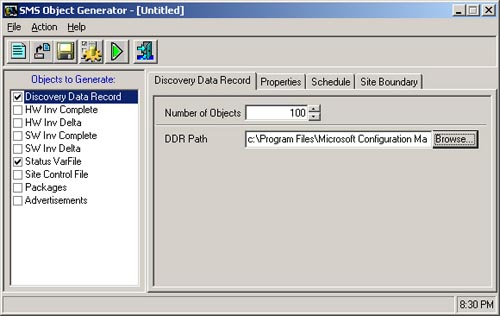
testing the collection evaluator. Figure 4 shows the SMS Object Generator user interface for generating DDRs. Enter the path of the Discovery Data
Manager inbox in the DDR path text box. In the default ConfigMgr
installation, the path is C:\Program Files\Microsoft Configuration
Manager\inboxes\ddm.box.
POC Exit Criteria and Deliverables
The exit criteria for the POC should include
completing all functional tests and stress tests and completion of
required deliverables. Be sure to review any unresolved problems that
occur during testing to determine whether they are “showstoppers” that
prevent you from moving to the pilot phase before making adjustments.
Potential showstoppers include issues that would seriously affect
existing functionality in your live environment, compromise security, or
prevent required functionality from working. You can note less serious
issues as exceptions and continue to investigate them in the POC
environment while moving forward with your pilot.
Here are the major deliverables of the POC:
Updated project plans based on test results and adjustments.
Detailed process documentation providing procedures for each required ConfigMgr task.
Any
configuration elements you plan to use in production, such as scripted
installations, site settings files, and object definition files.
If you have customized any group policy objects
to support ConfigMgr functionality. Examples of
group policy settings that you can use to support ConfigMgr
functionality are client site assignment and BITS (Background
Intelligent Transfer Service) settings.
Transferring Site Settings
Site settings files are XML (eXtensible Markup
Language) files that can be used to reliably reproduce site
configuration items such as site component configuration, client agent
properties, and site maintenance tasks. To create a site settings file
for use in production, perform the following steps:
1. | Open
the Configuration Manager Console and then navigate to System Center
Configuration Manager -> Site Database -> Site Management in the
console.
|
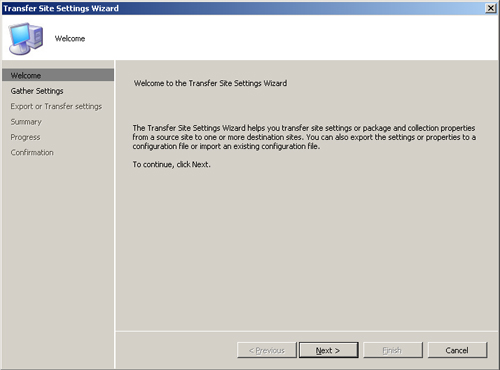
2. | Right-click
the site and choose Transfer Site Settings. This launches the Transfer
Site Settings Wizard. On the Welcome screen shown in Figure 5, click Next.
|
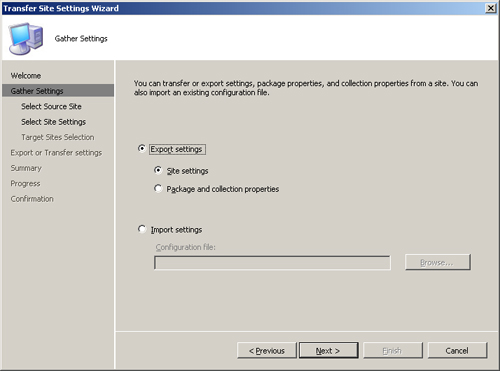
3. | On the Gather Settings screen displayed in Figure 6, confirm that the Export settings and Site settings radio buttons are selected and then click Next.
|
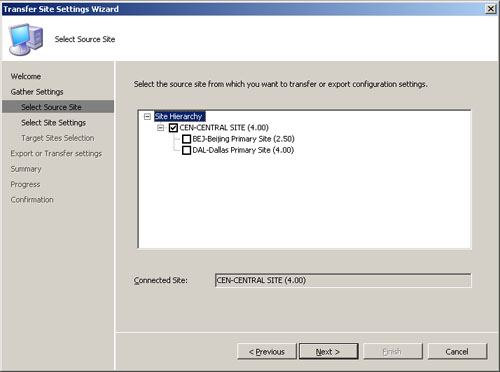
4. | On the Select Source Site screen shown in Figure 7, check the box next to the site(s) you want to export settings from and then click Next.
|
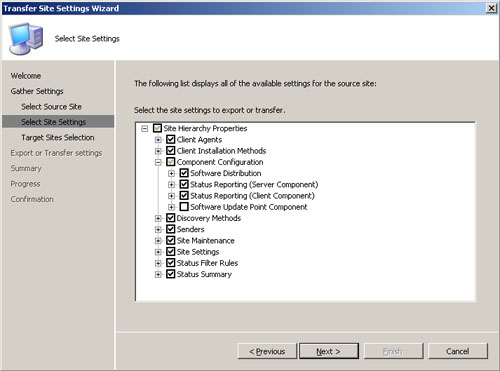
5. | On the Select Site Settings screen shown in Figure 8,
expand the tree control and check the boxes next to the settings you
want to transfer. Checking the box at the top of the tree will select
all site settings.
|
6. | Select
Export or Transfer Settings from the navigation bar on the right side
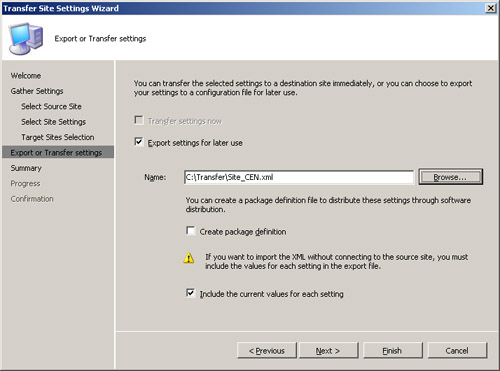
of the wizard. In the Export or Transfer Settings screen shown in Figure 9,
make sure the Export settings for later use box is checked and enter
the path for the destination XML file. Check the Include current values
for each setting box and then click Next.
|
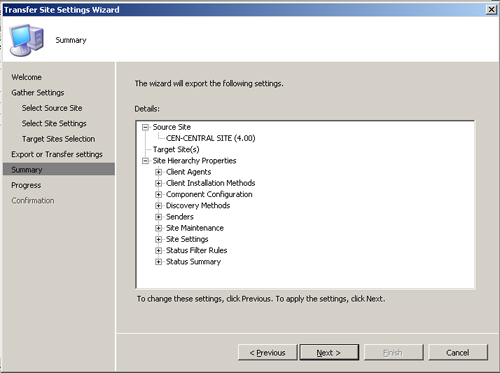
7. | Review the information in the Summary screen shown in Figure 10.
After clicking Next, you will see a progress information screen, and a
confirmation screen appears when the settings transfer completes. You
can now copy the XML file to your production network and use the same
wizard to import the settings on your production site.
|
On your production site, you will use the
Transfer Site Settings Wizard again to import the site settings. At step
3 of the preceding process, choose the Import Settings option instead
of Export settings, and browse to the saved XML file. The rest of the
process is essentially the same. For more information on the Transfer
Site Settings Wizard, see http://technet.microsoft.com/en-us/library/bb632809.aspx.
Transferring Other Objects
You
may have noticed the option to export packages and collections on the
Transfer Site Settings Wizard’s Gather Settings screen, shown earlier in
Figure 7.6.
Microsoft designed this option to transfer settings such as
collection-refresh schedules and package priority from one object to
another within your site. It does not provide a way to transfer packages
and collections developed in your POC environment to production.
You can use the ConfigMgr console to export the
definitions of certain objects as MOF (Managed Object Format) files
that you can import into your production environment. You can export MOF
definitions for instances of the following ConfigMgr object types from
the console:
Collections
Queries
Reports
To export objects’ definitions to MOF files,
right-click the parent node, choose Export Objects, and complete the
wizard to choose the instances to export, specify the file location, and
enter descriptive text. You can use a similar process to import objects
from MOF files.
If you’re planning to use Configuration Manager
OSD, you will want to develop and test your images, task sequences, and
driver packages in the POC environment. You can export and import task
sequences as XML files from the ConfigMgr console. Other OSD objects can
be copied manually in their native file formats and imported into the
production environment. Similarly, if you will be using ConfigMgr
software deployment, you will want to develop and test software packages
in the POC environment. To avoid introducing possible errors by
manually re-creating packages, you can use package definition files to
create consistent packages in the POC and production environments.
3. Pilot Phase
During the pilot phase, you will work with a
small subset of the users and systems in your live environment. Unlike
the POC, the pilot environment is intended to become a permanent part of
the production deployment of your solution. Typically, a pilot
deployment begins with a single ConfigMgr site. Client systems are
selectively added to the pilot. Often the initial group of clients in
your pilot consists of computers in the IT department or those whose
users are known as technically savvy and willing to be early adopters of
new technology. It is
important to keep users informed of any changes during the pilot and
solicit feedback on any unusual conditions the users might experience,
such as error messages or performance impact.
If you have an existing SMS implementation, you
must make sure that the boundaries of your pilot site(s) do not overlap
with the boundaries of any existing SMS sites. To avoid overlapping
boundaries, you may need to create dedicated IP subnets and/or AD sites
for your pilot deployment.
One of the essential goals of the pilot is to
monitor the impact ConfigMgr has on your production systems and your
network. This will be much easier if you are using an enterprise
monitoring tool such as Microsoft System Center Operations Manager
(OpsMgr). If you have Operations Manager in place, you should use the
Base OS management pack to capture baseline data on your pilot systems
before deployment. You can then track and investigate any major changes
in performance or event characteristics that may occur.
If you do not have access to an enterprise
monitoring tool, you can use the Windows performance monitoring tools to
capture performance data on your site systems and some client systems.
Here are some of the performance counters providing a general snapshot
of utilization of principal system resources:
Memory: Available Bytes
Memory: Pages/sec
Network Interface: Bytes Total/sec
Network Interface: Output Queue Length
Physical Disk (each instance): % Disk Time
Processor (total): % Processor Time
System: Processor Queue Length
For procedures for capturing this data, refer to
the Windows help files for the version of Windows you are using.
Capture a baseline prior to ConfigMgr deployment and capture additional
data after deployment. You should consider the impact of any major
changes in average system resource utilization or peak utilization that
may be associated with ConfigMgr activity such as inventory collection.
You should also use any
available network traffic monitoring tools to gather baseline statistics
on WAN and LAN utilization prior to the pilot deployment, and compare
the baselines with monitoring data gathered during the pilot. Most
organizations have network monitoring in place, which may be managed by a
dedicated network support team. If you do not already have network
monitoring tools, you can locate a variety of tools through sites such
as http://www.monitortools.com/.