2. Using Active Directory Administrative Tools
After a server has been promoted to a domain
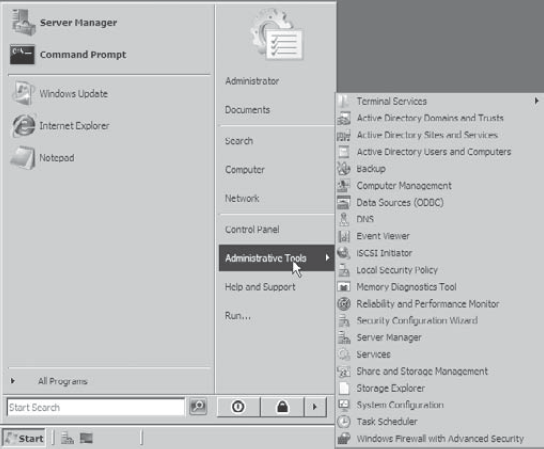
controller, you will see various tools added to the Administrative
Tools program group (see Figure 2).
These include the following:
Active Directory Domains and Trusts
Use this tool to view and change information
related to the various domains in an Active Directory environment. This
MMC snap-in also allows you to set up shortcut trusts.
Active Directory Sites and Services
Use this tool to create and manage Active
Directory sites and services to map to an organization's physical
network infrastructure.
Active Directory Users and Computers
User and computer management is fundamental for
an Active Directory environment. The Active Directory Users and
Computers tool allows you to set machine- and user-specific settings
across the domain.

A good way to make sure that Active Directory is
accessible and functioning properly is to run the Active Directory
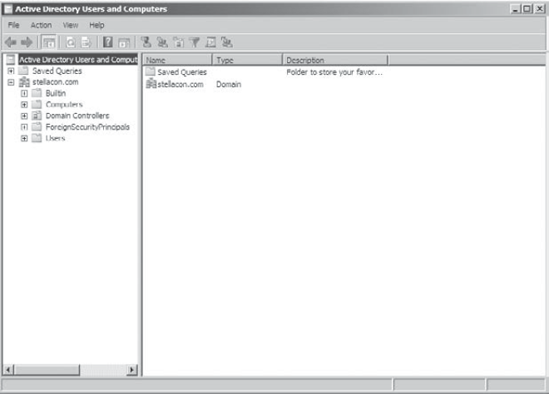
Users And Computers tool. When you open the tool, you should see a
configuration similar to that shown in Figure 3.
Specifically, you should make sure that the name of the domain you
created appears in the list. You should also click the Domain
Controllers folder and ensure that the name of your local server
appears in the right pane. If your configuration passes these two
checks, Active Directory is present and configured.

3. Testing from Clients
The best test of any solution is to simply verify
that it works the way you had intended in your environment. When it
comes to using Active Directory, a good test is to ensure that clients
can view and access the various resources presented by Windows Server
2008 domain controllers. In the following sections, you'll look at
several ways to verify that Active Directory is functioning properly.
3.1. Verifying Client Connectivity
Perhaps the most relevant way to test Active
Directory is by testing client operations. Using computers running
previous versions of Windows (such as Windows NT 4 or Windows 95/98),
you should be able to see your server on the network. Earlier versions
of Windows-based clients should recognize the NetBIOS name of the
domain controller. Windows 2000 and newer computers should also be able
to see resources in the domain, and users should be able to browse for
resources using the My Network Places icon.
If you are unable to see the recently promoted
server on the network, there is likely a network configuration error.
If only one or a few clients are unable to see the machine, the problem
is probably related to client-side configuration. To fix this, make
sure the client computers have the appropriate TCP/IP configuration
(including DNS server settings) and that they can see other computers
on the network.
If the new domain controller is unavailable from any
of the other client computers, you should verify the proper startup of
Active Directory .
If Active Directory has been started, ensure that the DNS settings are
correct. Finally, test network connectivity between the server and the
clients by accessing the My Network Places icon.
3.2. Joining a Domain
If Active Directory has been properly configured, clients and other servers should be able to join the domain. Exercise 2 outlines the steps you need to take to join a Windows XP Professional computer to the domain.
In order to complete this exercise, you must have
already installed and properly configured at least one Active Directory
domain controller and a DNS server that supports SRV records in your
environment. In addition to the domain controller, you need at least
one other computer, not configured as a domain controller, running one
of the following operating systems: Windows 2000, Windows XP
Professional (Windows XP Home Edition cannot join a domain), Vista,
Windows Server 2003, or Windows Server 2008.
Once clients are able to successfully join the
domain, they should be able to view Active Directory resources using
the My Network Places icon. This test validates the proper functioning
of Active Directory and ensures that you have connectivity with client
computers.
On
the Desktop of the computer that is to be joined to the new domain,
right-click the My Computer icon and click Properties (or select System
from the Control Panel). Select
the Network Identification tab. You will see the current name of the
local computer as well as information on the workgroup or domain to
which it belongs. If
you want to change the name of the computer, click Change. This is
useful if your domain has a specific naming convention for client
computers. Otherwise, continue to the next step. In
the Member Of section, choose the Domain option. Type the name of the
Active Directory domain that this computer should join. Click OK. When
prompted for the username and password of an account that has
permission to join computers to the domain, enter the information for
an administrator of the domain. Click OK to commit the changes. If
joining the domain was successful, you will see a dialog box welcoming
you to the new domain. You will be notified that you must reboot the computer before the changes take place. Select Yes when prompted to reboot.
|