CSS-P information can be defined
in a style sheet or inline. Defining the CSS rule in a style sheet
(either external or internal) has the benefit of truly separating
content from presentation, which, in turn, makes it easier to reshape
the content via another style sheet for another medium. A block of
text, for example, can be positioned on the right when viewed in a
monitor and left when printed out. Moreover, many designers find that
centralizing the layout information in a style sheet is a far more
effective way to work. Often, the same layout is used on multiple pages
of a site; with CSS-P rules in an external style sheet, you can modify
the layout of all the related pages simply by altering the CSS in the
style sheet. To accomplish the same change when the CSS is applied
inline would require extensive search-and-replace and the re-uploading
of every altered file.
Dreamweaver recognizes the importance of the <div> tag in modern Web site design with the integration of the <div> object. Not only is the insertion of the <div>
tag now possible in Design view, but Dreamweaver also provides visual
feedback indicating placement and easy modification through the
Property and Tag inspectors.
1. Defining a CSS rule for a <div> tag
When using a <div> object, the
typical workflow is to first create the required CSS rules. In most
cases, the CSS rule uses the ID selector because it is applied to only
one <div> tag. It's a good idea to give your CSS rules descriptive names, such as #header, #footer, #mainContent, and #navigation.
To create a CSS rule for use with <div> tags, follow these steps:
Choose Window  CSS Styles to open the CSS Styles panel.
From the CSS Styles panel, click the New CSS Rule button. This action opens the New CSS Rule dialog box.
From the New CSS Rule dialog box, set the Type option to ID.
Enter a name for your new style in the Selector field. It's a good idea to create the style for your <div> tag as an ID. To create an ID, preface the style name with a pound sign, as in #mainContent.
If you want to create your style in an external style sheet, use the Browse button to locate an existing style sheet.
If you want to add the style to the <head> region of the current document, select This Document Only from the Rule Definition list.
Click OK when you're finished to open the CSS Rule Definition dialog.
Select the Positioning category.
From the Positioning category (see Figure 1),
enter desired values for the following attributes: Type, Width, Height,
Visibility, Z-Index, Overflow, Placement (Top, Right, Bottom, and
Left), and Clip settings (Top, Right, Bottom, Left). Overflow and Clip
settings are optional.
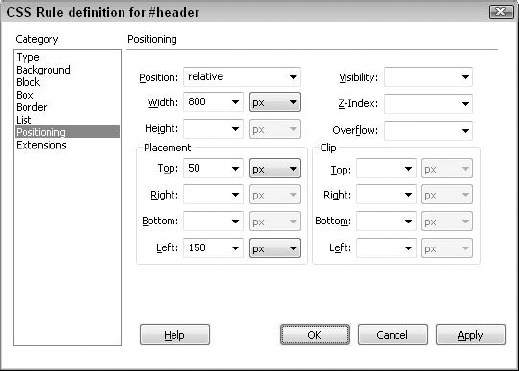
The Type attribute offers three options: Absolute, Relative, and Static. An Absolute <div> uses the upper-left corner as the origin for the Left and Top measurements, whereas Relative <div> tags originate from the current location. Use Static when you don't want to place the <div> in a certain position, but you still want to specify a rectangular block. Static <div> types ignore the Left and Top attributes.
If appropriate, select other categories and enter any additional style sheet attributes. Click OK when you're finished.
2. Inserting the <div> tag
After you have defined your CSS rule, follow these steps to add a <div> tag to the page:
Place your cursor where you want the <div> tag to appear. You can also select content on a page you'd like to wrap a <div> tag around.
From the Layout category of the Insert panel, click the Insert Div Tag button. Alternatively, you can choose Insert => Layout Objects => Div Tag. Dreamweaver displays the Insert Div Tag dialog box, as shown in Figure 2.
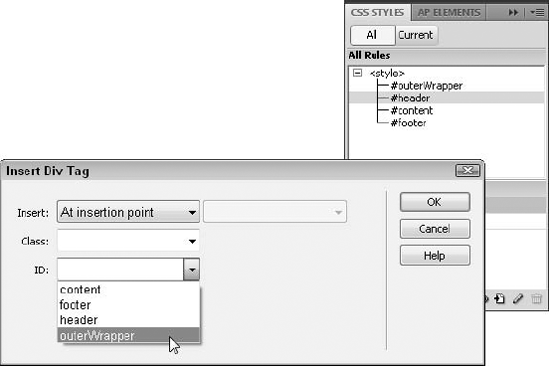
Choose the CSS rule from either the Class or ID list. Dreamweaver shows only those IDs that have not been previously applied.
|
If the CSS rule is not available from either of the
lists — perhaps because the style sheet is dynamically applied — you
can enter the name directly into either the Class or ID field. However,
unless Design Time Style Sheets are used to show the styles, the layout
won't render properly in Dreamweaver.
|
|
Select
where you'd like the tag placed from the Insert list. Dreamweaver
provides different options depending on the makeup of the page and
whether content is already selected. Only tags with assigned IDs are
listed, along with the <body> tag. Here are the Insert options you can choose from:
At Insertion Point: Inserts the <div> tag at the current cursor position. This option is available only if no content is selected.
Wrap Around Selection: Wraps the <div> tag around the currently selected content. Available only if a selection was made prior to inserting the <div> tag.
Before Tag: Puts the tag before the tag selected in the adjacent field.
After Tag: Inserts the <div> tag after the tag selected in the adjacent field.
After Start Of Tag: Places the <div> tag immediately following the opening tag in a tag pair, before any content within the tag.
Before End Of Tag: Inserts the tag right before the closing tag in a tag pair, after any content within the tag.
|
Be sure not to insert the <div>
tag in the middle of an empty tag. Empty tags, you may remember, are
tags that have no corresponding closing tag and enclose no content,
such as <img>.
|
|
Click OK when you're finished to insert the tag.
If the <div> tag was not wrapped
around previously selected content, Dreamweaver adds placeholder text
to help identify the tag and its class or ID. As another helpful aid to
identification, a red outline appears when your cursor crosses the
outer boundary of the <div>. This highlight is
controlled by the Mouse-Over option found in the Highlighting category
of the Preferences. The red outline is replaced by a thick blue one
when the <div> tag is selected, as shown in Figure 3.
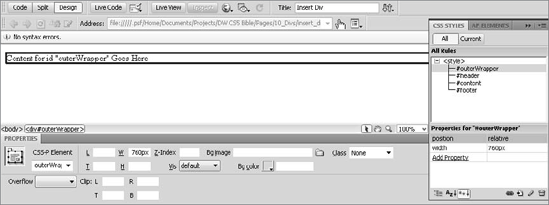
Select the <div> in Design view and
the Property inspector displays all the current attributes. If you make
any changes in the Property inspector, such as adding or altering the
background color, the change is written into the associated CSS style
rule. If the <div> tag's position property is set to
absolute, the outline is supplemented with positioning and sizing
handles. The interaction among object, Property inspector, and style
sheet holds true if you drag the selected <div> around
the page or resize it using the sizing handles; see the later section,
"Modifying an AP Element," for more details. You can also modify <div> tag properties by editing the style rule directly or by altering its properties on the Tag inspector panel.
|
If your layout is controlled by an external style
sheet that also controls the layout of other pages in your site, be
careful when adjusting the properties of a <div> tag.
When you make changes, Dreamweaver modifies the CSS style rule in the
external style sheet, potentially altering the layout of other pages
using the same style sheet.
|
|