I’m guessing you’ve worked hard in this
lesson and could use a bit of time relaxing on the beach. How about a
compromise. Let’s draw and paint other people relaxing on the beach. If
you know how to keep sand and saltwater out of your laptop, then go out
on location. If not, pick out a photo or two from my Waikiki collection
in the Places > Honolulu folder on the CD. There are several good
choices to consider. I’m torn between beach_couple.jpg and
beach_lady.jpg. Figure 1
shows my dilemma. I really like the figure of the elderly lady, but
it’s a bit stark with no background other than sand. The sky, trees, and
the strip of people sunbathing under beach umbrellas in the other photo
would make a good setting for her. What to do?
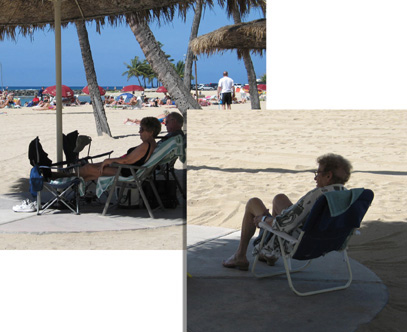
Image Manipulation
Painter
provides most of the same tools for editing photos that you’ll find in
Photoshop or Photoshop Elements, though some are named and organized a
bit differently. We can easily make a composite using the Lasso tool
(it’s a roommate of the Rectangular and Oval Selection tools) followed
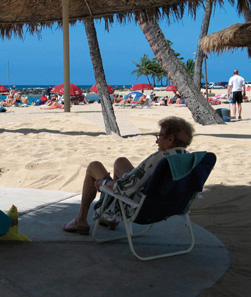
by the Copy and Paste commands. Figure 2
shows how nicely (and quickly) these two photos can be blended. The
layered RIFF file is also available in the Honolulu folder, as
beach_lady_layered.
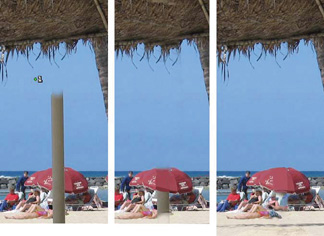
Well, there is one thing about the composite
that’s not quite right. The post that begins just at the feet of the
couple now appears to end 20 yards or so out toward the ocean in the
beach lady image. You can simply ignore it because the photo is only
going to be used for reference. But if it really bothers you, or you
want to practice some retouching techniques, here’s how to eliminate it.
Choose the Rubber Stamp tool, which shares a
space in the Toolbox with the Cloner. You’ll use this to apply pixels
from one area of the image to another. We’ll clone clear sky, shaggy
roof, and sand over the post. Holding down the Option/Alt key, click on
the point you want to designate as the source. A number 1 will appear
alongside a green dot. Now begin painting over the target area that you
want to cover. Figure 3
shows the process. The section on the left has the source indicated,
and some of the sky and the shaggy roof has been painted out. Establish a
new source pixel for sand to clone over the bottom of the post.
|
Painter
IX and earlier versions don’t have a Rubber Stamp tool, so use a
Cloners variant. Choose Straight or Soft Cloner and establish the source
pixel as above by clicking with the Option/Alt key held down.
|
The best way to fill in the missing part of the
umbrella is to simply paint with the Scratchboard Tool and reds sampled
from the umbrella. That result, in the middle section of the figure,
should be enough for our purposes. But if you must cover that last bit
of post, here’s how I did it. I cloned in a sunbather from another
position and cloned in the striped towel from the extreme left to cover
the “missing” face of the woman lying on the sand.