|
Dreamweaver CS5.5’s interface shares the look and
feel of other programs in the Adobe “Creative Suite,” like Photoshop,
Illustrator, and Flash. Out-of-the-box, Dreamweaver organizes its
various windows as a unified whole (see Figure 1).
That is, the edges of all the windows touch each other, and resizing
one window affects the others around it. This type of interface is
common on Windows computers, but Mac fans accustomed to independent
floating panels might find this look strange. Give it a chance. As
you’ll soon see, the design has some benefits. (But, if you just can’t
stand this locked-in-place style, you can detach the various panels and
place them wherever you like on the screen; see Section 1.1.6 for instructions.) 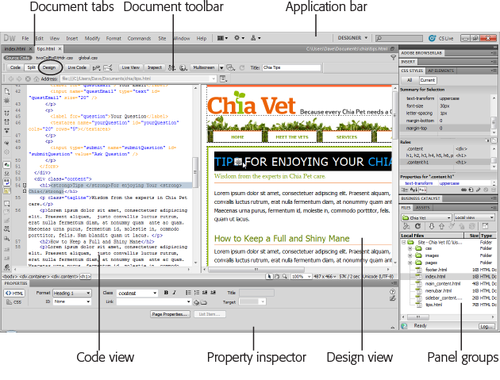
Many
of the program’s individual windows help you handle specific tasks,
like building style sheets.
Note: The
look of these windows depends on what kind of computer you use (Windows
or Macintosh) and what changes you make to the program’s preference
settings. Even so, the features and functions generally work the same
way.
1. The Document WindowYou build web pages in Dreamweaver’s document window.
As in a word processor, simply click inside the window and start typing
to add text to a page. You’ll work in this window as you build a page,
and you’ll open new document windows as you add pages to your site or
edit existing ones. Several
other screen components provide useful information about your document.
They may appear in different locations on Windows and Mac computers
(see Figures Figure 1 and Figure 2, respectively), but they work the same way. 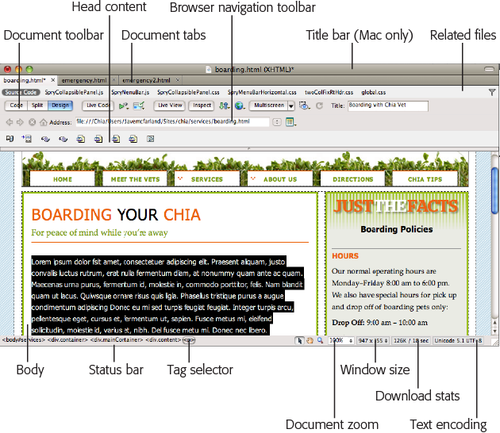
For example: Title bar (Mac only).
The title bar displays the name of the file on which you’re currently
working. In addition, if the page is XHTML-compliant , Dreamweaver indicates that in parentheses. For instance, in the example shown in Figure 2, the web page is written in XHTML and saved as a file named boarding.html. Document tabs. When you have more than one web document open at a time, small tabs appear at the top of the document
window—one for each open file. The name of the file appears in the tab;
to switch to a file, just click its tab. In Windows, the Document tab
bar also displays where you saved the file you’re working on (see Figure 1-1). Related files bar.
The related files bar lists all CSS (cascading style sheets),
JavaScript, and server-side programming pages (like PHP) the current web
page uses. You’ll learn more about external files, such as external
style sheets , JavaScript files, and server-side pages . But as a quick summary, it’s common in current web
design to have other files supply design and interactivity to a page of
HTML. Web designers frequently work on these files, so the related files bar lets you quickly jump to and work on “helper” files like external style sheets and JavaScript programs. Document toolbar.
The Document toolbar lets you change the title of a page, switch
between Design and Code views, jump to Live View (to see how the page
looks and works in a web browser), preview the page in different
browsers, make sure your page is free of HTML errors, and change the
look of the document
window.
When
you first install Dreamweaver, it displays your pages in split view,
with both the raw HTML and the visual design side-by-side. We’ll assume you’re in Design view (the visual, “this is what your page
will pretty much look like in a browser” view) most of the time. (To
make the toolbar visible if it’s not already, choose
View→Toolbars→Document.) However, if you have a really big screen,
staying in Split view gives you a great education in HTML; you can add
elements to the Design view and instantly see the corresponding HTML
tags added to the Code view.
Note: You may find two other toolbars, the Standard toolbar and Style
Rendering toolbar, useful. The Standard toolbar is common on many
Windows programs and includes buttons for frequent file and editing
tasks, like creating a new page, opening a page, saving one or all open
documents, canceling and repeating commands, and cutting, copying, and
pasting page elements. (Dreamweaver hides this toolbar until you summon
it by choosing View→Toolbars→Standard.) The Style Rendering toolbar
comes in handy when you work with CSS.
Browser navigation toolbar.
This toolbar works with the program’s Live View feature. When you click
the Live View button in the Document toolbar, Dreamweaver displays your
page in a web browser built right into the program. As a result, you
can see what your page will look like in a browser (Dreamweaver uses
WebKit—basically the Safari and Chrome web browsers, both based on
WebKit—for this feature). You can ctrl-click (⌘-click) a link on the
page and Dreamweaver will load that page.
Head content.
Most of what you put on a web page winds up in the body of the page,
but some elements are specific to the region of a page called the head. This is where you put things like the page’s title, the meta tags
(for example, a description of the page, or keywords used in the page)
that provide information for some search engines and browsers,
JavaScript programs, and links to CSS files . None
of this information actually appears on your page when it’s “live” on
the Internet, but you can have a look at it in Dreamweaver by choosing
View→Head Content. You’ll see a row of icons representing the different
bits of information in the head. Tag Selector.
The Tag selector is extremely useful. It provides a sneak peek at the
HTML that, behind the scenes, composes your web page. It indicates how
Dreamweaver nests HTML tags in your document to create what you see on
the page. In addition, the Tag selector lets you isolate, with a single
mouse click, an HTML tag and all the information inside it. That means
you can cleanly remove a page element or set its properties , add behaviors , and precisely control the application of styles . You’ll
make good use of the Tag selector in the tutorials to come. For
experienced Dreamweaver fans, it’s one of the program’s most useful
tools.
Note: In
Design view, clicking the <body> tag in the Tag selector is
usually the same as pressing Ctrl+A (⌘-A) or choosing Edit→Select All.
It selects everything in the document window. However, if you click inside a table or <div> tag ,
choosing Edit→Select All selects only the contents of the table cell or
<div> tag. In such a case, you need to press Ctrl+A (⌘-A) several
times to select everything on the page. After you do, you can press the
Delete key to instantly get rid of everything in your document. Careful, though: Pressing Ctrl+A (⌘-A) or choosing Edit→Select All in Code view selects all the code. Deleting code gives you an empty file—and an invalid web page.
2. The Insert PanelDreamweaver
provides many windows for working with the various technologies
required to build and maintain a website. Dreamweaver calls most of its
windows panels,
and they sit in tidy groups on the right edge of your screen. If the document window is your canvas, the Insert panel holds your brushes and paints, as you can see in Figure 1-3.
Although you can add text to a web page simply by typing within the
document window, the Insert panel’s click-to-add approach simplifies the
process of adding page elements like images, horizontal rules, forms,
and multimedia content. Want to put a picture on your web page? Just
click the Images icon. 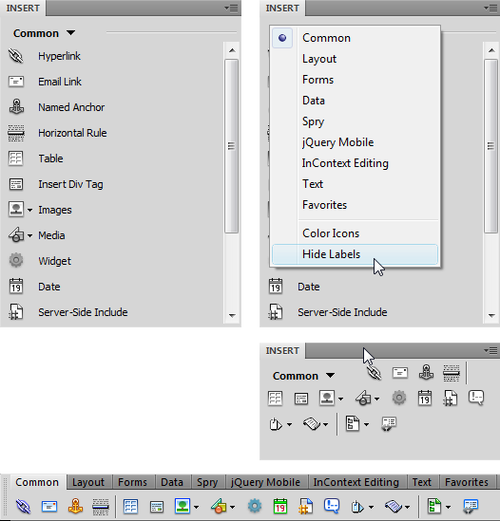
Note: Adding
elements to your web page this way may feel like magic, but the Insert
panel is really just a quick way to add code to a page, whether it’s
HTML, XHTML, JavaScript, or server-side programming like PHP .
Clicking the Images icon, for instance, simply inserts the <img>
tag into the underlying HTML of your page. Of course, Dreamweaver’s
visual approach hides that code and cheerfully displays a picture on the
page.
When
you first start Dreamweaver, the Insert panel is open. If you ever
close it by mistake, you can open it again by choosing Window→Insert or
by pressing Ctrl+F2 (⌘-F2). On the other hand, if space is at a premium
on your screen, you can close the Insert panel and use the Insert menu
instead. The commands in the Insert menu duplicate all the objects
available from the Insert panel. You can even turn the Insert panel into
a toolbar above the document window, as described in Figure 1-3. The Insert panel offers nine sets of objects, each available by selecting an option from the menu at the top of the panel (see Figure 1-3, top right) or by clicking one of the tabs on the Insert toolbar (bottom image in Figure 1-3): Common objects.
In addition to images, tables, and email links—which you’ll use
frequently in everyday web design—this category of the Insert panel
offers access to Dreamweaver’s template
features. Templates let you build basic web-page designs that you can
use over and over again on your site, speeding up page development and
facilitating easy updates.
Layout objects.
The objects in this category help you control the layout of a web page
by organizing the page’s contents using CSS or HTML tables. In addition,
this panel includes Dreamweaver’s Spry widgets that let you add
interactive page elements, such as drop-down menus, and animated,
collapsible panels so you can fit more information in less space on a
page. Form objects.
Want to get some input from visitors to your website? Use forms to let
them make comments, order products, or answer questions. The Forms
category lets you add form elements like radio buttons, pull-down menus,
and text boxes. Dreamweaver includes sophisticated form validation so you can make sure visitors input the correct information before they submit a form. Data. Dreamweaver makes connecting your web pages to databases as easy as clicking a few buttons . The Data
category provides powerful tools that help you build dynamic pages:
controls that add records to your database, for example, or that update
information already in a database. Dreamweaver also includes several
data tools that work without a complicated database setup. Its Spry
dataset feature lets you display interactive data in a table, so
visitors can sort the data by column and even change the information
displayed on the page by interacting with the data—all without having to
reload an additional web page.
Note: If
you’re a longtime Dreamweaver user, you know that versions of the
program before Dreamweaver CS4 displayed tool buttons in color; now it
displays the buttons in the Insert panel in black-and-white—if you liked
it better the old way, right-click the Insert panel and then choose
Color Icons. Better yet, you can move the Insert panel back to its old
location above the document window by selecting Classic from the Workspace Switcher menu (jump ahead to Figure 1-6). This action not only brings back the old Insert bar, it also adds color to all the buttons.
Spry.
Spry is a technology from Adobe that lets you easily add interactive
features to your site, from drop-down navigation menus to animated
effects to complex displays of data. Basically, Spry is a simple way for
web designers to insert complex JavaScript programming into websites.
The Spry
category of the Insert panel gathers together all of Dreamweaver’s Spry
features. You’ll find the same buttons spread throughout the Insert panel; for example, the Spry
tools related to form validation also appear in the Form objects
category, while the Spry dataset buttons are also available from the
Data category. jQuery Mobile.
jQuery Mobile is a JavaScript-powered toolset for building websites and
web applications that work well on mobile devices, like Android phones
and iPhones. The objects listed in this category simplify the creation
of page elements like lists, form fields, and text areas for
mobile-enhanced websites.
InContext Editing.
If you build websites that non-web-savvy folk will update, Adobe offers
a commercial service called InContext Editing, which lets nontechnical
people edit web pages using a simple web-based interface. Unfortunately,
while Adobe used to offer this as a standalone tool that you could use
with any website, InContext Editing is now available only when you use Business Catalyst (www.businesscatalyst.com) to host your site. Owned by Adobe, Business
Catalyst is a web-hosting service for web designers whose clients
require sophisticated e-commerce capability, mail-list management,
advanced web statistics, and automated tools to manage and update
websites. The service offers hosting packages ranging from a $9 a month
“starter” package to a $79 per month “pro” package. Dreamweaver includes
a Business Catalyst panel that lets you download and install a
Dreamweaver extension to help you manage sites hosted by Business
Catalyst. Of course, if you already have a web hosting company or don’t
want to use Business Catalyst, you should steer clear of this category. Text objects.
This category of objects lets you format type—make it bold or italic,
for instance. Unfortunately, clicking some of the buttons in this
category can introduce HTML errors if you don’t know what you’re doing.
The Property inspector
is a much more effective tool for creating headlines, bulleted lists,
and bold and italic text. The one useful button in this category is
Characters, which lets you insert text that’s not easy to type on a
keyboard, like the trademark and copyright symbols . Favorites.
Perhaps the most useful category, Favorites, can be anything you want
it to be. That is, after you discover which objects you use the most
(like the Image command, if you work with a lot of graphics). You can
add those objects to this set of personal tools. You may find that once
you populate this category, you’ll never again need the other categories in the Insert panel. For instructions on adding objects to your Favorites tools, see the box on the opposite page. ASP, PHP, ColdFusion.
If you’re building database-driven web pages, you’ll discover yet
another category of objects. The exact name of the category depends on
the server model you use (PHP, Microsoft’s Active Server Pages, or
Adobe’s ColdFusion server, for example), but it always contains
frequently used code snippets for the appropriate programming language.
|