With an emulator set up, you do not need an Android
device to get started in Android application development. Having one is a
good idea before you try to ship an application (e.g., upload it to the
Android Market). But perhaps you already have a device—maybe that is
what is spurring your interest in developing for Android.
The first step to make your
device ready for use with development is to go into the Settings
application on the device. From there, choose Applications, then
Development. That should give you a set of check boxes for choosing
development-related options, similar to what's shown in Figure 1.
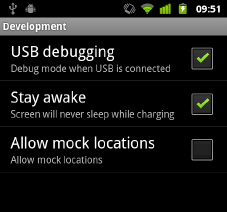
Generally, you will want to
enable USB debugging so that you can use your device with the Android
build tools. You can leave the other settings alone for now if you wish,
though you may find the Stay awake option to be handy, as it saves you
from having to unlock your phone repeatedly while it is plugged into
USB.
Next, you need to set up your
development machine to talk to your device. That process varies by the
operating system of your development machine, as covered in the
following sections.
1. Windows
When you first plug in your
Android device, Windows attempts to find a driver for it. It is
possible that, by virtue of other software you have installed, the
driver is ready for use. If Windows finds a driver, you are probably
ready to go.
If Windows doesn't find the driver, here are some options for getting one:
Windows Update:
Some versions of Windows (e.g., Vista) prompt you to search Windows
Update for drivers. This is certainly worth a shot, though not every
device will have supplied its driver to Microsoft.
Standard Android driver: In your Android SDK installation, you will find a google-usb_driver
directory, containing a generic Windows driver for Android devices. You
can try pointing the driver wizard at this directory to see if it
thinks this driver is suitable for your device.
Manufacturer-supplied driver:
If you still do not have a driver, search the CD that came with the
device (if any) or search the web site of the device manufacturer.
Motorola, for example, has drivers available for all of its devices in
one spot for download.
2. Mac OS X and Linux
Odds are decent that simply plugging in your device will "just work." You can see if Android recognizes your device by running adb devices in a shell (e.g., OS X Terminal), where adb is in your platform-tools/ directory of your SDK. If you get output similar to the following, Android detected your device:
List of devices attached
HT9CPP809576  device
If you are running Ubuntu (or perhaps another Linux variant) and this command did not work, you may need to add some udev rules. For example, here is a 51-android.rules file that will handle the devices from a handful of manufacturers:
SUBSYSTEM=="usb", SYSFS{idVendor}=="0bb4", MODE="0666"
SUBSYSTEM=="usb", SYSFS{idVendor}=="22b8", MODE="0666"
SUBSYSTEM=="usb", SYSFS{idVendor}=="18d1", MODE="0666"
SUBSYSTEMS=="usb", ATTRS{idVendor}=="18d1", ATTRS{idProduct}=="0c01", MODE="0666",
 OWNER="[me]"
SUBSYSTEM=="usb", SYSFS{idVendor}=="19d2", SYSFS{idProduct}=="1354", MODE="0666"
SUBSYSTEM=="usb", SYSFS{idVendor}=="04e8", SYSFS{idProduct}=="681c", MODE="0666"
Drop that in your /etc/udev/rules.d directory on Ubuntu, and then either reboot the computer or otherwise reload the udev rules (e.g., sudo service udev reload). Then, unplug the device, plug it in again, and see if it is detected.