Building a Simple Two-Item Menu
Although many applications demand serious user
interfaces, sometimes you don’t need complexity. A simple one- or
two-button menu can accomplish a lot. Use these steps to create a
hand-built interface for simple utilities:
1. | Create a UIViewController subclass that you use to populate your primary interaction space.
|
2. | Allocate a navigation controller and assign an instance of your custom view controller to its root view.
|
3. | In the custom view controller, create one or two buttons and add them to the view’s navigation item.
|
4. | Build the callback routines that get triggered when a user taps a button.
|
Recipe 1 demonstrates these steps. It creates a simple view controller called TestBedViewController and assigns it as the root view for a UINavigationController. In the loadView
method, two buttons populate the left and right custom slots for the
view’s navigation item. When tapped, these show an alert, indicating
which button was pressed. This recipe is not feature rich, but it
provides an easy-to-build two-item menu.
This code uses a handy bar
button creation macro. When passed a title and a selector, this macro
returns a properly initialized autoreleased bar button item ready to be
assigned to a navigation item.
#define BARBUTTON(TITLE, SELECTOR) [[[UIBarButtonItem alloc] initWithTitle:TITLE style:UIBarButtonItemStylePlain target:self action:SELECTOR] autorelease]
If you’re looking for more complexity than two items can offer, consider having the buttons trigger UIActionSheet menus. Action sheets,
let users select actions from a short list of options
(usually between two and five options, although longer scrolling sheets
are possible) and can be seen in use in the Photos and Mail
applications for sharing and filing data.
Note
You can add images instead of text to the UIBarButtonItem instances used in your navigation bar. Use initWithImage: style: target: action: instead of the text-based initializer.
Recipe 1. Creating a Two-Item Menu Using a Navigation Controller
@implementation TestBedViewController
- (void) rightAction: (id) sender
{
    showAlert(@"You pressed the right button");
}
- (void) leftAction: (id) sender
{
    showAlert(@"You pressed the left button");
}

- (void) loadView
{
    self.view = [[[NSBundle mainBundle] loadNibNamed:@"mainview"
                    owner:self options:nil] lastObject];
    self.navigationItem.rightBarButtonItem =
        BARBUTTON(@"Right",@selector (rightAction:));
    self.navigationItem.leftBarButtonItem = BARBUTTON(@"Left",selector(leftAction:));
}
@end

@implementation TestBedAppDelegate
- (void)applicationDidFinishLaunching:(UIApplication *)application
{
    UIWindow *window = [[UIWindow alloc]
              initWithFrame:[[UIScreen mainScreen] bounds]];
    UINavigationController *nav = [[UINavigationController alloc]
      initWithRootViewController:[[TestBedViewController alloc] init]];
    [window addSubview:nav.view];
    [window makeKeyAndVisible];
}
@end
|
Adding a Segmented Control
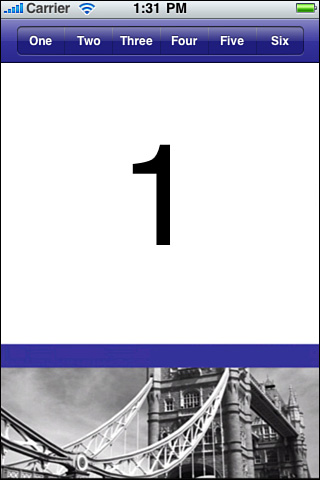
The preceding recipe showed how to use the two available button slots in your navigation bar to build mini menus. Recipe 2 expands on that idea by introducing a six-item UISegmentedControl and adding it to a navigation bar’s custom title view, as shown in Figure 2. When tapped, each item updates the main view with its number.
The key thing to pay attention to in this recipe is the momentary
attribute assigned to the segmented control. This transforms the
interface from a radio button style into an actual menu of options,
where items can be selected independently and more than once. So after
tapping item three, for example, you can tap it again. That’s an
important behavior for menu interaction.
Unlike Recipe 1, all items in the segmented control trigger the same action (in this case, segmentAction:). Determine which action to take by querying the control for its selectedSegmentIndex
and use that value to create the needed behavior. This recipe updates a
central text label. You might want to choose different options based on
the segment picked.
Note
If you want to test this code with the momentary property disabled, set the selectedSegmentIndex property to match the initial data displayed. In this case, segment 0 corresponds to the displayed number 1.
Segmented controls use styles to specify how they should display. The sample here, shown in Figure 2, uses a bar style. It is designed for use with bars, as it is in this example. The other two styles (UISegmentedControlStyleBordered and UISegmentedControlStylePlain) offer larger, more metallic-looking presentations. Of these three styles, only UISegmentedControlStyleBar can respond to the tintColor changes used in this recipe.
Recipe 2. Adding a Segmented Control to the Navigation Bar
-(void) segmentAction: (UISegmentedControl *) sender
{
    // Update the label with the segment number
    UILabel *label = (UILabel *)[self.view viewWithTag:101];
    [label setText:[NSString stringWithFormat:
        @"%0d", sender.selectedSegmentIndex + 1]];
}

- (void) loadView
{
    self.view = [[[NSBundle mainBundle] loadNibNamed:@"mainview"
        downer:self options:nil] lastObject];

    // Create the segmented control
    NSArray *buttonNames = [NSArray arrayWithObjects:@"One", @"Two",
        @"Three", @"Four", @"Five", @"Six", nil];
    UISegmentedControl* segmentedControl = [[UISegmentedControl alloc]
        initWithItems:buttonNames];
    segmentedControl.segmentedControlStyle =
        UISegmentedControlStyleBar;
    segmentedControl.momentary = YES;
    @selector(segmentAction:[segmentedControl addTarget:self action:)
        forControlEvents:UIControlEventValueChanged];

    // Add it to the navigation bar
    self.navigationItem.titleView = segmentedControl;
    [segmentedControl release];
}
|