1. Install the ADT for Eclipse
If you will not be using Eclipse for your Android
development, you can skip to the next section. If you will be using
Eclipse but have not yet installed it, you will need to do that first.
Eclipse can be downloaded from the Eclipse web site, www.eclipse.org/. The Eclipse IDE for Java Developers package will work fine.
Next, you need to install the Android Developer Tools (ADT) plug-in. To do this, open Eclipse and choose Help =>
Install New Software. Then, in the Install dialog box, click the Add
button to add a new source of plug-ins. Give it a name (e.g., Android)
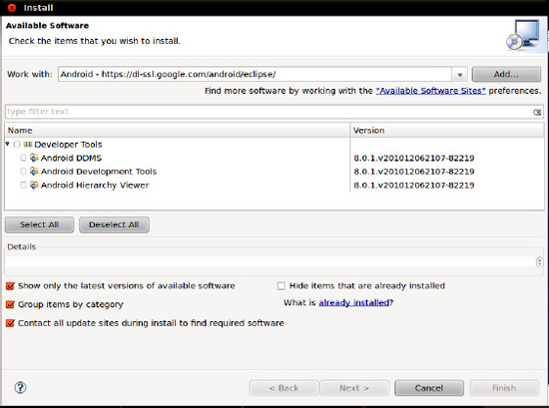
and supply the following URL: https://dl-ssl.google.com/android/eclipse/. That should trigger Eclipse to download the roster of plug-ins available from that site (see Figure 1).

Check the Developer Tools
check box and click the Next button. Follow the rest of the wizard steps
to review the tools to be downloaded and review and accept their
respective license agreements. When the Finish button is enabled, click
it, and Eclipse will download and install the plug-ins. When it's done,
Eclipse will ask to restart; let it do so.
Then, you need to show ADT where to locate your Android SDK installation from the preceding section. To do this, choose Window =>
Preferences from the Eclipse main menu (or the equivalent Preferences
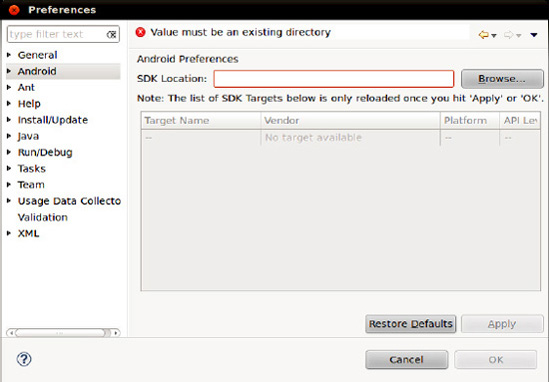
option for Mac OS X). Click the Android entry in the list pane of the
Preferences dialog box, as shown in Figure 2.

Then, click the Browse button
to find the directory where you installed the SDK. After choosing it,
click Apply in the Preferences dialog box, and you should see the
Android SDK versions you installed previously. Then, click OK, and the
ADT will be ready for use.
2. Install Apache Ant
If you will be doing all of your
development from Eclipse, you can skip to the next section. If you wish
to develop using command-line build tools, you need to install Apache
Ant. You may have this installed already from previous Java development
work, as it is fairly common in Java projects. However, you need Ant
version 1.8.1 or later, so check your current copy (e.g., ant -version).
If you do not have Ant or do not have the correct version, you can obtain it from the Apache Ant web site, at http://ant.apache.org/. Full installation instructions are available in the Ant manual, but the basic steps are as follows:
Unpack the ZIP archive in a logical place on your machine.
Add a JAVA_HOME environment variable, pointing to where your JDK is installed, if you do not have one already.
Add an ANT_HOME environment variable, pointing to the directory where you unpacked Ant in step 1.
Add $JAVA_HOME/bin and $ANT_HOME/bin to your PATH.
Run ant -version to confirm that Ant is installed properly.