Compiled iPhone applications live in application
bundles. Like their Macintosh cousins, these application bundles are
just folders named with a .app extension. Your program’s contents and
resources reside in this folder, including the compiled executable,
supporting media (such as images and audio), and a few special files
that describe the application to the OS. The folder is treated by the
operating system as a single bundle.
Application Folder Hierarchy
iPhone bundles are
simple. Unlike the Mac, iPhone bundles do not use Contents and Resources
folders to store data or a MacOS folder for the executable. All
materials appear at the top level of the folder. For example, instead of
putting a language support (.lproj) folder into Contents/Resources/,
Xcode places it directly into the top .app folder. You can still use subfolders to organize your project, but these developer-defined folders do not follow any standard.
The iPhone SDK’s core OS support includes the NSBundle
class. This class offers access to the files stored in the application
bundle. NSBundle makes it easy to locate your application’s root folder
and to navigate down to your custom subfolders to point to and load
built-in resources like sounds, images, and data files.
Note
As on a
Macintosh, user domains mirror system ones. Official Apple-distributed
applications reside in the primary /Applications folder. Third-party
applications live in /var/mobile/Applications. The underlying UNIX file
system is obscured by the iPhone’s sandbox, which is discussed later in
this section.
The Executable
The executable
application file of your application resides at the top-level folder of
the application bundle. It carries executable permissions so it can run
and is signed as part of the application bundle during the compilation
process. You may only load and run applications that have been signed
with an official developer certificate. Those certificates are issued by
Apple via the iPhone developer program portal at the official developer
Web site.
Apple offers several kinds
of signing profiles called mobile provisions that vary by how the
application will be deployed. You need separate provisions for
applications that will be tested during development on a local device,
for applications that will be sent out to registered devices for
testing, and for those that will be distributed through App Store.
The Info.plist File
As on a
Macintosh, the iPhone application folder contains that all-important
Info.plist file. Info.plist files are XML property lists that describe
an application to the operating system. Property lists store key-value
pairs for many different purposes and can be saved in readable
text-based or compressed binary formats. In an Info.plist file, you
specify where the application’s executable (CFBundleExecutable, “Executable file”) can be found, the text that appears under the application icon (CFBundleDisplayName, “Bundle display name”), and the application’s unique identifier (CFBundleIdentifier, “Bundle identifier).
Be careful when setting
the display name. Titles that are too long to display properly are
truncated; the iPhone adds ellipses as needed. So your application named
“My Very First iPhone App” may display as “My Very F....” This provides
less information to your end user than a simpler title like “First App”
would offer.
The application
identifier typically uses Apple’s reverse domain naming format (for
example, com.sadun.appname). The identifier plays a critical role for
proper behavior and execution; it must not duplicate any other
identifier on App Store. In use, the product identifier registers your
application with SpringBoard, the “Finder” of the iPhone. SpringBoard
runs the home screen from which you launch your applications. The
product identifier also forms the basis for the built-in preferences
system called the user defaults.
The identifier is
case sensitive and must be consistent with the provisions you generate
at the developer portal. Problems with misnamed bundle identifiers have
cost developers many hours of wasted time. Specify the identifier by
editing your project’s settings in Xcode (see Figure 4).
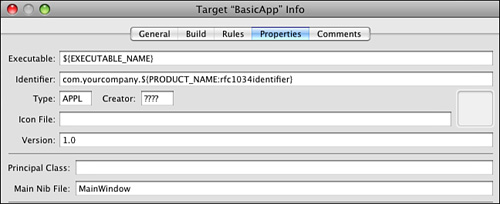
Note
To change identifiers, open the Targets list in the Xcode project’s left-hand column. Double-click Targets > Your Application Name.
This opens the Target Info window. Click on the Properties tab and edit
the Identifier from com.yourcompany to a reverse domain name that
represents your actual company. Enter your personal domain and let Xcode
append the application product name.
Application
preferences are automatically stored in the application sandbox. The
sandbox mimics the domains and folders normally found on the core OS. On
the iPhone, preferences appear in a local Library folder and use the
application identifier for naming. This identifier is appended with the
.plist extension (for example, com.sadun.appname.plist), and the
preferences are stored using a binary .plist format. You can read a
binary .plist by transferring it to a Macintosh via Xcode’s organizer.
Note
To copy application data
from the iPhone to your Macintosh, open the Organizer window (Windows
> Organizer). Select your device and then an item from the
applications list. Click the arrow next to the name to reveal the
Application Data bundle and then drag that bundle to the desktop. It
expands to a standard folder named with the application identifier and
the date and time the data was retrieved.
You
can edit property list files directly in Xcode or use the Property List
Editor that ships as part of Xcode’s utilities. It’s located in
/Developer/Applications/Utilities and offers a user-friendly GUI. Use
Apple’s plutil utility to convert property lists from binary to a
text-based XML format: plutil –convert xml1 plistfile. Apple uses binary plists to lower storage requirements and increase system performance.
As with the Macintosh,
Info.plist files offer further flexibility and are highly customizable.
With them, you can set application-specific variables (UIRequiresPersistentWiFi) or specify how your icon should display (UIPrerenderedIcon).
These variables are powerful. They can define multiple roles for a
single application although this functionality is not available to
third-party development.
Other standard Info.plist keys include UIStatusBarStyle for setting the look and color of the status bar and UIStatusBarHidden for hiding it altogether. UIInterfaceOrientation lets you override the accelerometer to create a landscape-only (UIInterfaceOrientationLandscapeRight) presentation. Register your custom application URL schemes (for example, myCustomApp://) by setting CFBundleURLTypes.
The Icon and Default Images
The icon.png image and
Default.png are two key image files. Icon.png acts as your application’s
icon, the image used to represent the application on the SpringBoard
home screen. Default.png (also known as your “launch image”) provides
the splash screen displayed during application launch.
Unlike Default.png, the icon filename is arbitrary. If you’d rather not use “icon.png,” set the CFBundleIconFile
key in your Info.plist file to whatever filename you want to use but be
aware that this might cause trouble when submitting your application to
App Store; iTunes Connects requires the application to use icon.png (or
Icon.png) even if the Info.plist specifies another name. This key is
not set by default, so be sure to add a value regardless of the art you
use.
Apple recommends matching
Default.png to your application’s background. Many developers use
Default.png to launch images for a logo splash or for a “Please wait”
message. These go against Apple’s human interface guidelines (launch
images should provide visual continuity, not advertising or excuses for
delays) but are perfectly understandable uses. Xcode lets you take
screenshots of your application in action using its Organizer window
(Window > Organizer). It also offers the option to set one of those
shots as your Default.png image.
The official application
icon size is 57-by-57 pixels. SpringBoard automatically scales larger
art. Provide flat (not glossy) art with squared corners. SpringBoard
smoothes and rounds those corners and adds an automatic gloss and shine
effect. If for some compelling reason you need to use prerendered art,
set UIPrerenderedIcon to <true/> in your Info.plist file.
As with all on/off Info.plist items, make sure to set the value for UIPrerenderedIcon to the Boolean value true (<true/>, the checked box in the Xcode GUI). Using a string for “true” (<string>true</string>)
may work on the simulator while producing no effect on the iPhone. Also
remember that the 3.0 Xcode property list editor hides the actual key
name. Add a field for the “Icon already includes gloss and bevel
effects” key and check the box that appears in the value column.
When submitting your
application to App Store, you need to create a high-resolution
(512-by-512 pixel) version of your icon. Although you can up sample your
57-by-57 icon.png art, it won’t look good. Going the other way allows
you to maintain high-quality art that you can compress to your icon as
needed. Keep your art simple and compressible. An icon that looks
stunning at 512×512 looks muddled and sloppy at 57×57 when overly
detailed.
Note
You may include a
29-by-29 pixel image called Icon-settings.png in your project. This
image represents your application in the Settings application. Most
developers skip this option. If not included, Settings simply scales
your icon.png image.
NIB Files
Interface Builder
creates .xib files that store precooked addressable user interface
layouts in XML format. (If you’re curious, you can open these files in
your favorite text editor and peek at the XML.) Most IB-based
applications contain several .xib files that define various view
components. Typical .xib contents might include window layouts, custom
table cells, pop-up dialogs, and more.
When creating your
application bundles, Xcode compiles the XML data into a NIB package,
which is placed alongside the executable and any other application
components. (NIB, somewhat archaically, stands for NeXT Interface
Builder, which is the ancestor of the OS X Interface Builder used to
build iPhone applications.) The .nib files appear at the top level of
your application bundle and are used directly from your program when
loading screens.
Note
When you develop programs that do not use XIB Interface-Builder bundles, remove the NSMainNibFile
key from Info.plist and discard the automatically generated
MainWindow.xib file from your project. This reduces clutter in your
program and keeps your application from trying to load an interface file
that you never fully defined. Set the fourth argument of UIApplicationMain() in main() to the class name of your application delegate.
Files Not Found in the Application Bundle
As with the Macintosh,
things you do not find inside the application bundle include preferences
files (generally stored in the application sandbox in
Library/Preferences), application plug-ins (stored in /System/Library at
this time and not available for general development), and documents
(stored in the sandbox in Documents).
At
this time, the iPhone SDK does not let you prepopulate these folders.
Since your program cannot edit or overwrite any files in the application
bundle, copy any files that need to be changed, such as database files,
to another folder (Documents or Library) on the first run of your
program.
Another thing that seems
to be missing (at least from the Macintosh programmer point of view) is
Application Support folders. You should copy your support data, which
more rightfully would be placed into an Application Support structure,
to your Documents or Library folders from the application bundle when
your application is first launched. Thereafter, check to make sure that
data is there and recopy the data if needed.
IPA Archives
When users
purchase your application they download a .ipa file from iTunes. This
file is actually a zipped archive. It contains a compressed payload,
namely the app bundle you built from the components just described.
iTunes stores .ipa archives in the Mobile Applications folder in the
iTunes Library. If you rename a copy of any .ipa file to use the .zip
extension, you can easily open it using standard compression software.
Each application is
customized on download to ensure that it can only be installed and run
on the iPhone devices authorized by your iTunes account. This prevents
the application from being shared freely over the Internet. Although
software pirates have created cracking tools, these are not widely used
in the wild. Apple’s basic protections ensure that for the most part
only those who have purchased and downloaded the application from iTunes
can run your software.
Sandboxes
The iPhone OS
restricts all SDK development to application “sandboxes” for the sake of
security. The iPhone sandbox limits your application’s access to the
file system to a minimal set of folders, network resources, and
hardware. In some ways, it’s like attending a restrictive school with a
paranoid principal:
Your application can play in its own sandbox, but it can’t visit anyone else’s sandbox.
You
cannot share toys. You cannot share data (except via the
user-controlled system pasteboard). You cannot mess in the
administrative offices. Your files must stay in the folders provided to
you by the sandbox, and you cannot copy files to or from other
application folders.
You
cannot peek over the fence. Reading from or attempting to write to
files outside your sandbox is grounds for App Store rejection. Your
application is prevented from writing to most folders outside the
sandbox by the iPhone OS.
Your
application owns its own Library, Documents, and /tmp folders. These
mimic the standard folders you’d use on a less-restrictive platform but
specifically limit your capability to write and access this data.
In addition to
these limitations, your application must be signed digitally and must
authenticate itself to the operating system with a coded application
identifier, which you must create at Apple’s developer program site.
On the bright side,
sandboxing ensures that all program data gets synced whenever your
device is plugged into its home computer. On the downside, at this time
Apple has not clarified how that synced data can be accessed from a
Windows- or Macintosh-based desktop application.
Note
Sandbox specification files
(using the .sb extension) are stored in /var/mobile/Applications along
with each actual sandbox folder. These files control privileges such as
read-and-write access to various bits of the file system. As a
developer, you will not be able to see or manipulate these files, but
they are there, controlling the ways your app may or may not interact
with the operating system.