6. Game API
The MIDP specification supports easy game development through the use of the javax.microedition.lcdui.game package. It contains the following classes:
GameCanvas
LayerManager
Layer
Sprite
TiledLayer.
The aim of the API is to facilitate richer gaming content through a set of APIs that provides useful functionality.
6.1. GameCanvas
A basic game user interface class that extends javax.microedition.lcdui.Canvas, GameCanvas provides an offscreen buffer as part of the implementation even if the underlying device doesn't support double buffering. The Graphics object obtained from the getGraphics()
method is used to draw to the screen buffer. The contents of the screen
buffer can then be rendered to the display synchronously by calling the
flushGraphics() method. The GameCanvas
class also provides the ability to query key states and return an
integer value in which each bit represents the state of a specific key
on the device:
public int getKeyStates();
If the bit representing a
key is set to 1, then this key has been pressed at least once since the
last invocation of the method. The returned integer can be ANDed
against a set of predefined constants, each representing a specific key,
by having the appropriate bit set (support for the last four values is
optional).
We use the GameCanvas class members that describe key presses (e.g., GameCanvas.FIRE_PRESSED) to ascertain the state of a key in the manner shown below:
if ( getKeyStates() & Game.Canvas.FIRE_PRESSED != 0 ) {
  // FIRE key is down or has been pressed - take appropriate action
}
6.2. TiledLayer
The abstract Layer class is the parent class of TiledLayer and Sprite. A TiledLayer consists of a grid of cells each of which can be filled with an image tile. An instance of TiledLayer is created by invoking the constructor:
public TiledLayer(int columns, int rows, Image image, int tileWidth,
                                                    int tileHeight);
The columns and rows arguments represent the number of columns and rows in the grid. The tileWidth and tileHeight arguments represent the width and height of a single tile in pixels. The image argument represents the image used to create the set of tiles that populate the TiledLayer.
Naturally, the dimension of the image in pixels must be an integral
multiple of the dimension of an individual tile. The use of TiledLayer is best illustrated with an example.
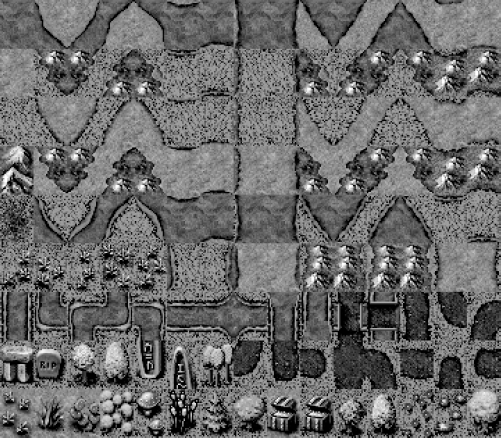
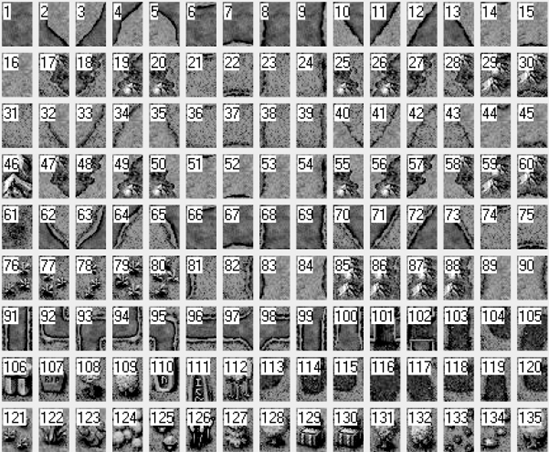
One of the principal uses of TiledLayer is the creation of large scrolling backgrounds from relatively few tiles. Consider the example in Figure 2, which shows a big set of tiles of equal dimensions that we can arrange in different ways to create a TiledLayer
background using selected tiles. You can for example reuse tile 1 to
create a large lake or tiles 1, 5 and 16 to create a strip of land
surrounded by a small lake. The dimensions of the image are 360 × 315
pixels and each tile's dimension is 24 × 35 pixels; that gives us a
total of 135 tiles which can be treated as a 15 × 9 array (see Figure 3) and manipulated to create our background.
We put TiledLayer scrolling backgrounds into use later on, with a LayerManagerDemo example.
6.3. Sprite
A Sprite is a
basic visual element suitable for creating animations and consists of an
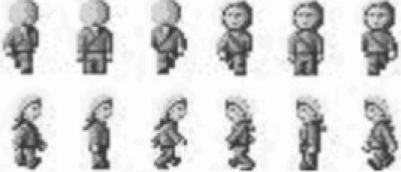
image composed of several smaller images (frames). The Sprite can be rendered as one of the frames. By rendering different frames in a sequence, a Sprite provides animation. Let us consider a simple example. Figure 2.8
consists of 12 frames of the same width and height. By displaying some
of the frames in a sequence, we can produce an animation.
Here's how to create and animate a sprite based on the image in Figure 4. The code is abbreviated for clarity and we will see a more complete example in the LayerManagerDemo MIDlet:
// create image for sprite
Image image = Image.createImage("/example_sprite.png");
// create and position sprite
guy = new Sprite(image, SPRITE_WIDTH, SPRITE_HEIGHT);
guy.setPosition(spritePositionX, spritePositionY);
// paint sprite on the screen
public void paint(Graphics g) {
  g.setColor(255, 255, 255);
  g.fillRect(0, 0, getWidth(), getHeight());
  guy.paint(g);
}
// loop through all the frames
while (running) {
  repaint();
  guy.nextFrame();
  ...
}
In addition to various transformations such as rotation and mirroring, the Sprite
class also provides collision detection, which is essential for games
as it allows the developer to detect when the sprite collides with
another element and prevent the hero from crossing a solid wall or
obstacle. Both pixel-level and bounding-rectangle collisions are
available.
6.4. LayerManager
As the name implies, the LayerManager manages a series of Layer objects. Sprite and TiledLayer both extend Layer. More specifically, a LayerManager controls the rendering of Layer
objects. It maintains an ordered list so that they are rendered
according to their z-values (in standard computer graphics terminology).
We add a Layer to the list using the method:
public void append(Layer l);
The first layer appended has
index zero and the lowest z-value – that is, it appears closest to the
user (viewer). Subsequent layers have successively greater z-values and
indices. Alternatively, we can add a layer at a specific index using the
method:
public void insert(Layer l, int index);
To remove a layer from the list we use the method:
public void remove(Layer l);
We position a layer in the LayerManager's coordinate system using the setPosition() method. The contents of LayerManager are not rendered in their entirety; instead, a view window is rendered using the paint() method of the LayerManager:
public void paint(Graphics g, int x, int y);
The x and y arguments are used to position the view window on the displayable object (Canvas or GameCanvas) upon which the LayerManager is rendered. The size of the view window is set using this method:
public void setViewWindow(int x, int y, int width, int height);
The x and y values determine the position of the top left corner of the rectangular view window in the coordinate system of the LayerManager. The width and heightLayerManager.
arguments determine the width and height of the view window and are
usually set to a size appropriate for the device's screen. By varying
the x and y coordinates we can pan through the contents of the
6.5. LayerManagerDemo Example
Our LayerManagerDemo example summarizes all Game API concepts seen so far. It illustrates the use of a Sprite (for animating the hero), a TiledLayer (for background construction), a LayerManager (for scrolling the background), and a GameCanvas
(for drawing it all).
In the constructor, we load the image resources used by our TiledLayer and the Sprite (see Figures 2.6 and 2.8, respectively). We create our game hero, using the Sprite
constructor, then set the frame sequence, which allows us to loop only
to the frames that interest us. In this case, we want the hero to walk
downwards, so we choose to use only frames 6, 7 and 8:
guy = new Sprite(guyImage,SPRITE_WIDTH,SPRITE_HEIGHT);
guy.setFrameSequence(new int[] {6,7,8});
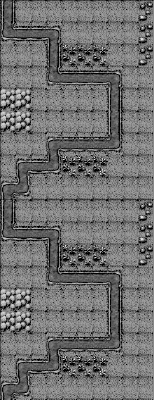
We then create the background for the game scene, by constructing a new TiledLayer from the source image (see Figure 5), and use the fillLayer() method and the cells array to create a terrain over which our hero will walk.
We create a LayerManager to manage both the background TiledLayer and the Sprite (both inherit from Layer). We append the Sprite
then the background layer, to ensure that the hero is shown over the
background and not the other way around, since the hero has a smaller
z-index. This is how it's done in code:
// creating LayerManager
manager = new LayerManager();
manager.append(guy);
manager.append(background);
manager.setViewWindow(0,0,SCREEN_WIDTH,SCREEN_HEIGHT);
We also set the view window to
match the size of the screen so we can see it in its entirety, and not
just a portion of it. Try playing with the values for the view window
and you get partial views of the background that you can use for other
games ideas. The last line of code in the constructor just sets the GameCanvas to be in full-screen mode.
Since your animation runs
permanently, it's good practice to put it in another thread, so we don't
block the current thread, which serves UI application requests. This
frees the application to continue processing events. To do this, we make
our GameCanvas Runnable, implement the game animation loop within the run() method, and use the start() and stop() methods to start and stop the animation:
public void start() {
  running = true;
  Thread t = new Thread(this);
  t.start();
}

public void stop() {
  running = false;
}
Using t.start() triggers the run()
method, which is then responsible for the game animation. This includes
managing background scrolling, animating the sprite, drawing everything
to the screen, and resetting the background scrolling when needed, so
our hero won't fall off the screen:
public void run() {
  Graphics graphics = this.getGraphics();
  // graphics.setColor(255, 255, 255);

  while(running) {
    layerY -= 1;
    background.setPosition(0,layerY);
    guy.setPosition(getWidth()/2 - guy.getWidth()/2,
                 getHeight()/2 - guy.getHeight()/2);
    manager.paint(graphics,0,0);
    flushGraphics();
    guy.nextFrame();

    try {
      Thread.sleep(20);
    }
    catch(InterruptedException e) {
      break;
    }

    if(layerY == -(background.getHeight() / 2)) {
      layerY = 0;
    }
  }
}
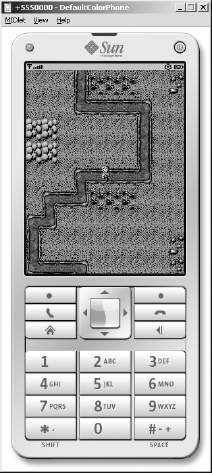
I strongly encourage you to at least run the example application with the WTK emulator (see Figure 6)
so you can see for yourself how these techniques combine to generate
the illusion of motion that is the basis of all games and get motivated
to create your own games using this skeleton code.
This concludes our introduction to the Game API of MIDP 2.0.