The application shows the user one card at a
time, initially hiding the answer, and then lets users indicate whether
they got the answer right. It keeps track of how many times users answer
each card right or wrong, and users can create new flash cards and
delete existing flash cards. Initially, we’ll put the UI and mechanics
of the game together without any data persistence. Each time you run the
application, you’ll need to create the cards all over again. Then we’ll
look at how to persist the user-created flash cards between application
launches using object archiving.
Setting Up the Project
Create a new view-based iPhone application in Xcode and call it FlashCards.
As you’d suspect with an object-oriented flash card application, the
first thing that’s needed is a class that represents flash cards. Create
a new class by selecting File, New File and then the Objective-C class
template (NSObject subclass) from the iOS Cocoa Touch Class category. Name the new file FlashCard.m, and be sure the Also Create FlashCard.h check box is selected.
Creating the FlashCard Class Interface
A flash card object needs to
keep track of four distinct pieces of information: the question, the
correct answer, how often the user knew the correct answer, and how often the user got it wrong. Create NSString properties for the question and answer, NSUInteger properties for the right and wrong counters, and a custom initializer that accepts the question and answer as arguments (see Listing 1).
Listing 1.
#import <Foundation/Foundation.h>

@interface FlashCard : NSObject {
    NSString *question;
    NSString *answer;
    NSUInteger rightCount;
    NSUInteger wrongCount;
}

@property (nonatomic, retain) NSString *question;
@property (nonatomic, retain) NSString *answer;
@property (nonatomic, assign) NSUInteger rightCount;
@property (nonatomic, assign) NSUInteger wrongCount;

- (id)initWithQuestion:(NSString *)thisQuestion
                answer:(NSString *)thisAnswer;

@end
|
Implementing the FlashCard Class Logic
Our next step is to implement the FlashCard class. To do this, we’ll synthesize the four properties and write the initWithQuestion:answer method. The FlashCard.m implementation file is shown in Listing 2.
Listing 2.
#import "FlashCard.h"

@implementation FlashCard

@synthesize question, answer, rightCount, wrongCount;

- (id)initWithQuestion:(NSString *)thisQuestion answer:(NSString *)thisAnswer {

    if (self = [super init]) {
        self.question = thisQuestion;
        self.answer = thisAnswer;
     self.rightCount = 0;
        self.wrongCount = 0;
    }
    return self;
}

@end
|
Now that the FlashCard class is finished, we’ll turn our attention back to our main application.
Preparing the Application Interface
Click the FlashCardsViewController.h file in the Classes group and import the FlashCard class. Add outlets for five different labels: a count of the total cards (cardCount), a count of how many times the current card has been answered rightly (rightCount) and how many times wrongly (wrongCount), and the current question (question) and answer (answer). The view controller also needs outlets for four buttons: delete (deleteButton), mark right (rightButton), mark wrong (wrongButton), and next action (actionButton). There is also some states of the application to track in the controller. Add an NSMutable array (flashcards) property that will hold all the flash card objects, a counter property (currentCardCounter) that tracks which flash card is currently being displayed, and a read-only property (currentCard) that uses the counter, and the array to return the currently displayed flash card object.
We also need to consider the user’s actions. Users will add (addCard) and delete (deleteCard) flash cards, press the next action button to expose the flash card’s answer or flip to the next card (nextAction), and they will mark whether they knew the correct answer (markRight and markWrong). Each of these five actions will be connected to the buttons of our UI.
After you’ve added the outlets, properties, and actions, your FlashCardsViewController.h file should look like Listing 3.
Listing 3.
#import <UIKit/UIKit.h>
#import "FlashCard.h"

@interface FlashCardsViewController : UIViewController {

    IBOutlet UILabel *cardCount;
    IBOutlet UILabel *wrongCount;
    IBOutlet UILabel *rightCount;
    IBOutlet UILabel *question;
    IBOutlet UILabel *answer;
    IBOutlet UIBarButtonItem *deleteButton;
    IBOutlet UIBarButtonItem *rightButton;
    IBOutlet UIBarButtonItem *wrongButton;
    IBOutlet UIBarButtonItem *actionButton;
    NSMutableArray *flashCards;
    NSUInteger currentCardCounter;
    FlashCard *currentCard;
}

@property (nonatomic, retain) UILabel *cardCount;
@property (nonatomic, retain) UILabel *wrongCount;
@property (nonatomic, retain) UILabel *rightCount;
@property (nonatomic, retain) UILabel *question;
@property (nonatomic, retain) UILabel *answer;
@property (nonatomic, retain) UIBarButtonItem *deleteButton;
@property (nonatomic, retain) UIBarButtonItem *rightButton;
@property (nonatomic, retain) UIBarButtonItem *wrongButton;
@property (nonatomic, retain) UIBarButtonItem *actionButton;
@property (nonatomic, retain) NSMutableArray *flashCards;
@property (nonatomic, assign) NSUInteger currentCardCounter;
@property (nonatomic, readonly) FlashCard *currentCard;

-(IBAction) markWrong:(id)sender;
-(IBAction) markRight:(id)sender;
-(IBAction) nextAction:(id)sender;
-(IBAction) addCard:(id)sender;
-(IBAction) deleteCard:(id)sender;

@end
|
Next, add the @synthesize lines for each property to the FlashCardsViewController.m implementation file:
@synthesize cardCount, wrongCount, rightCount;
@synthesize question, answer;
@synthesize deleteButton, rightButton, wrongButton, actionButton;
@synthesize flashCards;
@synthesize currentCardCounter;
Update the dealloc method to release all the retained objects:
- (void)dealloc {
    [cardCount release];
    [wrongCount release];
    [rightCount release];
    [question release];
    [answer release];
    [deleteButton release];
    [rightButton release];
    [wrongButton release];
    [actionButton release];
    [flashCards release];
    [super dealloc];
}
Creating the Interface
It’s time to build
the first part of the FlashCards interface. Double-click the
FlashCardsViewController.xib file in the Resources group to open
Interface Builder. Complete the following steps to lay out the UI and
connect the outlets and actions:
1. | Click
the empty view, open the Attributes Inspector (Command+1), and then
click the Background attribute’s color picker and change the color to
white.
| 2. | Open the Library (Shift+Command+L) and drag a toolbar to the top of the view and another to the bottom of the view.
| 3. | Click
the Item button until just the button is selected, open the Attributes
Inspector (Command+1), and choose Add from the Identifier Properties
drop-down list.
| 4. | Click
the Item button in the bottom toolbar until just the button is
selected, open the Attributes Inspector (Command+1), and change the
Title attribute to Right.
| 5. | From the Library (Shift+Command+L), drag one Bar Button item to the top toolbar and two bar button items to the bottom toolbar.
| 6. | Click
the new button until just the button is selected, open the Attributes
Inspector (Command+1), and choose Trash from the Identifier Properties
drop-down list.
| 7. | Click
the middle button in the bottom toolbar until it is selected, open the
Attributes Inspector (Command+1), and change the Title attribute to Wrong.
| 8. | Click
the rightmost button in the bottom toolbar three times until just the
button is selected, open the Attributes Inspector (Command+1), and
choose Action from the Identifier Properties drop-down list. The view
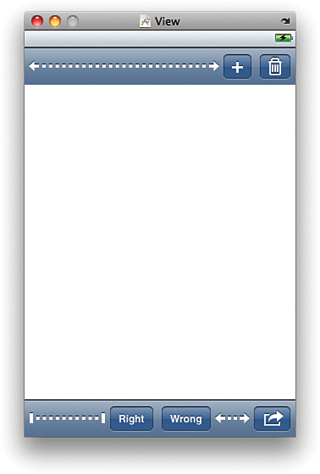
should now look like Figure 1.

| 9. | Within
the Library (Shift+Command+L) search for “space.” Drag a Flexible Space
Bar Button item from the library search results to the leftmost
position in the top toolbar.
| 10. | Drag a Fixed Space Bar Button item to the leftmost position in the bottom toolbar.
| 11. | Drag a Flexible Space Bar Button item to the position between the Wrong and Action button in the bottom toolbar.
| 12. | Drag
the right handle on the Fixed Space Bar Button item on the bottom
toolbar to the right until the Right and Wrong buttons are centered
horizontally in the toolbar. The view should now look like Figure 2.
| 13. | Open the Library (Shift+Command+L) and search for “label.”
| 14. | Drag
a label to the left-alignment guide on the top toolbar. Size the label
to be as wide as the entire toolbar up to the Add button.
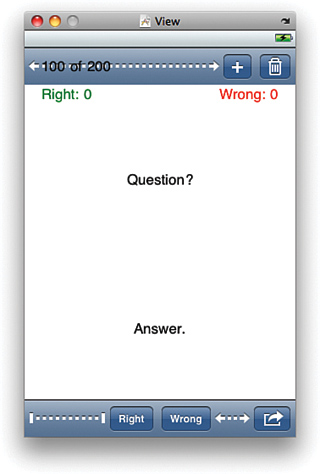
| 15. | Click the new label, open the Attributes Inspector (Command+1), and change the Text attribute to 100 of 200. This label will tell users which card they are on and how many cards they’ve created in total.
| 16. | Drag four labels onto the view between the two toolbars.
| 17. | Position
one of the labels just under the top toolbar and against the
left-alignment guide. Size the label wider to about the midpoint of the
view. Click the label, open the Attributes Inspector (Command+1), and
change the Text attribute to Right: 0. Click the Color attribute’s color picker and change the text color to green.
| 18. | Position
another one of the labels just under the top toolbar and against the
right-alignment guide. Size the label wider to about the midpoint of the
view. Click the label, open the Attributes Inspector (Command+1),
change the Layout attribute to Right Alignment, and change the Text
attribute to Wrong: 0. Click the Color attribute’s color picker and change the text color to red.
| 19. | Position
the third label just under the right and wrong labels and against the
left-alignment guide. Size the label wider to reach all the way to the
right-alignment guide. Size the label taller to reach about the midpoint
of the view. Click the label, open the Attributes Inspector
(Command+1), change the Layout attribute to center alignment, and change
the Text attribute to Question?
| 20. | Position
the final label just under the question label and against the
left-alignment guide. Size the label wider to reach all the way to the
right-alignment guide. Size the label taller to reach the bottom
toolbar. Click the label, open the Attributes Inspector (Command+1),
change the Layout attribute to Center Alignment, and change the Text
attribute to Answer. The view should now look like Figure 3.
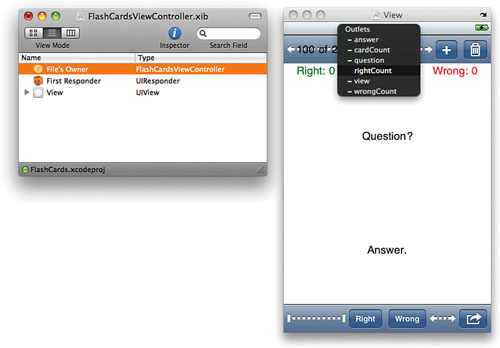
| 21. | Open
Document window. Connect the four button outlets (delete, right, wrong,
and action) to the respective buttons in the view. Connect the five
actions (addCard, deleteCard, markRight, markWrong, and nextAction) to the respective buttons in the view.
| 22. | Connect the five label outlets (question, answer, cardCount, rightCount, and wrongCount) to the respective labels in the view, as in Figure 4. Save the XIB file, quit Interface Builder, and return to Xcode.
|
|