1. Introduction to MIDP
There are three types of component that make up the Java ME environment for mobile devices such as mobile phones: configurations, profiles and optional packages.
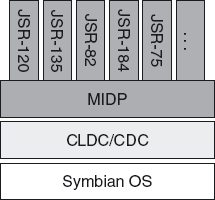
Figure 1
summarizes the architecture of the Java ME environment. Note that
Symbian OS is not a mandatory part of the Java ME environment.
The MIDP application
model defines what a MIDlet is, how it is packaged, and how it should
behave with respect to the sometimes constrained resources of an MIDP
device. MIDP provides an application framework for mobile devices based
on configurations such as CLDC and CDC.
It also defines how
multiple MIDlets can be packaged together as a suite, using a single
distribution file called a Java Archive (JAR). Each MIDlet suite JAR
file must be accompanied by a descriptor file called the JAD file, which
allows the Application Management Software (AMS) on the device to
identify what it is about to install.
2. Using MIDlets
A MIDlet is an application that executes under the MIDP. Unlike a desktop Java application, a MIDlet does not have a main method; instead, every such application must extend the javax.microedition.midlet.MIDlet
class and provide meaningful implementations for its lifecycle methods.
MIDlets are controlled and managed by the AMS, part of the device's
operating environment. They are initialized by the AMS and then guided
by it through the various changes of state of the application. We look
briefly at these states next.
2.1. MIDlet States
A state is designed to ensure
that the behavior of an application is consistent with the expectations
of the end users and device manufacturer. Initialization of the
application should be short; it should be possible to put an application
in a non-active state; and it should also be possible to destroy an
application at any time. Once a MIDlet has been instantiated, it resides
in one of three possible states (see Figure 2):
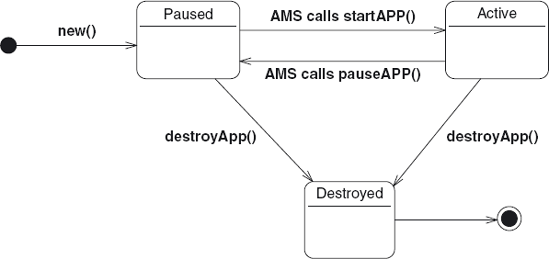
PAUSED
The MIDlet has been initialized but is in a dormant state. This state is entered in one of four ways:
after the MIDlet has been instantiated; if an exception occurs, the DESTROYED state is entered
from the ACTIVE state, if the AMS calls the pauseApp() method
from the ACTIVE state, if the startApp() method has been called but an exception has been thrown
from the ACTIVE state, if the notifyPaused() method has been invoked and successfully returned.
During
normal execution, a MIDlet may move to the PAUSED state a few times. It
happens, for example, if another application is brought to the
foreground or an incoming call or SMS message arrives. In these cases,
the MIDlet is not active and users do not interact with it. It is,
therefore, good practice to release shared resources, such as I/O and
network connections, and to stop any running threads and other lengthy
operations, so that they do not consume memory, processing resources,
and battery power unnecessarily.
ACTIVE
The MIDlet is functioning normally. This state is entered after the AMS has called the startApp() method. The startApp()
method can be called on more than one occasion during the MIDlet
lifecycle. When a MIDlet is in the PAUSED state, it can request to be
moved into the ACTIVE state by calling the startApp() method.
DESTROYED
The MIDlet has released all resources and terminated. This state, which can only be entered once, can be entered when the destroy-App(boolean unconditional) method is called by the AMS and returns successfully. If the unconditional argument is false, a MIDletStateChangedException may be thrown and the MIDlet will not move to the DESTROYED state. Otherwise, the destroy-App()
implementation should release all resources and terminate any running
threads, so as to guarantee that no resources remain blocked or using
memory after the MIDlet has ceased to execute.
The MIDlet also enters the DESTROYED state when the notify-Destroyed() method successfully returns; the application should release all resources and terminate any running threads prior to calling notify-Destroyed().
2.2. Developing a MIDlet
Once the source code has been
written, we are ready to compile, pre-verify and package the MIDlet into
a suite for deployment to a target device or a device emulator.
In this section, we create our
first MIDlet in a simple but complete example of MIDlet creation,
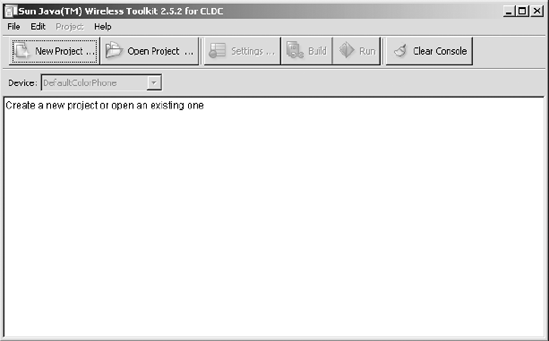
building, packaging and execution. We use a tool called the Java
Wireless Toolkit (WTK) which provides a GUI that wraps the functionality
of the command-line tool chain: compiler, pre-verifier and packaging
tool.
The WTK (see Figure 3) was created by Sun to facilitate MIDP development. It can be obtained free of charge from Sun's website (java.sun.com/products/sjwtoolkit/download.html).
The WTK offers the developer support in the following areas:
Building and packaging:
You write the source code using your favorite text editor and the WTK
takes care of compiling it, pre-verifying the class files, and packaging
the resulting MIDlet suite
Running and monitoring:
You can directly run applications on the available mobile phone
emulators or install them in a process emulating that of a real device.
Your MIDlets can be analyzed by the memory monitor, network monitor and
method profiler provided by the WTK.
MIDlet signing:
A GUI facilitates the process of signing MIDlets, creating new key
stores and key pairs, and assigning them to different security domains
for testing with the different API permission sets associated with those
domains.
Example applications:
The Wireless Toolkit comes with several example applications you can
use to learn more about programming with MIDP and many optional API
packages.
At the time of writing, the
WTK is available in production releases for Microsoft Windows XP and
Linux-x86 (tested with Ubuntu 6.x). For development, you also require
the Java 2 Standard Edition (Java SE) SDK of at least version 1.5.0,
available from java.sun.com/javase/downloads/index.html.
Check the WTK documentation, installed by default at C:\WTK2.5.2\index.html,
for more details on how to use the WTK's facilities for developing
MIDlets. Be sure to have installed both the Java SDK and the WTK before
trying out our example code.
2.3. Creating and Running a MIDlet using the WTK
Now that we are all set with
the basic tool, let's create our first MIDlet. The first thing we do is
to create a project within the WTK for our new application:
Go to Start Menu, Programs, Sun Java Wireless Toolkit for CLDC.
Choose Wireless Toolkit and click to start it up.
Click on New Project... and enter Hello World into the Project Name field and example.HelloWorldMIDlet into the MIDlet Class Name field.
Click on the Create Project button. In the following screen, change the Target Platform to JTWI and click OK.
Your project is now created,
so it's time to write our first MIDlet application. Open a text editor
and type in the following code:
package example;
import javax.microedition.lcdui.Display;
import javax.microedition.lcdui.Form;
import javax.microedition.midlet.MIDlet;
import javax.microedition.midlet.MIDletStateChangeException;
public class HelloWorldMIDlet extends MIDlet {
  private Form form = null;

  public HelloWorldMIDlet() {
    form = new Form("HelloWorld Form");
    form.append("Hello, World!");
    form.append("This is my first MIDlet!");
  }
  public void destroyApp(boolean arg0) throws MIDletStateChangeException {}
  public void pauseApp() {}
  public void startApp() throws MIDletStateChangeException {
    Display.getDisplay(this).setCurrent(form);
  }
}
In the constructor, we create a new Form object and append some text strings to it. Don't worry about the details of the Form class. For now it's enough to know that Form is a UI class that can be used to group small numbers of other UI components. In the startApp() method, we use the Display class to define the form as the current UI component being displayed on the screen.
Build your MIDlet with the following steps:
Save the file, with the name HelloWorldMIDlet.java, in the source code folder created by your installation of the Wireless Toolkit. Usually its path is <home>\j2mewtk\2.5.2\apps\Hello-World\src\example, where <home>
is your home directory. In Windows XP systems, this value can be found
in the USERPROFILE environment variable; in Linux, it is the same as the
home folder. You must save the .java file in the src\example folder because this MIDlet is in the example package.
Switch back to the WTK main window and click Build. The WTK compiles and pre-verifies the HelloWorldMIDlet class, which is then ready to be executed.
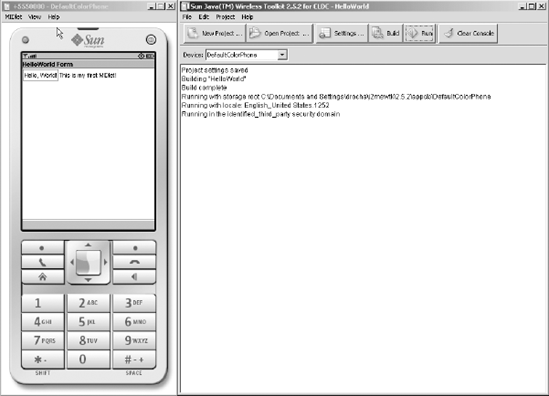
Click
on Run. You are presented with a list of MIDlets from the packaged
suite, which are ready to be run. As our test suite only has one MIDlet,
click on its name and it is executed on the mobile phone emulator (see Figure 4).
2.4. Packaging a MIDlet
Following the above steps is
sufficient to build simple MIDlets for running in the emulator. However,
if you are developing a more sophisticated MIDlet that contains many
classes, images, application parameters, and so on, you need to package
your MIDlet into a MIDlet suite.
Packaging creates a JAR file
containing all your class and resource files (such as images and sounds)
and the application descriptor (JAD) file, which notifies the AMS of
the contents of the JAR file.
The following attributes must be included in a JAD file:
MIDlet-Name: the name of the suite that identifies the MIDlets to the user
MIDlet-Version:
the version number of the MIDlet suite; this is used by the AMS to
identify whether this version of the MIDlet suite is already installed
or whether it is an upgrade, and communicate this information to the
user
MIDlet-Vendor: the organization that provides the MIDlet suite
MIDlet-Jar-URL:
the URL from which the JAR file can be loaded, as an absolute or
relative URL; the context for relative URLs is the place from where the
JAD file was loaded
MIDlet-Jar-Size: the number of bytes in the JAR file.
The following attributes are optional but are often useful and should be included:
MIDlet-n:
the name, icon and class of the nth MIDlet in the JAR file (separated by
commas); the lowest value of n must be 1 and all following values must
be consecutive; the name is used to identify the MIDlet to the user and
must not be null; the icon refers to a PNG file in the resource
directory and may be omitted; the class parameter is the name of the
class extending the MIDlet class
MIDlet-Description: a description of the MIDlet suite
MicroEdition-Configuration: the Java ME configuration required, in the same format as the microedition.configuration system property, for example, 'CLDC-1.0'
MicroEdition-Profile: the Java ME profiles required, in the same format as the microedition.profiles
system property, that is 'MIDP-1 0' or 'MIDP-2.0'; if the value of the
attribute is 'MIDP-2.0', the target device must implement the MIDP
profile otherwise the installation will fail; MIDlets compiled against
MIDP 1.0 will install successfully on a device implementing MIDP 2.0.
The following is the JAD file for our HelloWorld application:
MIDlet-1: HelloWorldMIDlet,,example.HelloWorldMIDlet
MIDlet-Description: Example MIDP MIDlet
MIDlet-Jar-Size: 1042
MIDlet-Jar-URL: HelloWorld.jar
MIDlet-Name: HelloWorld Midlet Suite
MIDlet-Vendor: Midlet Suite Vendor
MIDlet-Version: 1.0.0
MicroEdition-Configuration: CLDC-1.1
MicroEdition-Profile: MIDP-2.0
You can automate the task of creating the JAD file by clicking Package/Create Package in the WTK menu. The WTK creates HelloWorld.jar and HelloWorld.jad in the bin
folder of your project root. You can use Windows Explorer to browse to
that folder and check that the package files have been correctly
created. You can open the JAD file with a standard text editor to
inspect its contents. Double-clicking the JAD file executes your
application in the emulator (see Figure 4).