Note
Xcode’s compiler lets
you mix C++ and Objective-C code in the same project. The resulting
Objective-C++ hybrid projects let you reuse existing C++ libraries in
Objective-C applications. Consult Apple’s documentation for details.
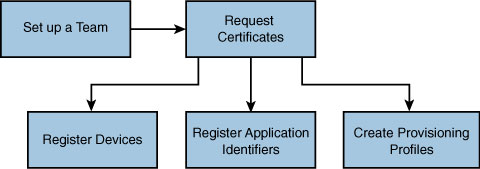
Using the Developer Portal
The iPhone developer program portal hosts all the tools needed to set up your system for iPhone development. It is found at http://developer.apple.com/iphone/manage/overview/index.action,
and you will not have access to it unless you have signed up for one of
the two paid iPhone developer programs. Here is where you can set up
your development team, obtain your certificates, register development
devices and application identifiers, and build your provisioning
profiles so you can properly sign your applications.
Because the details are
subject to change, this overview focuses on the big picture. Should
Apple alter any of the particulars, you’ll still know what the major
milestones are, so you can adjust accordingly. Figure 1 shows the key points of the process.
Setting Up Your Team
An iPhone development
team consists of one or more members. The primary member of the team,
called the “agent,” is the original person who enrolled into the iPhone
developer program. The agent has basic administrative powers over the
account: He or she can add other members to the team if this is not an
individual account, approve certificate requests, and so forth. In
addition, the agent can grant administrative privileges to other
members, who are called, unsurprisingly, “admins.” Members without
administrative privileges can request new provisions and download them,
but that’s pretty much the limit.
Admins can invite new
members at the portal using the Team screen. This is also where you can
update e-mail, check on certificates, and add and remove members.
Additional tabs in this screen let you check your technical support incidents and review your developer agreements with Apple.
Requesting Certificates
Certificates play a major
role in iPhone development. You cannot deploy applications to iPhones,
even for testing, without a valid development certificate. You also need
a distribution certificate for selling applications through the App
Store. You can request and download these certificates from the portal.
Start by generating a certificate request from your Macintosh’s Keychain Access utility.
1. | Launch the program from the /Applications/Utilities folder.
|
2. | Choose
Keychain Access > Certificate Assistant > Request a Certificate
from a Certificate Authority. Check your e-mail address, choose Saved to
Disk, and click Continue.
|
3. | Select
where to save the certificate (the Desktop is a good choice) and click
Save. Wait for the certificate to generate and click Done.
|
You then upload the
request at the portal to create either your development or distribution
certificate. The portal walks you through the process. Each certificate
must be approved by the team agent before it is issued. Once approved,
you can download it from the Certificates window on the portal site.
Install the new
certificate into your keychain by double-clicking it. Certificates are
currently good for one year. Make sure you remove any expired
certificates from your keychain as Xcode cannot readily distinguish
between them. You will encounter problems compiling until you do so.
Select the expired certificate in the Macintosh Keychain Access
application (/Applications/Utilities/Keychain Access.app) and delete it.
In addition to these two
certificates, you must also install the WWDR intermediate certificate
issued by Apple’s worldwide developer relations. It can be downloaded
from the portal or directly at http://developer.apple.com/certificationauthority/AppleWWDRCA.cer. Make sure you add this to your keychain as well.
Should you need to
develop on more than one machine at a time, you can export your
developer and distribution certificates from the Keychain Access
Utility. Right-click a certificate and choose the Export option. Choose
the .p12 Personal Information Exchange option and click Save. Enter a
password that you will remember and verify that password. Click OK to
continue. OS X prompts you to enter your admin password for your
Macintosh. Enter it and click Allow. Keychain Access generates the
encrypted p12 file. You can transfer this to another Macintosh system
and double-click to install. The local keychain will prompt you for the
password.
Registering Devices
You must register
all development iPhones at the program portal. You do so by providing a
device name and its unique device identifier (UDID). You can register up
to 100 devices at any time. Once registered, you may use that device
for your development and ad hoc provisions.
To begin, start by viewing the Devices screen at the portal and
clicking Add Device. Enter a name, enter a UDID, and click Submit.
Finding UDIDs is
not complicated: You can easily recover a device UDID from iTunes. When
docked, select the device name from the sources list (the left iTunes
column) and view the Summary tab. Click the words Serial Number. This
changes the display from Serial Number to Identifier (UDID). Choose Edit
> Copy (Command-C) and the UDID transfers to your system clipboard.
You can then paste that number into a file.
Alternatively, have your users download a copy of Ad Hoc Helper (http://itunes.com/apps/adhochelper)
to their iPhone. It is a free utility that I created to help people
e-mail their device IDs directly to a developer. When launched, it
automatically starts a new e-mail that is populated with the user’s
UDID. Users add your address as the recipient and tap Send.
Apple offers several
ways to register several devices at once. The most reliable option is to
enter several items into the Add Devices screen before clicking the Add
Device button. You can also use Apple’s iPhone Configuration Utility to
manage UDIDs. It is available for download at the portal site but has
had its ups and downs in terms of stability.
Please note that
Unregister does not immediately free up slots on your 100-slot devices
list. Due to some developers abusing the system there is a one-year
time-out before a slot can be reused. You can contact Apple and ask them
to override this setting if there is a valid reason that your slots
need to be reused within the year.
Registering Application Identifiers
Each application you
build should use an exclusive identifier. This string enables your
application to uniquely present itself to SpringBoard and guarantees
that it will not conflict with another application. Most typically, you
build your identifiers using Apple’s reverse domain notation, for
example, com.sadun.myApplicationName, uk.co.sadun.myApplicationName,
org.sadun.myApplicationName, and so on. Avoid using any special
characters in your application identifiers.
You need not
register each application at the portal, but you should register at
least one “wild-card” identifier. By this, I mean an identifier that
uses an asterisk as a wild-card matching character, for example,
com.sadun.*. You can use this single identifier to create provisions
that work with all your applications, regardless of whether they are
used only during development or are destined for the App Store. A
wild-card provision properly signs all applications whose identifiers
match its pattern.
The sole exception to this wild-card rule are application identifiers meant to be used with push notifications. Explaining why you must register applications
individually and how you can do so. Push-based applications aside, most
developers can get by with registering a single wild-card application ID
at the program portal.
Note
If you’re wondering what those random characters that precede your registered IDs are, they are Bundle Seed IDs and are meant to be used with applications that share keychain data.
Provisioning
Provisioning
profiles provide a way to associate registered developers and registered
devices with a specific iPhone development team. They are used in Xcode
to sign your code, authorizing the software to run on the device or to
be allowed in the App Store. Most developers use two key provisions: a
wild-card development provision and a wild-card distribution provision.
In addition, most developers eventually build one or more ad hoc
provisions, which allow you to distribute your application outside the
App Store to devices you have registered at the portal.
Create your profiles at the
Provisioning screen of the program portal. Choose the Development or
Distribution tab, click Add Profile, check the certificate name box, and
choose your wild-card application ID. For development and ad hoc
provisions, you must select the devices that are included. Click Submit
and then refresh the screen a few times. It usually takes less than
minute for the provision to be generated and made available for
download.
Should you need to add
devices at a later time, you can easily do so. Expand the device user
base by editing your already-issued provisions. Choose Edit > Modify,
check the new devices, and click Submit. Re-download the updated
provisioning profile by clicking Download.
To install provisions,
drag them onto the Xcode icon or (for development and ad hoc provisions
only) drop them into the Xcode Organizer window for the device. Xcode
automatically reads them in and installs them into your home folder in
~/Library/MobileDevice/Provisioning Profiles. To remove a provision, use
the Xcode organizer’s Provisioning Profiles pane.
Note
If you’d rather
manage your profiles from the command line, quit Xcode and delete them
from the profiles folder. The provisions do not retain their original
names so be sure to delete the correct file by using the command line
grep utility (e.g. grep -i firstpush *) or by peeking at the files in a text editor to find the right one.
Xcode automatically
installs provisions onto devices to ensure that applications compiled
with those provisions can run properly. To remove a provision from a
device, open Settings > General > Profiles on the iPhone or iPod
touch in question. Select a profile, and click the red Remove button.
When you remove a device provision, you won’t be able to run any
applications signed with that provision.